
User's Manual
- 8 -
Installation Sequences
After safety mandated preparatory steps have been taken, the installation sequence is the suggested
method for completing the accessory installation. In some instances the suggested sequence is written for
one associate to install and in others the sequence is given as part of a team accessory installation. Unless
otherwise stated in the document, the associates may perform the installation steps in any order to make
the installation as efficient as possible while maintaining consistent quality.
Pre-Installation Precaution
• Use Seat and Floor Protectors to avoid damage to surfaces.
• If the vehicle is equipped with an Anti-theft radio the radio code must be written down prior to
disconnecting the battery cable. The code must be re-entered when the negative battery cable is
reinstalled.
Battery Disconnect
• Move seats forward and recline back slightly.
• Remove the Negative (-) battery terminal using 10 mm socket before starting any disassembly.
Remove Factory Headrests
• Remove driver side headrest while depressing release button, and repeat for passenger side.
• Disconnect elastic straps, and repeat for passenger side.
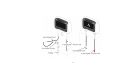
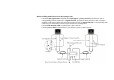
Install SLIMLINE Headrests Monitor A and Monitor B
• Insert wire puller into left hand hole of seat back and pull through to bottom, and feed cable #1 from
Monitor A down left hole in top of driver side seatback.
• Repeat the above steps for the right hole of seat back and cable #2.
• Insert headrest while pulling cable #1 and cable #2 down seat back.
• Repeat for passenger side and Monitor B.