Owner’s Manual Armrest Video Monitor with Built-in DVD Page 1 of 27
Table of Contents Safety Precautions 3 Features 4 Screen Rotation Instructions 5 Control Buttons on Front Panel 6 Input, Output connections 7 Remote Control Battery Installation 8 Remote Control Functions 9-11 General Operating Instructions 12 Accessory Operating Instructions 13 DVD Basics DVD General OSD Set UP Parental Control Playing an Audio CD 14 15,16 17,18 19 Playing MP3 Discs Connecting USB Devices 20 21 Warnings 22 Troubleshooting 22 Specifications 23 FCC Notice 24 WEE
Important Notice It is unlawful in most jurisdictions for a person to drive a motor vehicle which is equipped with a television viewer or screen that is located in the motor vehicle at any point forward of the back of the driver's seat, or that is visible, directly or indirectly, to the driver while operating the vehicle. In the interest of safety, the armrest video monitor should never be installed where it will be visible, directly or indirectly, by the operator of the motor vehicle.
Features 7 inch TFT-LCD with 16:9 aspect Built in slot Loading DVD loader Infrared transmitters for wireless headphones AV source(Input)- 3 RCA jacks USB Port Stereo Earphone Jacks (2) Remote Sensor on the Front Panel 7 Control Buttons plus navigation buttons on the Front Panel --- POWER, SOURCE, EJECT, STOP, PAUSE, AND PLAY.
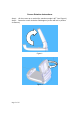
Screen Rotation Instructions Step 1: Lift the screen up to vertical (the maximum angle is 800.
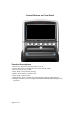
Control Buttons on Front Panel 1 2 3 7 4 5 6 8 Function Descriptions 1. Power Key: Press to power the system on or off 2. Source Key: Press to change the video source (DVD, AUX) 3. Eject Key: Press to eject disc. 4. Stop: Press to stop the Disc playing. 5. Pause: Press button to pause the disc. 6. Play: Press to play the disc. 7. Menu/Select: press to display the menu and select picture setting options. 8. Navigation button: press to navigate UP/DOWN/LEFT/RIGHT through menu selections.
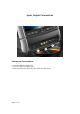
Input, Output Connections 3 1 2 Connection Descriptions 1. 3.5mm headphone output jacks 2. AUX AV input jacks (RCA type) 3.
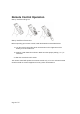
Remote Control Operation Battery Installation Diagram Battery Installation Instructions Before operating your remote control, install the batteries as described below. 1. Turn the remote control face down. Press down on the ridged area of the battery cover and slide it off. 2. Install (2) "AAA" batteries as shown. Make sure that proper polarity (+ or -) is observed. 3. Slide the cover back until it clicks. The remote control will operate the armrest console only.
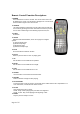
Remote Control Function Descriptions 1. POWER Press this button to turn the unit ON. The current video source will be displayed on screen, and the picture will appear in a few seconds. Press the button again to turn the unit OFF 2. SOURCE Any video equipment connected to the AV inputs can be used with the monitor by pressing this button. Each time the button is pressed, the AV source will change in the following sequence DVD, AV. 3. EJECT No function 4.
15. NEXT Play the next chapter or track. 16. FF(Fast Forward) Press button to search disc forward continuously. There are 5 speed options to choose: 2X, 4X,8X,16X, and 32X. 17. FR(Fast Rewind) Press button to search disc backward continuously. There are 5 speed options to choose like FF ( Fast Forward) is. 18. REPEAT(Except VCD with PBC on) Repeats part or all of a chapter, title, track, or an entire disc. 19. A-B(Except MP3) Repeat from point A to point B. 20.
31. NUMBERS (1) Decimal number: 0 to 9 (2)+100: Add 100 32. AUTO MEMORY (If TV mode is available) When the AUTO MEMORY button is pressed, all channels in TV mode are searched and tuned ; all the channels with signals detected are automatically stored. 33. ERASE/ADD (If TV mode is available) When tuned to a channel, press this button to store or erase the channel from memory. The stored channel numbers are displayed in green on the screen, and the non-stored channel numbers are in red.
General Operating Instruction Turning the unit ON or OFF 1. Pivot/rotate the screen until a comfortable viewing angle is reached. The internal friction detent will hold the screen in position while the system is in use. 2. Pressing the POWER button on the left-button corner of the front panel or the remote will turn the system on or off alternately. When in use, the internal backlighting will illuminate the buttons. 3. The unit will also power on when a disc is inserted into the slot. 4.
Accessory Instructions Wireless Headphones The unit includes a built-in single channel infrared transmitter for use with wireless IR headphones. The volume can be adjusted with the control on each headset. The wireless headphones must be used within a line of sight from the transmitter as infrared transmission, like visible light travels only in a straight line. The IR transmitters are located just above the top of the LCD screen. Wired Headphone There are two 1/8" (3.
DVD Basics To get the optimum use out of DVD, make sure you read this section completely. Regional Coding Both the DVD player and disc are coded by region. These regional codes must match in order for the disc to play. If the codes don't match, the disc won't play. This units code is set to the region it is being shipped to. By default, other regional codes cannot be played in this unit.
Settings and Adjustments This chapter describes how to adjust settings using the on-screen setup pages included in the SETUP MENU. Using the Setup Menu Using the setup menu, you can do the initial setup, adjust the picture quality, and set the various output. You can also set a language for the on-screen display and the setup display, and limit playback by children. (1) Press the SETUP button to display the icons and pages on the display screen.
Settings for Display Press the SETUP button, use WX buttons to navigate to the General Setup Page, and then the T button to select TV Display sub-menu. The setup allows you to adjust screen setting (aspect ratio). Press X and then use the buttons ST to select the appropriate setting. The options are as follows: Normal/PS (Pan and Scan) This displays the wide picture on the screen with a portion of the left & right sides removed .
Settings for Parental (Parental Control) (Accessible only when no disc is loaded) This section of the SETUP MENU allows users to control the content of movie playback from G to ADULT. The parental control function allows you to limit viewing to your preference. 1. After navigating to the Parental sub-menu under Preference Page, use theTS buttons to select from: KID SAF (Children) G PG PG 13 PGR R NC-17 ADULT Note: The lower the value, the more strict the limitation. 2.
Settings for Password (Parental Control Password) (With no disc loaded) Press the SETUP button and navigate to the Password submenu under Password Setup Page. The menu appears and allows you to change the parental control password. Press X and then press ENTER. OLD PASSWORD Input the old password or the default password (6 digits). NEW PASSWORD Input a new password (6 digits) using numeric buttons. CONFIRM PWD Confirm the new password by entering the same new password again.
Playing an Audio CD When playing an audio CD, the DISPLAY banner appears automatically. It displays the current track and the amount of the time for that track playing, the total amount of time on the disc and the current time running on the disc. Press the DISPLAY button on the remote to display the DISPLAY banner. The options below show you what happens when you press the DISPLAY button. Press Display (1X) “Single Elapsed " appears along with the current track playing and the time of that track.
Playing an MP3 Disc MP3 is the format for storing digital audio. An audio CD quality song can be compressed into the MP3 format with very little loss of quality, while taking up much less space. CD-R/RW discs that have been encoded in MP3 format can be played on your DVD player. Selecting Folders and Songs When a MP3 disc is inserted in the player, the navigation screen appears automatically. You can change folders and songs by navigating the file system.
Connecting a USB Device You can connect a USB mass storage class device such as a USB memory stick, digital audio player, etc. to the USB port. Selecting Folders and Songs When a USB device is connected to the port, the navigation screen appears automatically unless the contained file has auto play; such as a movie. Then you must hit stop on the remote to open the navigation menu. You can change folders and files by navigating the menu. 1. If a file is playing, press STOP.
Warnings Do not use any solvents or cleaning materials when cleaning the video system. Do not use any abrasive cleaners, they may scratch the screen. Use only a lightly dampened lint free cloth to wipe the screen if it is dirty. Close the LCD screen in the fully closed position when not in use. Before putting on headphones always adjust the volume setting to the lowest position. Do not put pressure on the screen.
. Specifications LCD Backlighting LED Resolution 480 (RGB) x 234 Operation Temperature -20 to 70C Storage Temperature -40 to 85C Expected Backlight life 20,000Hours Video Display System NTSC Audio Output Operating Voltage Page 23 of 27 0.
Notices FCC Notice This device has been tested and found to comply with the limits for a Class B digital device, pursuant to part 15 of the FCC Rules. These limits are designed to provide reasonable protection against harmful interference in a residential installation. This device generates, uses, and can radiate radio frequency energy, and if not installed and used in accordance with the instructions, may cause harmful interference to radio communications.
WEEE Notice Disposal of Old Electrical & Electronic Equipment (Applicable in the European Union and other European countries with separate collection systems) This symbol on the product or on its packaging indicates that device shall not be treated as household waste. Instead it shall be handed over to the applicable collection point for the recycling of electrical and electronic equipment.
Dolby Stereo Compatibility When using this unit with a multi-channel processor, you can enjoy the atmosphere and excitement provided by DVD movie and music software featuring stereo 2-channel recordings. Manufactured under license from Dolby Laboratories. “Dolby” and double-D symbol are trademarks of Dolby Laboratories Macrovision Notice This product incorporates copyright protection technology that is protected by U.S. patents and other intellectual property rights.
Notes Page 27 of 27