
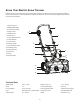
Replacement Part List

7
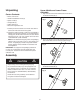
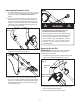
4. Secure the upper handle to the handle brackets with
the knobs and carriage bolts. Make sure the knobs are
tightened (Fig. 4).
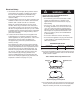
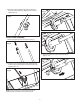
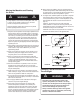
Chute Crank Assembly
1. Remove the spring pin from the crank rod. (Fig. 5).
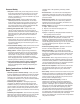
2. Install the crank rod through the center plate and insert
it into the opening at the back of the housing with holes
aligned (Figs. 6 – 8).
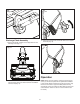
NOTE: Loosen or tighten the crank adjustment knob as
needed to allow for smooth control of the crank rod.
3. Secure the crank rod in place with the spring pin
(Figs. 9 – 10).
Fig. 4
Fig. 5
Fig. 6
Fig. 7
Fig. 8
Fig. 9