
Operator`s manual

2
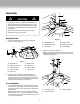
Assembly
Getting Started
1. Remove the tree stand from the box and familiarize
yourself with the unit (Fig. 1).
2. Inspect the stand carefully for shipping damage. If
damage is seen or suspected (such as damaged wire
insulation, cracks in the enclosures, loose connections or
exposed copper wire), do not assemble. Instead, contact
Snow Joe Customer Service for assistance.
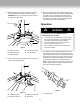
Tree Installation
1. Locate the tree base collar in the parts bag and slide the
collar onto the tree pole (Fig. 2). Do not attempt to insert
the tree pole into the collar while the collar is screwed into
the tree stand.
Note: This tree stand will accommodate standard size
tree poles up to 1.25 in. (3.18 cm) in diameter. If the collar
will not slip onto the tree pole, this indicates that your tree
pole is not a standard size.
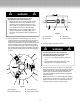
2. Insert the tree pole into the stand.
Note: For poles with pointed ends (crimps), carefully turn
the pole into the spindle until the crimp hooks onto the rib
inside the spindle (Fig. 3).
m CAUTION m
Inspect wiring, which, if damaged during shipping, may
cause serious bodily injury during equipment use. If any
damage is seen or suspected, do not assemble. Instead,
contact Snow Joe Customer Service (1-866-766-9563)
for assistance.
Handle with care during assembly so that electrical
wiring does not become damaged.
D
I
H
G
B
F
E
C
A
Figure 1
A. Spindle Screw
B. Rotaing Power Base
C. Tree Base Collar
D. Tree Stand Base
E. Switch Box
F. Reset Switch
G. Light Switch
H. Rotation Switch
I. Power Cord
C
B
A
B
B
D
E
F
Figure 2
A. Articial Tree Pole
B. Spindle Screws (x3)
C. Receptacle
D. Tree Base Collar
E. Rotating Power Base
F. Tree Stand Base
A
B
C
C
C
Figure 3
A. Articial Tree Pole
C. Collar Screws (x3)
B. Tree Stand Base