
Replacement Part List

7
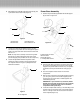
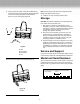
2. Using an open end wrench, loosen the nut between the
body and the rotor (counterclockwise). Hold the loosened
nut and turn the outer body bolt counterclockwise.
Remove nut, bolt, and washers (Figure 9).
3. Pull out the rotor starting at the left side (Figure 10).
Note: You may need to pull out the rotor using both hands.
Please wear gloves to prevent injury.
4. Install the new rotor reversing the above steps.
Storage
CAUTION: Store electrical appliances in a locked area away
from children and unauthorized users.
1. Before storing, inspect the entire appliance for any
damaged or worn parts. Check connections and screws
and tighten if necessary. Check blade condition. Examine
the extension cord and its plug for excess wear or
damage, and replace if warranted.
2. Store the snow thrower safely out of harm’s way and
prevent access by unauthorized users, preferably by
placing in a locked cabinet. Keep away from dust and
humidity by loosely covering with a tarp and using de-
humidifying products as conditions warrant.
3. Keep the extension cord with the appliance. If the entire
appliance is locked away, keep the key in a container or
plastic bag, tied or taped to the handle so it isn’t lost. If
the appliance isn’t locked up, it is advisable to store the
key in a separate secure place to prevent unauthorized
use.
Service and Support
If your Snow Joe 322P electric snow thrower requires service
or maintenance, please call 1-866-SNOWJOE for assistance.
Model and Serial Numbers
When contacting the company, reordering parts, or arranging
model and serial numbers, which are found on the decal on
the lower tube. Copy these numbers into the space provided
below.
Figure 9
C. Bolt
D. Flat washer
E. Flat washer
F. Nut
F
D
C
E
Figure 10
G. Rotor
G
Please record the following numbers from the housing or handle of
your new product:
3 2 2 P
Model #:
Serial #: