
Replacement Part List
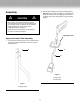

Operating Procedures
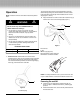
1. Turn on the snow thrower switch: With key inserted,
squeeze on/off switch to power on. Position the appliance
so that the blade makes level contact with the ground, by
titling it slightly forward (away from you). When starting in
deep snow, see suggestion below.
2. Begin to push the snow thrower forward: Do not rush.
If the snow is being completely cleared from the ground,
you are moving at the correct rate of forward motion.
3. Snow depth: Your rate of speed will depend on the depth
of the snow.
• The snow thrower’s capacity for snow removal is 4
inches (10 cm) for each pass. A single pass should clear
all snow up to that depth, permitting you to move at a
steady rate on a straight path.
• For snow deeper than 4 inches, a side-to-side motion
is effective. Hold in each hand the top and lower handles
and make a sweeping pass from side to side; you should
aim to remove 4 inches with each sweep. Keep up a
steady back and forth movement for each area of work.
Rest at intervals as needed.
4. Desired path width: You can only clear a path as wide
as the appliance width at one time. By angling the snow
thrower to the right or to the left of your current path,
place the cleared snow wherever you desire it to go. Of
course, you should place it where it does not need to be
cleared later.
5. Note wind direction: If possible, move in the same
direction as the wind.
6. Working on gravel or pebbles: To avoid throwing loose
surface material along with snow, push down on the
handle to raise the scraper above the gravel or pebbles.
7. Power cord and extension cord: Inspect both cords
at the end of each snow-clearing session to detect any
damage; if damaged, replace. Be careful to avoid the
blade running over the cord. Keep cords clear of heat
sources, sharp objects, or heavy weights standing on
them when in storage. Don’t yank on cords or otherwise
abuse them.
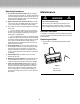
Maintenance
Lifetime Lubrication
Lubrication is not necessary and may damage the appliance.
The snow thrower is lubricated for lifetime use at the factory
before shipment.
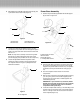
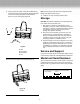
Replacing the Rotor
1. Remove lock nut (counterclockwise) and at washer
(Figure 8).
m WARNING m
Risk of Serious Bodily Injury:
Remove the key and disconnect the extension cord
before beginning any maintenance task. If the switch
were to engage accidentally serious injury could result.
Figure 8
A. Lock nut
B. Flat washer
B
A
6