
Replacement Part List

5
Operation
NOTE: It is best to remove snow before it becomes packed
down.
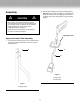
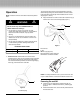
1. Extension cord: Note that the snow thrower has a
polarized plug (J), with one prong slightly longer and wider
than the other. The extension cord plug and the slotted
end should be likewise polarized, so that the original plug
ts snugly into the extension cord slots.
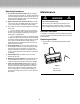
To prevent the snow thrower cord and extension cord from
disconnecting during use, tie the extension cord into a loose
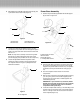
knot around the lower bar (K) of the handle as shown in next
step (Figure 7, Item O).
2. Plug the extension cord into a wall outlet. Insert the key (L)
into the slot in front of the hand-grip (M) (Figure 7).
NOTE: For safety and efcient use of your snow thrower, use
only UL-rated extension cord recommended for outdoor use.
Powering On and Off
3. Insert the key (L). Squeeze the On/Off switch (N), as
shown in Figure 7. Release the switch by releasing grip
pressure.
4. When nished with work, remove the key and disconnect
the extension cord.
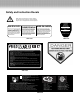
m WARNING m
Electric shock may cause SEVERE INJURY or
DEATH. Heed these warnings:
• Do not allow any part of snow thrower to make
contact with water while powered on. If the appliance
becomes wet while turned off, wipe dry before
starting.
• Use only a UL-rated extension cord for outdoor, all-
weather use. Do not use an extension cord over 150
feet (46 meters).
• Do not touch the appliance or its plug with wet hands
or while standing in water. Wearing rubber boots
offers some protection.
EXTENSION CORD CHART
Cord Length is: 100 ft. (30m) 150 ft. (46m)
Wire Gauge is: 16 14
Figure 6
J. Polarized plug
J
Figure 7
K. Lower bar
L. Key
M. Hand-grip (Top bar)
N. On/Off switch (under hand grip)
O. Extension cord tied to handle
L
N
K
O
M
O