ANODE ELLIPTICAL MACHINE E16 ANODE E16 #[E#l INSTRUCTION MANUAL /finishers IMPORTANT: Road sll Instructions carefully before using this product. Retsina this owner's manumit for future reference. The specifications of this product may vary from his photo, subject to change without notice. ERR: ERE REFER ARE. REAP FRUITERER AAR (URE, PERUKES NE.
ATTENTION Se Assembly Instruction Video a vou can scan this QR code to enter em into our YouTube page to follow the Ae product assembly videos. ne Hope it will be helpful for you. PEL Lh re pillbox a ll Contact us at Instagram (5s us at Facebook (Scan this QR Code) (Scan this QR Code) PLEASE DO NOT RETURN THIS PRODUCT TO THE STORE. STOP. Contact customer service if you have any questions regarding assembly or proper operation of the machine.
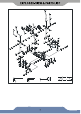
IMPORTANT SAFETY INFORMATION: ooo EXPLODED-VIEW & PARTS LIST PARTS LIST ASSEMBLY INSTRUCTIONS 06 QUICK START GUIDE-INSTRUCTION MANUAL 13 14
Please keep the instruction manual properly to facilitate future inquiries. 1. Iris important to read this entire manual before assembling and using the equipment. Safe and effective use can only be achieved if the equipment is assembled, maintained and used properly. 2. Before starting any exercise program you should consult your doctor to determine if you have any medical or physical conditions that could put your health and safety at risk, or prevent you from using the equipment properly.
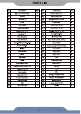
No. Description Qty. No. Description Qty.
No. Description Qty. No. Description Qty. 63 Nylon Nut 1 91 Washer 2 64 End Cap 2 92 Spring Washer d6 2 65 Nut M10*1.
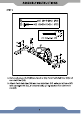
STEP © #35 d8*xD20%2 PCS ©) foam— #32 M8%50%20%S14 PCS a #74 S13-14-15 1PC A. Remove hexagon bolt (32) and washer (35) from front stabilizer (33)and rear stabilizer (56). B. Attach front stabilizer (33) and rear stabilizer (56) onto main frame (67) with carriage bolt (32), arc washer (28), spring washer (7) and domed nut (23).
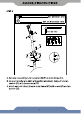
STEP 2 © PCS — #28 PCS #73 S6 1PC A. Remove screw arc washer (28) from main frame (67). B. Connect middle wire 1&10 with middle wire 2&29. Connect tension control (81) with tension wire (77). C. Attach support tube (11) onto main frame (67) with screw (27) and arc washer (28).
STEP 3 a8 PCs #15 dRD32%2 PCS fm #16 MB*164S14 PCS O17 513 2°C§ Cs ee #74 513-14-15 1PC A. Remove hexagon bolt (16), spring washer (7) and washer (15) from support tube (11). B. Attach lower handlebar (24L/R) onto support tube (11) with hexagon bolt (16), spring washer (7) and washer (15) Then, attach end cap (17) to hexagon bolt (16).
STEP 4 #49L/R © 2PCS| 519 Om 3 PCS He 1/2” PCS & #54L/R 2PCS| |#72 58 1PC #17 S13 PCS #75 S17-19 1PC (yy S17 PCS OE S19 PCS A. Attach U bracket (52) to the crank (66L/R) with bolt (49L/R) and arc washer (50). Secure by tightening spring washer (53) and nylon nut (54L/R). B. Attach end cap (55) to nylon nut {54L/R). Attach end cap (45) to hexagon bolt (46). C. Attach end cap (17) to hexagon bolt (38) and nylon nut (34).
STEP M8%30%S6 PCS 07 d8 PCS #71 M5%10 PCS 1PC #74 513-14-15 1PC 09 1PC A. Remove screw (8) and spring washer (7) front support tube (11). B. Attach handlebar (2) to support tube (11) with screw (8), spring washer (7) and small cover (9). C. Remove screw (71) from computer (1). Connect computer line (1a) with middle wire D. Attach computer (1) to support tube (11) with screw (71). E. Insert handle pulse wire (69)into the hole on the back of computer (1) The assembly is complete.
STRETCH EXERCISE No matter how you do sports, please do some stretch at first, The warm muscle will extend easily, so warm up yourself with 5-minutes, Then We suggest the following stretch exercise, five times. counts for each time or longer do these exercise again after sports. 1.TOE TOUCH Slow bend forward from your waist, letting your back and shoulders relax as you stretch toward your toes, Reach down as far as you can and hold for 15 counts. And then relax, repeat 3 times. (Picture 1). 2.
SPECIFICATIONS: HOUR -KM/H or Mile/H KM or Mile CAL KM or Mile -40—240BPM TOTAL DISTANCE PULSE FUNCTIONAL BUTTONS: MODE Press to select functions. SET(IF set the values of time, distance and calories when not in scan mode. RESET (IF to reset time, distance and calories. KEY FUNCTION: 1. SCAN (1). Step into auto scan mode,show every function in turn. in this mode, each function can not be set; hold this key ,the computer will be reset, each function will return zero except total distance function. 2.
ANODE GROUP, Inc.