SAFETY INSTRUCTION AND OPERATORS MANUAL FOR SHREDDER GRINDER- CHIPPER THANK YOU for buying a SNAPPER product! Your SNAPPER SHREDDER-GRINDER-CHIPPER was designed and built to provide long and satisfactory service. Keep in mind that i, like any other mechanical advice, can be potentially dangerous if used improperly and that no accident prevention program can be successful without the wholehearted cooperation of the person responsible for the operation of the equipment.
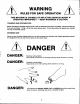
WARNING RULES FOR SAFE OPERATION TH‘S MACHINE IS CAPABLE OF INFLICTING SERIOUS INJURY IF OPERATED IMPROPERLY — READ WARNINGS & CAUTION. TRAINING AND PREPARATION Before operating this shredder-chipper-grinder, read and understand this manual completely. Become familiar with it for your own safety. To fall to do so may cause serious injury.
OPERATORS RESPONSIBILITY Never allow children to operate your shredder-chipper-grinder, nor adults lacking the proper instructions. Keep children, pets, and bystanders a minimum of 20 feet away from your work area. Flying chips can be hazardous. Never run this machine in an enclosed area since the exhaust from the engine contains carbon monoxide which is an odorless, tasteless, and deadly poisonous gas. Never run this machine on cement or blacktop.
Know how to turn the unit off. Never clear discharge area with hands, feet, or any other part of your body. Never clear discharge area while unit is running. After shredder-chipper is shut off, then use along handle tool to clear area. Never move your shredder-chipper or leave it unattended with the engine running. OPERATE IN SAFE ENVIRONMENT Never operate your shredder-chipper on slippery, wet, muddy, or icy surfaces. Safe footing is essential in preventing accidents. Only operate on level ground.
When viewed from the pulley side, the rotor runs counterclockwise. This action tends to pule materials into the shredding chamber. 'Short stalks (bean plants), cobs, sod and similar materials should be fed into the hopper by garden spade or pitchfork. Long stalks like com or trimmings can be best fed by hand slowly to avoid having the rotor pull in the complete stalk, wrap it and stall. When feeding stalks or trimmings by hand, be certain to keep your hands away from the rotor and hammers.
MAINTENANCE AND STORAGE If the cutting mechanism strikes any foreign object or if your machine should start making an unusual noise or vibrating, stop the engine, disconnect spark plug wire from the spark plug. Allow the engine to cool before: (a). Inspect for obvious damage. {b} Check for loose parts, bolts, or rods, Examine rotor visually for any obvious defects. Check the bearing collar set screws regularly to be sure they are tight. After every 100 hours of use, re lubricate the bearings (item no.
ASSEMBLY INSTRUCTIONS MODEL: SG 5000 Your Snapper shredder-chipper has been shipped with the basic unit completely assembled, leaving only the handles, wheels, and foot to assemble. Before beginning assembly, make sure all parts have been received and are in good condition. If there are shortages or damages, file a claim with the delivery company immediately. " {NOTE: In the following Instructions, the "item” number refers to the part number on page 13.
REPLACEMENT OF HOPPER VITA VIBRATION DAMPENERS {1} Take the hopper (item #31) and push the vibration dampeners up into the holes, see drawing page 12 and Fig. A below. {2} Place the hopper with the vibration dampeners on the unit, NOTE: the slanted side of the hopper is over the discharge end. Align the holes of the side plates with the hopper. (3) With the x 1 1/4 bolts (item #38) and x 1 1/2 bolts (item #39) thread the bolt up through the shredder side plate and into the vibration dampener.
SHREDDING TIPS (TECHNIQUE): You will need to run your shredder-chipper-grinder several times to meal how different types of material shred and how fast it will handle each. Generally you can use your basic shredder-chipper-grinder with the 1" screen for most materials, either green or dry. For wet soggy materials you may be beater without any screen.
{4 My centrifugal clutch smokes and burns the belt. In all probability the inner shoes of the rotor assembly are worn. A view of the clutch pulley is given on page 11. \You may also have a loose drive belt. if you attempt starting your shredder with heavy material in the grinding chamber, the rotor may refuse to turn when the engine comes up to rpm, thus burning the clutch.. Check the shredding chamber for cleanliness.
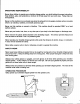
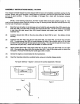
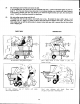
RIGHT WAY WRONG WAY Use stick, never hands, if material bridges in Don't allow pets, children or bystanders in clodhopper. Do keep people away and discharge sting area, shredded material into compost heap or fixed known obstruction.
CENTRIFUGAL CLUTCH SERVICING INSTRUCTIONS LUBRICATION AND MAINTENANCE The centrifugal clutch on this machine is permanently lubricated and does not require oil or grease. If after long periods of use, the pulley assembly wobbles excessively, check the bushing in the pulley assembly. This assembly may need replacement. REMOVAL AND DISASSEMBLY 1) Loosen set screws and remove clutch from the engine crankshaft. ) Remove retaining ring and slide off rotor assembly.
Item No. PARTS LIST FOR SG 5000 Part No. Description 40811~ Rotor Amendment 40810 Hammer Rod 40802 Hammer 40805 Spacer 516" LG 40804 Spacer 5/8" LG 40803 Spacer 7/8" LG 40807 Chipper Unite 40848 x 1" Flat Hd. Socket Cap Screw 40806 Groove Pin 40812 Chipper Side Plate 40813 Drive Side Plate 40814 Top Plate 40815 Scroll 40816 Screen 1" 40817 Bar Screen (Optional} 40818 Battle Plate 40819 Screen & Baffle Rod 40820 Pipe Spacer 11773 Hair Cotter 3/32" 40854 x 8 Hex Hd. Cap Screw Bik. 80636 x 1-1/4 Hex Hd.
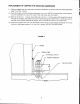
REMOVAL AND RE-INSTALLATION OF GROOVE PINS (1) Remove hopper. {item #3) {2} Turn rotor until hammer rod {item #4} is facing up — See sketch, (8) Turn hammer rod {stem #4) unit small end of groove pin (stem #11) is facing up. (4) Use a 3/16 Dia. punch and drive groove pin out of hammer rod. (5) When installing groove pin be sure you put the end without groove in hole first, then drive pinto hammer rod until it stops. (6} Re-install hopper. % 3/16 PUNCH .
MANUFACTURER’S 2 YEAR LIMITED WARRANTY For-two (2) Years from purchase date for the original purchaser’s residential, non-commercial use [ninety (90) days from purchase date for the original purchaser’s commercial, rental, or other non-residential use], SNAPPER POWER EQUIPMENT, through any SNAPPER dealer will replaces, free of charge, any part or parts found upon examination by the factory at McNaughton, Georgia, to be defective in material or workmanship or both.