
Installation Manual


6. Position Bumper in place and start bottom bolts using (2) 7/16"-14 x 1 1/4" Hex Head Bolts or (2) M12 x 35mm Hex
Head Bolts (depends on the year model), (2) 7/16" Flat Washers, and (2) 7/16" Lock Washers. Do not tighten at
this time.
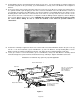
7. 97 TJ's have holes on the inside of the frame rail. These holes are not on 98-on TJ's and are not required. These
are optional and will require dropping the fuel tank to reach the installation of the inner Metal Plates. However if
you would like to install the inner Metal Plates, they must be drilled to 7/16".NOTE: Measure the distance on the
mounting bracket and match these measurements on the frame or you may mount the outer four holes to the
frame and use the holes on the bracket as a template to mark the drilling locations (Figure 5). Remove Bumper
and set aside. Drill the frame holes to 7/16". CAUTION: Use extreme care in assuring the locations you drill
are correct. Before drilling be sure to check the backside of the frame for possible hazards or
obstructions.
Figure 5
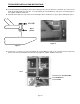
8. Position the new bumper against the back of the vehicle frame and reinstall Hardware listed in Step 6. Locate (8)
3/8"-16 x 1 1/4" Hex Head Bolts, (8) 3/8" Flat Washers, (8) 3/8” Lock Washers, and (4) Backing Plates. Secure
Bumper to frame by using the hardware listed in this step (Figure 6). Do not tighten hardware at this time.
9. Locate (4) 1/2"-20 x 1 1/4" Hex Head Bolts, (4) 1/2" Lock Washers, and (4) 1/2" Flat Washers. Carefully start all
four bolts
through the top of the Reinforcement Bracket into top of Bumper. Tighten all hardware at this time.
Illustration is for reference only, styles may vary with application
3/8”-16 x 1 1/4” Hex Bolt
3/8” Flat Washer
3/8” Lock Washer
Backing Plates
Bottom Mount Bracket
7/16”-14 x 1 1/4” Hex Bolt
or M12 x 35mm Bolt
7/16” Flat Washer
7/16” Lock Washer
Rock Crawler Bumper
Rear Plate
Figure 6
Page 3 of 5