
Installation Manual


SUPPORT BRACKET INSTALATION INSTRUCTIONS
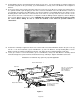
1. Remove factory bumper and rear body mount on both sides (Figure 1 ).
2. The use of a pry bar and some assistance will be needed to install the Reinforcement Brackets. Place pry bar
between the body and frame, lift body and remove body mount. "CAUTION": Be extremely careful not to
damage the paint or body when lifting.
3. Use vise grips to bend body seam above the frame rail forward toward front of Jeep (Figure 2). This will allow
clearance for Reinforcement Bracket. NOTE: If Jeep has a body lift this step is not required.
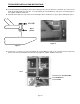
4. Lift body with pry bar and slide Reinforcement Bracket between body and frame rail.
5. TJ Wrangler: Locate (1) 1/2”-20 x 1 1/4" Hex Head Bolt, (2) 1/2" Flat Washers, and (1) 1/2" Fender Flange Lock
Nut. Insert Bolt with Flat Washer through hole in the bottom of frame. Go through hole in the side of frame and
through Reinforcement Bracket. Secure Bolt with the rest of the hardware listed in this step (Figure 2). Do not
tighten at this time. Repeat steps 2-5 for opposite side.
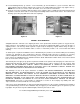
YJ Wrangler: Locate (1).1/2"-20 x 1 1/4" Hex Head Bolt, (2) 1/2" Fender Flat Washers, and (1) 1/2" Fender Flange
Lock Nut. Insert Bolt with Flat Washer through hole in the top of frame. Go through hole in the top of frame and
through Reinforcement Bracket. Insert Fender Flange Nut through the hole on the bottom of the frame and hand
tighten at this time (Figure 3). NOTE:
Taping the Flange Nut to a wrench before inserting into the frame will ease
the installation. Repeat steps 2-5 for opposite side.
TJ Reinforcement Bracket
Figure 1 Figure 2
YJ Reinforcement Bracket
Figure 3 Figure 4
Page 2 of 5