
Installation Manual

WWW.SMITTYBILT.COM
For Technical Support/Warranty Information please call 310-762-9944
Smittybilt, 400 West Artesia Blvd, Compton, CA 90220
Installation Instructions
Winch Quick Connect Kit
Part # 35220 (8’)
Part # 35210 (24’
)
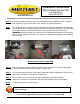
Step 4: Attach the red (positive) cable to the positive terminal on the battery.
Step 5: Attach the black (negative) cable to the negative terminal on battery.
Step 6: Secure the cable in appropriate locations using the included cable ties. Installation is now
complete.
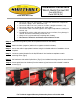
Step 7: Locate an optimal location for the On/Off switch. Use bracket as template to mark
mounting holes. (Fig G)
Step 8: Set bracket to side and drill pilot holes. (Fig H) Use included mounting screws to secure bracket.
Step 9: Insert switch base into bracket (from the bottom up) and secure with included 2 machine
screws (Fig I)
(Fig G) (Fig H) (Fig I)
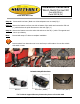
Do not run cable near moving parts. ( Suspension and driveline components
like shocks, springs, axles, driveshaft’s ect)
Do not run cable near heat. (exhausts, headers, catalytic converters, ect)
Do nut run cable across or through any sharp edges.
Do not route cable near moving parts in the engine compartment. (cooling fan,
fan belt, ect)
Periodically check the cable and connects for wear and tear, if any damage is
noticed, disconnect immediately and do not use.
Always wear eye protection when working with a battery.
Disconnect connectors and install covers when not in use.