
Manual


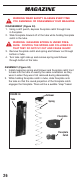


• Verify the sear deactivation
le
v
er is in the lo
w
er position;
it m
ust be protr
uding into the
magazine well as shown in
Figure 16B
.
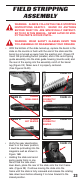
• Holding the slide and recoil
spring guide firmly in one
hand, hold the take down
le
v
er down, place the rear of the slide onto the front frame
rails. (Figure 28) Continue moving the slide onto the
frame until the slide is fully rearward and release the rotating
take down lever before allowing it to move forward to the
closed position.
FIELD STRIPPING
ASSEMBLY
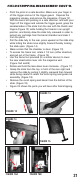
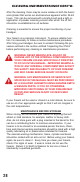
• With the bottom of the slide turned up, replace the barrel in the
slide so the muzzle is flush with the end of the slide and the
barrel lug is turned up away from the ejection port. (Figure 23
Insert the protruding button (smaller) end of the recoil spring
guide assembly into the slide guide housing (muzzle end) and
the rear of the spring into the assembly notch of the barrel
lug.(Figure 24) Make sure it is properly centered.
(See Figures 25-28)
FIGURE 24
FIGURE 23
FIGURE 26
FIGURE 28
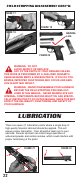
WARNING: ALWAYS FOLLOW THE FIELD STRIPPING
INSTRUCTIONS EXACTLY. NEVER DO ANYTHING
BEYOND WHAT YOU ARE SPECIFICALLY INSTRUCT-
ED TO DO IN THIS MANUAL. NEVER ALTER OR MOD-
IFY THE PARTS IN YOUR PISTOL.
WARNING: WEAR SAFETY GLASSES EVERY TIME
YOU ASSEMBLE OR DISASSEMBLE YOUR FIREARM.
SPRING
MISALIGNED
SPRING
CORRECTLY
ALIGNED
SPRING
NOT SEATED
SPRING
CORRECTLY
SEATED
23
FIGURE 29
FIGURE 25
FIGURE 27