
Manual


20
DISASSEMBLY -
FIELD STRIPPING
WARNING: ALWAYS KEEP THE MUZZLE POINTED IN
A SAFE DIRECTION.
WARNING: NEVER DO ANYTHING BEYOND WHAT
YOU ARE SPECIFICALLY INSTRUCTED TO DO IN
THIS MANUAL. NEVER ALTER OR MODIFY THE
PARTS IN YOUR FIREARM.
WARNING: WEAR SAFETY GLASSES THAT ARE
SPECIFIED FOR FIREARMS USE EVERY TIME YOU
ASSEMBLE OR DISASSEMBLE YOUR FIREARM.
WARNING: ANY MAINTENANCE, ADJUSTMENT OR
SERVICE NOT SPECIFIED IN THIS MANUAL MAY
AFFECT THE SAFETY AND RELIABILITY OF YOUR
FIREARM AND MUST BE PERFORMED BY A QUALIFIED
GUNSMITH USING GENUINE SMITH & WESSON PARTS. IF
YOU DO OTHERWISE, IMPROPER FUNCTIONING OF YOUR
FIREARM MAY OCCUR AND SERIOUS INJURY OR DEATH
MAY RESULT.
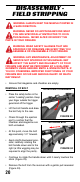
• Ensure that magazine and chamber are empty.
REMOV
AL OF
BOLT
•
Place the safety button in the
center “Loading” position. Keep
your finger outside the trigger
guard and off the trigger.
• Lift the bolt handle and draw
the bolt fully to the rear.
• Check through the ejection
port to confirm that the
chamber and magazine are
both unloaded.
• At this point, move the bolt
approximately 1/2˝ forward.
• Apply slight downward pres-
sure, carefully rotating the
bolt handle down and to the
right (a little wiggling may be
required to align the parts).
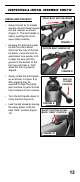
• Continue to rotate the handle down until it nearly touches the
stock (Figure 23).
• Remove the bolt from the receiver with a gentle pull rearward
(Figure 24).
FIGURE 24
FIGURE 23
ROTATE BOLT DOWNWARD
WITHDRAW BOLT