
Manual


Quality materials
and
precision
craltsmanship
make
lhis line slido action
shotgun one
you
will
be
proud
to own
and
use.
The specially designed, streamlined
receiver ls
permanenlly
aligned with the barrel.
All barrels are
proof
tested, both
gauges
are
chambered
for 3' magnum shells,
but 2ya" may be used as
well.
Plain
barrel shotguns are
supplied with
Full, Modified
or lmproved
Cylinder chokes.
Models
are available
with
Ventilated Rib.
The
gun
has
positive
extraction
and automatic side ejection.
Sate Fhe Control-The
trigger
must
be released, then
pulled
lor every shot
and the tore end must
be com-
plstely
torward
to close action in order to lire.
Safety
button
is located at the
top of receiver, Slide Safely
button back tor
"safe"
position
and
forward lor
"lire"
position.
Capacily-The
shotgun has a 6 shot capacity
(5
in
magazins,
1 in chambe0.
The magazine
capacity can
be changed
to lwo shells to comply with lhe Federal
Migratoty
Huntlng Laws. To reduce
to
3
shot
capacity
(t!/o
shells in magazine
and one in chamber), unscrew
magazine cap from
kont of magazine mount, wooden
plug
may
now be inserted in magazine
tube. Beplace
magazine cap and tighlen.
To
Load-Push safety
button back
(safe position).
Insert
live shells inlo
the magazine, pump
one shell into
the chamber
and insert
another shell into
lhe maga-
zine. The gun
is now loaded
to full
capacity.
TO UNLOAD
Push
safety button back
(safe position).
Depress
release lever and
pull
forend tully rearward until
shell
from barrel is ejected. Roll
gun
sideways to allow shell
on lifter to drop from ejection
port.
Close
action. Open
and roll
gun
sideways to allow
released shell from
magazine to drop from ejection
port.
Continue
until
magazine and
gun
are empty.
CAUTION
Use
of
proper
safety
precautions,
including
adequate
eye and ear
protection,
is recommended
for the user
of
this
product
and for
others in the vicinity
of the user.
Smith
& Wesson
Smith&Ilftsson
2100
Roosevelt
Ave.
Springlield,
Massachusetls
01101,
U.S.A.
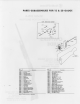
DISASSEMBLY
-
916A
To disassemble
Action proceed
as follows:
1. Close Aclion.
2.
Remove
screw in
top ol Butt Plale
or recoil pad,
Loosen bottom
screw.
Swing butt
plate
90"
either
way.
Wilh a long
screw driver
(at
least 8'
long shank)
remove
slock
bolt. Pull
slock rea.ward
to remove
from
Frame.
3. With
a
%"
pin punch
drive
trigger
plale
pin
out lrom
solid side ol frame.
Remove trigger plate
screw.
pull
trigger plale
assembly
rearward from
kame. Remove
Cartridge
C0loff.
4. Open action
all the way rearward.
Remove
Eiector
Screw and ejector
lhrough side ejection part
open-
ing.
5. [,love
breech bolt forward
until
rear of right
hand
exlractor is approxjmately
14" lotwaad
ol lhe rear
of
Ejection part
opening.
With a
screw driver between
top rear of Bolt
and Frame pry
bolt down.
push
forend rearward
10 disengage
slide
from bolt.
Re-
move
slide from handle
bar and
track by
moving
slide
toward the
center of the
frame. Bolt
may be
removed kom
rear ot frame.
6. Unscrew
magazine cap from
magazine
mount.
Re-
move magazine
spring and follower.
Remove
maga-
zine tube
forward through barrel
mount. Remove
lorend
assembiy forward
kom frame
7. Unscrew knurled
ring lrom forend
assembly
and
pull
lorend
wood faom assembly.
To reassemble
proceed
in
the reverse
order
ou ined
above.
NOTE:
The barrel
cannot be
removed lrom
the frame.
These are
permanently
aligned at
the lactory.
S&W No.
5565A
Printed
in
U.S-A.