Contents 1 2. 3 4 5 6 General safety instructions _______________________________ 2 Installation ___________________________________________ 9 Description of the controls ______________________________ 12 Operating instructions __________________________________ 16 Cleaning and maintenance ______________________________ 17 Troubleshooting ______________________________________ 18 Thank you for choosing one of our products.
Warnings TRANSLATION OF THE ORIGINAL INSTRUCTIONS 1 General safety instructions This manual is an integral part of the appliance; it must always be kept intact together with the dishwasher for future reference (even if sold). Before using the appliance, carefully read all the instructions contained in this manual.
Warnings Never leave waste packaging unattended. Do not allow children to play with packaging materials. Separate waste packaging materials by type and consign them to the nearest recycling centre. The plate with the technical data, serial number and marking is in a visible position on the inside edge of the door. It must not be removed. The appliance must be earthed in compliance with electrical safety regulations.
Warnings Building-in the appliance underneath a hob is absolutely forbidden. Installing a hob on top of freestanding appliance is absolutely forbidden. To ensure stability, install the appliance only under continuous worktop, securely fixed to adjacent cabinets. If the appliance is installed in a high cabinet, both the appliance and the cabinet must be adequately fixed.
Warnings The appliance must be connected to the water supply by means of new hoses. Briefly test the appliance after installation. Run a wash cycle with a temperature of between 45 and 70°C with the dishwasher empty and using a specific dishwasher detergent. (It is not sufficient to run a soak cycle). If the dishwasher fails to operate correctly, disconnect it from the electrical power supply and call the nearest technical service centre. Never attempt to repair the appliance yourself.
Warnings 6 suffocation. Observe all the safety instructions on the packaging of these products. Do not drink the water residues which may be present on the dishes or appliance at the end of the washing program. Never place solvents such as alcohol or turpentine, which are potentially explosive, inside the appliance. Never load dishes soiled with ash, wax or paint. Never leave the dishwasher door open; people might trip over it.
Warnings have it replaced by the manufacturer or an authorised technical service centre. Some components are live even with the on/off button in the off position. Before performing any maintenance work on the appliance, disconnect it from the electrical power supply. Do not clean the machine with a water jet machine, high-pressure or steam cleaners. Models with “acquastop” device This device prevents flooding in case of water leak.
Warnings 1.1 Declaration of conformity The appliance complies with the essential requirements of the following European directives: - 200/125/EC - 211/65/EU - 2014/35/EU - IEC/EN 62471, risk group 1, for models with internal lighting. IEC/EN 61770 1.2 Disposal This appliance must be disposed of separately from other waste (directives 2012/19/EC).
Installation 2. Installation 2.1 Technical characteristics Water supply pressure min. 0,05 - max. 0,9 MPa (min. 0.5 – max. 9 bar) max. 60°C 12-13 standard place settings IPX0 Water supply temperature Capacity Class of protection against moisture Protection against electric shock class I Electrical data see the data plate Appliance dimensions (mm) 2.2 General Information This appliance may be placed up against walls or other furniture units.
Installation Building-in a dishwasher underneath a hob is absolutely forbidden. Moreover, dishwashers may not be installed directly touching appliances which are not conventional built-in kitchen appliances (e.g. fireplaces, stoves, etc.). When installing the dishwasher in a compartment next to one or more other appliances, it is essential to comply with all the recommendations provided by the appliance’s manufacturer (minimum distances, installation procedures, etc.).
Installation DRAIN CONNECTION Insert the dishwasher’s drain hose into a drain pipe having a diameter of at least 4 cm, or alternatively, place it inside the kitchen sink using the plastic support provided, taking care not to crush or excessively bend the hose. It is important to prevent the hose from coming loose and falling. For this purpose, the plastic support is equipped with a hole for tying it to the wall or water tap.
User instructions 3 Description of the controls 3.1 Upper panel All the dishwasher controls are grouped on the upper panel. Switch-on, programming, switch-off, etc. procedures are only possible when the door is open.
User instructions P2 P3 (*) P4 P5 AUTO SENSOR ECO MIX 65° INTENSIVE 70° - - 15 3,5 (KWh/cycle) - (1) Energy consumption Water consumption (liters/cycle) - Rinse cold (1) Duration (min) SOAK Drying P1 Wash Program Pre-wash PROGRAMS TABLE 0,02 When this cycle is selected, the dishwasher recognizes the type of soil and automatically adjusts the washing parameters. The program ends with a drying cycle.
User instructions (*) Standard program according to EN 50242 - EN 60436. The DRY ASSIST option (if present) must be enabled. For consumption data, please see the information sheet provided. (1) Consumption and program duration are measured according to EN 50242 EN 60436. The values may vary due to various factors, such as the inlet water temperature and the number of dishes. (2) Program duration with the option selected (default) / not selected. (3) 55°C with the dry assist option selected (default).
User instructions Option 1 SPECIAL 2 DRY ASSIST 3 ½ LOAD FLEXY ZONE 4 DELAY OPTIONS TABLE Description Creates additional programs. Allows the dishes to be dried perfectly even at low rinse temperatures, with significant energy savings. It starts automatically if the selected program is compatible with it. If it is not required, press the button to disable it. Ideal if just a few dishes need to be washed, allowing energy savings and a shorter wash cycle.
User instructions 4 Operating instructions After having installed the dishwasher, remove the basket retainers. 4.1 Adding the salt The salt prevents the formation of scale deposits. Unscrew the cap of the salt container. Only for the first time, fill the container with a litre of water. Pour salt (approx. 1 kg) into the container using the funnel provided with the dishwasher. Remove any salt residues before screwing the cap back on.
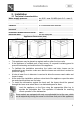
User instructions 5 Cleaning and maintenance Before carrying out any work, always unplug the appliance from the electrical supply or switch off the omnipolar circuit breaker. CLEANING THE WATER INTAKE FILTER Close the water supply tap, unscrew the end of the water intake hose, remove the filter A and clean it under running water. Put the filter A back into its seat and carefully screw the water intake hose back on. CLEANING THE SPRAY ARMS Remove the spray arms and wash them with a jet of water.
User instructions 6 Troubleshooting The dishwasher is capable of signalling a number of faults through the simultaneous illumination of several indicator lights, with the following meanings: FAULT E1 DESCRIPTION Acquastop failure (some models only) Safety level E2 Water heating fault E3 Water temperature detection fault E4 Water intake fault E5 Water drainage fault E6 Turbine flow-meter fault (some models only) E7 Alternate washing system fault E8 Water intake system fault E9 Wash pump faul