PRECAUTIONS 3 General safety instructions For this appliance Appliance purpose This user manual Manufacturer’s liability Identification plate Disposal Information for European Control Bodies Energy efficiency technical data To save energy Light sources How to read the user manual 3 6 7 7 7 7 7 8 8 8 8 8 DESCRIPTION 9 General Description 9 Control panel 10 Other parts 10 Accessories 11 Optional accessories (can be purchased separately) 12 Advantages of humidified and steam cooking 12 USE 13 Prelimin
• • • • • • • • • • lacking in experience in the use of electrical appliances, provided that they are supervised or instructed by adults who are responsible for their safety. Children must not play with the appliance. Keep children under the age of 8 at a safe distance unless they are constantly supervised. Keep children under the age of 8 away from the appliance when it is in use. Cleaning and maintenance must not be carried out by unsupervised children. The cooking process must always be monitored.
nickel- or chromium-plating). • Racks and trays should be inserted as far as they will go into the side guides. The mechanical safety locks that prevent them from being removed must face downwards and towards the back of the oven cavity. • • • • Do not use steam jets to clean the appliance. • Do not spray any spray product near the appliance. • Do not obstruct ventilation openings and heat dispersal slots. • Fire hazard: never leave objects in the oven cavity.
• • • • • • • • • personnel in accordance with current standards. Have the electrical connection performed by authorised technical personnel. The appliance must be connected to ground in compliance with electrical system safety standards. Use cables withstanding a temperature of at least 90 °C. The tightening torque of the screws of the terminal supply wires must be 1.5 - 2 Nm.
plated surfaces with the tip or the plug of the temperature probe. • Do not insert the temperature probe into openings and slots on the appliance. • When the temperature probe is not in use, make sure that the protective metal cap is properly closed. • Do not pull the cable to remove the temperature probe from the socket or from the food. • Make sure that the temperature probe or its cable do not get caught in the door.
Power voltage Danger of electrocution • Unplug the appliance. To dispose of the appliance: • Cut the power cable and remove it. • Deliver the appliance to the appropriate recycling centre for electrical and electronic equipment waste, or return it to the retailer when purchasing an equivalent product, on a one for one basis. Our appliances are packaged in non-polluting and recyclable materials. • Deliver the packing materials to the appropriate recycling centre.
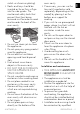
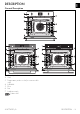
DESCRIPTION General Description 1 Control panel 2 Seal 3 Temperature probe socket (on some models only) 4 Light bulb 5 Door 6 Fan 7 Loading nozzle Frame shelf 91477A303/A DESCRIPTION - 9
Control panel 1 Function Knob In Quick Mode, this knob allows you to select the cooking function. 2 Display The touchscreen display allows you to interact with the appliance. Touch the icons to access the various functions. All the operating parameters will be shown on the display. 3 Temperature Knob In Quick Mode, this knob allows you to select the cooking temperature. 4 ON/OFF key The ON/OFF button turns the appliance on or off.
Perforated tray Cooling fan Useful for steaming fish and vegetables. Steel baking tray The fan cools the appliance and comes into operation during cooking. The fan causes a steady outflow of air from above the door which may continue for a short period of time even after the appliance has been turned off.
Deep tray emptying of the reservoir. PPR2 or STONE(refractory stone) Useful for collecting fat from foods placed on the rack above and for cooking pies, pizzas, baked desserts, biscuits, etc. Protective cover (on some models only) Ideal accessory for baking bread (pizza, bread, focaccia...), but you can also use it for more delicate preparations such as biscuits. BBQ (teflon-coated barbecue grill pan) Used to cover and protect the temperature probe socket when the temperature probe is not in use.
The addition of steam allows the use of less fat in favour of a healthier and more genuine cuisine. It also minimizes the loss of weight and volume in food while cooking. Steam cooking is particularly suitable for cooking meat: in addition to making it very soft, it maintains it bright and makes it more succulent. Also recommended for baking leavened and bread dough. The humidity in fact lets the dough grow and develop while cooking before creating the outer crust.
Configuration for steam cooking desired shelf taking care to place the steel baking tray on the shelf below. This allows liquids to be collected separately from the food which is being cooked. If you intend to use the perforated baking tray for steam cooking, it must be placed on the Display The parameters and values for the currently selected function will be indicated on the display.
HISTORY protected) active and available in the place where the appliance is installed. • Internet connection. • Name and password of the home Wi-Fi network or WPS (Wi-Fi Protected Setup) mode available. For further information, please refer to the "Built-in oven connectivity" manual. TIMER First use etc...
When the current time is visible, after 2 minutes from the last operation by the user it is displayed with low brightness. The first time you use the appliance, it may be set to a language other than the one you speak. It is recommended that you set the required language at this point. 4. Touch the SETTINGS button on the display (at the right in the lower area 5. Touch the display button ). . 6.
3. Touch the TRADITIONAL COOKING MENU button. 4. Select a combination function (for example FAN-HEATED ) to enter the relevant cooking screen. 5. Touch the START right in the cooking level. button (at the lower ) to start pre-heating. Preheating stage Cooking itself is preceded by a preheating stage, which allows the appliance to heat to the cooking temperature more quickly. This stage is indicated by a progressive increase in the temperature level reached.
2. Scroll through the values and select the required duration. Programmed cooking Programmed cooking is the function which allows a time-controlled cooking operation to be stopped at an established time depending on the time set by the user, after which the appliance will switch off automatically. For safety reasons, it is not possible to set the end of cooking time by itself without setting the cooking duration. 3. Touch the CONFIRM button to confirm the selected cooking duration.
STATIC ECO Traditional cooking suitable for the preparation of one dish at a time. Ideal for cooking roasts, fatty meats, bread, pies. FAN-ASSISTED Intense and uniform cooking. Ideal for biscuits, cakes and multilevel cooking. THERMALLY-VENTILATED The heat is distributed quickly and evenly. Suitable for all dishes, ideal for cooking on several levels without mixing odours and flavours. TURBO Allows quick cooking on multiple shelves without mixing the aromas.
4. Touch the CONFIRM the selected duration. The DELETE button to confirm button appears in the lower area that can be used to delete a timer if one has been selected. 2. Insert the tip of the probe into the food before you place it in the oven. 3. For best results, make sure that the temperature probe is placed transversely in the thickest part of the food and for least 3/ 4 of its length. Make sure that it does not touch the tray underneath and that it does not protrude from the food. 5.
If the probe does not read the temperature of the food correctly, 2 error messages will appear on the display (to acknowledge), after which, the appliance will automatically carry out timed cooking. Setting cooking parameters when using the temperature probe 1. Select a cooking function. 2. Touch the TEMPERATURE button or the relevant value. 3. Scroll through the values and select the required cooking temperature. 4. Touch the CONFIRM 5. Touch the PROBE button. button in the lower area . 6.
Medium Sets a medium difference between the probe temperature and oven cavity temperature. This results in a medium cooking time. fast Sets the largest difference between the probe temperature and the temperature of the oven cavity. This results in a shorter cooking time. 3. Touch the CONFIRM button to confirm the selected probe temperature. Press the cooking button to eliminating the . With preheating: 1. Touch the START button to start preheating.
2. Touch the QUICK MODE button in the "main menu" (in the information area at the top left). It is now possible to use the knobs to operate the appliance. 3. Turn the Functions 7. Insert the plug of the temperature probe into the socket at the side, using the probe to open the protective cover. knob to select the required function. You can select all the traditional 8. Close the door. functions apart from the PIZZA 9. Turn the Temperature knob to set the cooking temperature.
4. Touch the TEMPERATURE button or the relevant value. 5. Scroll through the values and select the required cooking temperature. 10. Touch the START button (at the lower right ) to start the reservoir filling procedure. Reservoir filling Use cold tap water which is not too hard, softened water or still mineral water. Do not use distilled water, tap water with a high chloride content (> 40 mg/ l), or other liquids.
5. Place the end of the tube at the bottom of the jug (or container). 7. When finished, shake the loading wand to remove any water residue. 8. Place the loading wand back in its holder. 9. Remove the jug (or container). 10. Close the door. 6. Press the start button to start filling the appliance reservoir with water. The appliance will automatically draw the quantity of water necessary for cooking on the basis of the set duration.
You can skip the pre-heating phase by pressing the button related. After pre-heating, a buzzer will sound and a message will display to indicate that the food can be put in the oven. Reservoir draining Before draining the reservoir, wait for the oven to cool down, leaving the door open. To make sure that the water remaining in the reservoir is not too hot, wait at least 40 minutes.
7. Shake the loading nozzle to remove any remaining water. 8. Place the loading nozzle place in its housing. 9. Remove the jug (or container). 10. Remove condensation from the base and walls of the oven cavity, the door glass and drip tray and the front of the appliance using a sponge. 8. Scroll through the values and select the required steam percentage. Take care: the water may be very hot. The drained water cannot be used for other cooking. Combination cooking with steam 1.
13. Touch the START button (at the lower right ) to start the reservoir filling procedure. 14. Proceed with reservoir filling as described above. Preheating stage Cooking itself is preceded by a preheating stage, which allows the appliance to heat to the cooking temperature more quickly. This stage is indicated by a progressive increase in the temperature level reached. Unless otherwise indicated in the recipe, it is not recommended to place food in the oven during the preheating stage.
and steam cook for around 4-5 minutes. • Vegetables: steam cooking vegetables gives excellent results. They maintain their colour, flavour and nutritional properties. For dense vegetables such as potatoes, turnips and parsnips, cook at 100°C for the same length of time you would boil them on a hob. For broccoli and carrots, cook for 6 minutes if you want them to remain firm, or 10 minutes if you want them to be softer. • Fish: due to the delicate nature of fish, steaming gives excellent results.
the heat better. • The temperature and the cooking time depend on the quality and consistency of the dough. • To check whether the dessert is cooked right through: At the end of the cooking time, put a toothpick into the highest point of the dessert. If the dough does not stick to the toothpick, the dessert is cooked. • If the dessert collapses when it comes out of the oven, on the next occasion reduce the set temperature by about 10°C, selecting a longer cooking time if necessary.
• Do not reuse the bags after cooking. To select the Sous Vide cooking: 1. Touch the COOKING 5. Scroll through the values and select the required cooking temperature. button on the "main menu". 2. Touch the STEAM COOKING MENU button. 1. Select the SOUS VIDE function. 2. For settings, see the procedure described in the "Steam cooking" paragraph.
11. Scroll through the values and select the required duration. The hours and minutes can be selected separately. The duration of the combined steam function can be from a minimum of 1 minute to a maximum of 12 hours and 59 minutes. The expected time for the end of cooking is shown under the duration; the minutes needed for preheating are already calculated. 12. Touch the CONFIRM button to confirm the selected cooking duration. 13.
TURBO Allows quick cooking on multiple shelves without mixing the aromas. Perfect for large volumes that call for intense cooking. The injection of steam speeds up cooking without drying out the food. FAN-ASSISTED GRILL The intense heat from the grill is distributed by the fan along with injections of steam; this creates optimal conditions for grilling even thick slices of meat without drying them out.
Quick recipes In this section you will find recipes created by Smeg chefs for cooking quick recipes. This category allows you to prepare traditional recipes in less time. By choosing the type and weight of food, the appliance selects the most suitable function, time and temperature. The instructions on the display indicate when to put the food in the oven and on which shelf. 1. Touch the SMART COOKING button on the "main menu". 2. Scroll through the functions until you select QUICK RECIPES 3.
3. Touch the CONFIRM button to confirm that you wish to delete the history (or the CANCEL operation). button to cancel the Mini guide to accessories Rack We recommend the use of the grill as a support surface for baking moulds/casseroles. In the absence of the baking tray grill, the grill can be used as a base for grilling with the deep baking tray placed on a shelf below to collect the juices. Use the perforated baking tray with the steel pan placed on the level below.
6. Touch the COOKING DURATION button or the relevant value. 7. Scroll through the values and select the required duration. The recipe name can contain a maximum 12 characters, including spaces. The name must contain at least one character in order to store the recipe. The character letter. deletes the previous 14. Touch the CONFIRM the program. button to store 8. Touch the CONFIRM button to confirm the selected cooking duration.
Other functions The special functions menu includes several functions such as defrosting, proving or cleaning... • Touch the OTHER FUNCTIONS button on the “main menu”. 8. Touch the START button to start the defrost by weight function. When finished, a buzzer sounds briefly, which can be deactivated by touching any point of the display or by opening the door. Preset parameters: Type Certain functions are not available on all models. DEFROST BY WEIGHT Automatic defrosting function.
2. Place the dish into the oven cavity. 3. Close the door. 4. Select DEFROST BY TIME . 5. Touch the COOKING DURATION button or the relevant value. 6. Scroll through the values and select the required duration. 7. Touch the CONFIRM the settings. button to confirm 8. Touch the START button to start the Defrost by time function. When finished, a buzzer sounds briefly, which can be deactivated by touching any point of the display or by opening the door. 9. Touch the HOME function.
2. Select PLATE WARMING . 3. Touch the START button to start the Plate warming function. Unless otherwise set, the Plate warming function has a maximum duration of 12 hours and 59 minutes. The following can be set while the function is in operation: • the temperature (from 40°C to 80°C); • the duration of the function 11. Touch the HOME button to quit the function. 12. Proceed with draining the reservoir as described above. KEEP WARM This function allows you to keep precooked foods warm.
6. Touch the START Stone function. button to start the As with normal cooking functions, you can skip pre-heating and set a timed and programmed cooking. 7. After preheating, open the door and place the food to be cooked on the accessory. 8. Close the door. When finished, a buzzer sounds briefly, which can be deactivated by touching any point of the display or by opening the door. BBQ (Barbecue) Useful for barbecue cooking. For use with the BBQ accessory sold separately.
6. Scroll through the values and select the temperature (from 60°C to 100°C). then release. or 7. Touch the CONFIRM button to confirm the selected temperature. 8. Touch the START Sabbath function. To stop the function: button to start the • Touch the HOME seconds. button for around 3 • Touch the WAND button on the display (positioned in the lower area ). Pay attention to the distance to be maintained so as not to be hit by the wand projection. 8.
10. When finished, shake the loading wand to remove any water residue. 6. Press the START button to start draining the water into the jug (or container). When complete, the display will indicate that the residual water removal process is complete. 11. Place the loading wand back in its holder. 12. Remove the jug (or container). 13. Close the door. When the door is closed, an automatic system will automatically draw in any residual water in the loading wand to avoid drips.
If there is no intervention by the user, the appliance cancels the function and the display shows the current time again. Touch the CONFIRM button to activate the Digital clock mode. (SmegConnect models only) A notification also appears in the app when you reconnect. Blackout during a programmed function If the power failure occurs while a programmed cooking process is set: • If the blackout is restored within the set start time, the appliance remains in standby mode updating the time until start.
Oven settings Eco light Dedicated menu for additional product functions. • In the "settings menu SETTINGS " touch the OVEN button. Keep warm This mode allows the appliance to keep cooked food warm (at low temperatures) after cooking finishes with a cooking cycle for which a duration has been set (if this is not manually interrupted), without altering the taste and smell obtained during cooking.
hardness degree of the water (°dH or °dF), the approximate number of hours is as follows: Value °dH °dF Hours 1 0 ÷ 11 0 ÷ 20 8 2 12 ÷ 17 21 ÷ 30 7 3 18 ÷ 24 31 ÷ 42 6 4 25 ÷ 30 43 ÷ 53 5 5 31 ÷ 50 54 ÷ 90 4 Automatic wand Sets the automatic operation mode of the reservoir filling and draining wand. 1. Select Automatic wand 2. Select On. 2. Select Yes. 3. Touch the CONFIRM button to activate the Controls lock mode.
Display brightness the lower area This allows the display brightness level to be selected. The Display brightness function is factory set to High. ). Showrooms Menu dedicated to showrooms. • Touch the SHOWROOMS 1. Select Display brightness. 2. Select from the options High - Medium Low. 3. Touch the CONFIRM the selection. button to confirm Weight type Allows you to set the unit of measurement to display the weight value in kilograms (kg) or in ounces (oz).
Restore settings the "settings menu This restores all settings to the original factory settings. The operation also deletes personal recipes. • Touch the FACTORY RESET button on " (at the centre of the lower area ). 1. Touch the Yes button if you want to restore the original factory operations. or 2. Touch the No button to cancel the operation. CLEANING AND MAINTENANCE Cleaning the appliance See General safety instructions. 1.
4. Lower the door and once it is in place remove the pins from the holes in the hinges. consists of two glasses. Cleaning the door glazing The glass in the door should always be kept thoroughly clean. Use absorbent kitchen roll. In case of stubborn dirt, wash with a damp sponge and an ordinary detergent. Removing the internal glass panes For easier cleaning the internal glass panes of the door can be removed. 1. Lock the door with the appropriate pins. 2.
10. Be sure to fit the 4 pins of the inner glass well into their seats on the door. Cleaning the oven cavity In order to keep your oven in the best possible condition, clean it regularly after letting it cool down. Avoid letting food residue dry inside the oven cavity, as this could damage the enamel. Take out all removable parts before cleaning. For easier cleaning, it is recommended to remove: • the door; • The rack/tray support frames. the sides to be cleaned more easily.
3. Remove the frame from the rear pin B located at the bottom of the side wall. 3. Screw in the front fixing pin (you can help yourself with a tool, e.g. a coin). 4. Repeat the operation for the frame placed on the other side wall. To refit the rack/tray support frames: 1. Slide the rear part of the frame into the housing under the pin B located at the bottom of the side wall. 4. Repeat the operation for the frame placed on the other side wall.
1. Touch the OTHER FUNCTIONS button on the "main menu" (in the main area ). 2. Select VAPOR CLEAN . 3. Touch the START button to start the reservoir filling procedure. 4. Proceed with reservoir filling as described above. Vapor Clean cleaning phase 5. Touch the START button to start the Vapor Clean function. This stage is indicated by a progressive increase in the cooking level.
After this, the appliance will not allow any other function to be run until a new descaling process is performed. 2. Touch the START button to start the function. 3. Descaling starts. After completion of the descaling process the request to drain the descaling solution will be displayed. Reservoir draining 1. Open the door 2. Place a jug or container on the open door. 3. Remove the loading wand from its holder. Preliminary operations In case there is residual water inside the reservoir: 1. Open the door.
6. Press the start button to start filling the appliance reservoir with water. 7. When you have finished filling water into the reservoir, touch the CONFIRM button to continue with the function. The appliance starts the function using the parameters set. • When cleaning the reservoir and the hydraulic circuit, leave the jug on the door open with the loading wand inside. The appliance cyclically discharges certain quantities of water used for cleaning.
5. Place the end of the tube at the bottom of the jug (or container). 13. Press the START button to start draining the water into the jug (or container). 14. Wait for the end of the drain flow. When complete, the display will indicate that the residual water removal process is complete. It is recommended to carry out the cleaning process of the reservoir and the water circuit a couple of times. 6. Press the start button to start filling the appliance reservoir with water. 7.
9. Place the loading wand back in its holder. 10. Remove the jug (or container). 11. Close the door. 12. Touch the START button to start the selected steam function. 13. Wait for the function to be executed until the end. 14. At the end of the function, drain the reservoir as described above. 15. Wait for the end of the drain flow. 16. Drain the water from the jug. 3. Touch the WAND button on the display (positioned in the lower area ).
3. Immerse the end of it into the jug until it reaches the bottom. 9. Close the door. When the door is closed, an automatic system will automatically draw in any residual water in the loading wand to avoid drips. A bubbling noise may be heard; this is completely normal. 10. Touch the FULL RESERVOIR CALIBRATION button to complete calibration. 11. Wait for the end of calibration. On completion, a warning on the display indicates the end of the calibration procedure. 4.
The aforementioned power cables are sized taking into account the coincidence factor (in compliance with standard EN 60335-2-6). Fixed connection Fit the power line with an all-pole circuit breaker with a contact separation distance sufficient to provide complete disconnection in category III overvoltage conditions, pursuant to installation regulations. Positioning See General safety instructions.
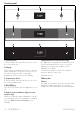
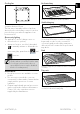
Appliance overall dimensions (mm) 58 - INSTALLATION 91477A303/A
Mounting into a column (mm) *Make sure that the cabinet top/rear section has an opening approx. 35-40 mm deep.
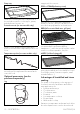
Mounting under worktops (mm) If the appliance is to be built-in under a worktop, a wooden bar has to be installed order to use the seal that is glued to the back of the front panel to prevent water or other liquids leaking in. A min. 603 mm B 560 - 564 mm C 583 - 585 mm D 9 - 11 mm E min. 5 mm F 121 - 1105 mm G min. 560 mm H min. 594 mm co Cutout for power cord (min. 6 cm2) jb Electrical connection box *Make sure that the piece of furniture top/rear part has an opening approx. 60 mm deep.
A min. 603 mm B 560 - 564 mm C 583 - 585 mm D 9 - 11 mm E min. 5 mm F 121 - 1105 mm G min. 560 mm H min. 594 mm co Cutout for power cord (min.