Dear Customer, Thank you for choosing this special edition Smeg – Dolce&Gabbana, Sicily is my love small domestic appliance. Smeg and Dolce&Gabbana have combined their artistic talents to create a unique collection, made in Italy by Smeg with unmistakeable Dolce&Gabbana design touches. We hope you enjoy using your new appliance! Kindest regards, SMEG S.p.A.
Contents 1.1 1.2 1.3 1.4 1.5 1.6 Introduction User Manual Intended use Manufacturer liability Identification plate Disposal 2 Description 2.1 Product description 3 Use 8 8 8 9 9 9 10 10 11 3.1 Before first use 3.2 Assembly 3.3 Using the slow juicer 4 Cleaning and Care 4.1 4.2 4.3 4.4 4.5 4.6 8 EN EN 1 Instructions Instructions Maintenance Cleaning the surfaces Cleaning the slow juicer Removing the seals and rotating brush for cleaning What to do if...
Important Safeguards RECOGNIZE SAFETY INFORMATION This is a safety alert symbol. This symbol alerts you to potential hazards that can result in severe personal injury or death. UNDERSTAND SIGNAL WORDS A signal word - DANGER, WARNING or CAUTION - is used with the safety alert symbol. DANGER denotes the most serious hazards. It means you could be killed or seriously injured if you do not immediately follow the instructions.
WARNING To reduce the risk of fire, electrical shock, personal injury, or damage when using the appliance, follow basic safety precautions, including the following: The following basic safety precautions apply when using electrical appliances. • When using electrical appliances, basic safety precautions should always be followed. Read all instructions. • To protect against risk of electrical shock, do not immerse the main body (motor) in water or any other liquid.
Important Safeguards 1 Instructions 1.1 Introduction Important information for the user: Instructions General information on this user manual, on safety and final disposal. Description Description of the appliance and its accessories. Use Information on the use of the appliance and its accessories, advice regarding preparations. Cleaning and care Information for correct cleaning and care of the appliance. Safety instructions Information Advice 8 1.
Important Safeguards Warning • This product contains a chemical known by the State of California to cause cancer, birth defects or other reproductive harm. • This appliance can cause low-level exposure to some of the substances listed,including benzene, formaldehyde, carbon monoxide, toluene, and soot. 1.4 Manufacturer liability The manufacturer shall not be held responsible for personal injuries or property damage caused by: • Any use of the appliance other than the one it was designed for.
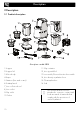
Description 2 Description 2.
3 Use Electrical Shock Hazard • • • • • Plug into a grounded 3-prong outlet. Do not remove the ground prong. Do not use an adapter. Do not use an extension cord. Failure to follow these instructions can result in death, fire, or electrical shock. Volts: 120 Volts AC only. Hertz: 60 Hz Your appliance has a 3-prong grounded plug. To reduce the risk of electrical shock, this plug will fit into an outlet only one way. If the plug does not fit in the outlet, contact a qualified electrician.
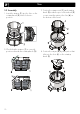
Use 3.2 Assembly 1. Insert the strainer (1) into the slots on the rotating brush (2) until it locks into position. 2. Check that the strainer (1) is correctly positioned inside the rotating brush (2). 12 3. Position the strainer unit (1) and rotating brush (2) inside the juice collector bowl (3) so as to insert the unit into the slots (4) on the bottom of the bowl. 4. Position the auger (5) by turning it so that it fits into the slots (6) on the rotating brush (2).
5. Place the hopper (7) onto the bowl, turning it clockwise until it locks into position. 6. Install the assembled unit (8) onto the motor body (9). Make sure that the juice density regulation lever (10) is in the CLOSE position.
Use 3.3 Using the slow juicer 1. Check that the juice density regulation lever (10) is in the CLOSE position before starting the appliance. 2. Place the juice jug (11) and the pulp container (12) under the relative outlets (13) and (14). 14 3. Push the lever switch upwards (15) to start the juicer. 4. Introduce the ingredients into the feed chute of the hopper (16) a little at a time using the pusher provided (17).
5. Open the juice outlet (18) before the juice collector bowl becomes full and move the juice density regulation lever (10) to the half-open position before adding the last ingredients. 6. When juicing is complete, stop the juicer, placing the lever switch (15) to the middle position. How to use the juice density regulation lever CLOSE position Use the lever in the CLOSE position during the initial phases of fruit or vegetable juice extraction.
Use • Remove the seeds or stones from fruit such as persimmons, apricots, lemons, plums, peaches, etc. before juicing. • Stalk vegetables with tough fibres such as celery, fennel, cardoons, etc. should be cut into pieces of approximately 3-4 cm. • Do not introduce sesame seeds, coffee beans or peppercorns. • Do not introduce fruit or vegetables preserved in alcohol, sugar, honey, etc. They could damage the appliance or cause it to malfunction.
Advice on which strainer to use Strainer Suitable for Fine Pure fruit or vegetable juices. How to use the REVERSE function The REVERSE function is used when the auger stops during operation: • Keep the lever switch pressed downwards for 3-5 seconds at a time. Repeat this process 2-3 times. Coarse Dense juices containing pieces of pulp, smoothies, milk shakes or soups. The REVERSE function pushes the ingredients upwards, releasing the auger and allowing the appliance to operate correctly.
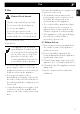
Cleaning and care 4 Cleaning and Care 4.1 Instructions Improper use Danger of electrocution • Switch off and unplug the appliance before cleaning it and its parts. Improper use Risk of damage to surfaces • Do not use steam jets to clean the appliance. • Do not use cleaning products containing chlorine, ammonia or bleach on steel parts or parts with metallic finishes on the surface (e.g. anodizing, nickel- or chromium-plating). • Do not use abrasive or corrosive detergents (e.g.
• Juice collector bowl seal: Grasp the seal on the bottom of the bowl and lift upwards to remove it. • Use the cleaning brush provided to clean the internal and external parts of the rotating brush unit under running tap water. • Rotating brush: Remove the blades as shown. Clean and wash the slow juicer immediately after use. Residues may dry out and make disassembly and cleaning difficult, as well as affect the operation of the appliance.
Cleaning and care 4.6 What to do if... Problem Cause Solution The plug is not properly inserted into the power socket. Insert the plug into the power socket. Do not use adaptors or extension cords. Check that the main power switch is turned on. The appliance does not work Make sure that the hopper The hopper has not been installed is installed properly properly. following the assembly instructions. Excessive residue.
Problem Cause The juice collector bowl does not fit onto the juicer Lever is in the OPEN position. body The juice collector bowl vibrates when the juice is being extracted IT EN Cleaning and care Solution Before fitting the bowl onto the juicer body make sure that the lever is in the CLOSE position. Hard ingredients (carrots, chicory, A slight vibration is normal, especially when processing beetroot, etc.). hard ingredients.