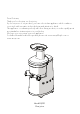
Dear Customer, Thank you for choosing our slow juicer. By choosing one of our products, you have selected an appliance which combines iconic style with innovative technical design and attention to detail. This appliance coordinates perfectly with other Smeg products, or works equally great as a standalone statement piece in your kitchen. We hope you enjoy using your new appliance! For further information about the product please visit: www.smeg50style.com or www.smeg.com.
Contents 1.1 1.2 1.3 1.4 1.5 1.6 1.7 Introduction User Manual Intended use General safety instructions Manufacturer liability Identification plate Disposal 2 Description 2.1 Product description 3 Use 22 22 22 23 25 25 25 26 26 27 3.1 Before first use 3.2 Assembly 3.3 Using the slow juicer 4 Cleaning and maintenance 4.1 4.2 4.3 4.4 4.5 22 EN 1 Instructions Instructions Cleaning the surfaces Cleaning the slow juicer Removing the seals and rotating brush for cleaning What to do if...
Instructions 1 Instructions 1.1 Introduction Important information for the user: Instructions General information on this user manual, on safety and final disposal. Description Description of the appliance and its accessories. Use Information on the use of the appliance and its accessories, advice regarding preparations. Cleaning and care Information for correct cleaning and care of the appliance. Safety instructions Information Advice 22 1.
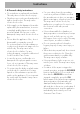
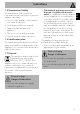
Instructions • Do not plug in or unplug with wet hands. This may cause electric shock or injury. • Plug the power cord correctly and push it tight in a wall socket. This may cause electric shock or fire. • If the supply cord is damaged, it must be replaced by the manufacturer, its service or similarly qualified persons in order to avoid a hazard. If the power cord is damaged, it may cause electric shock or fire. • Never alter the appliance. Also, do not disassemble or repair by yourself.
Instructions • During operation, do not try to move the body, disassemble the chamber set or parts and try to lock them. This may cause injuries or failures. Always switch off the appliance and unplug the power cord before carrying out any operation. • When using the appliance, avoid wearing neckties, long necklaces, scarves, etc., which could get entangled into the hopper chute. This may cause injury, failure or breakage. • Place the appliance on a flat and stable surface. This may cause injury or failure.
1.5 Manufacturer liability The manufacturer shall not be held responsible for personal injuries or property damage caused by: • Any use of the appliance other than the one it was designed for. • Not having read the user manual. • Tampering with any part of the appliance. • The use of non-original spare parts. • Not following the safety instructions. 1.6 Identification plate The identification plate bears the technical data, serial number and brand name of the appliance.
Description 2 Description 2.
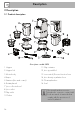
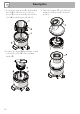
Use 3 Use Danger of electrocution 1. Insert the strainer (1) into the slots on the rotating brush (2) until it locks into position. • Plug the appliance into a grounded three-pin socket. • Do not remove earth prong. • Do not use an adapter. • Do not use an extension cord. • Failure to follow these instructions could result in death, fire, or electrical shock. 3.1 Before first use 1. Remove any protective packaging from the outside or inside of the appliance, and its accessories. 2.
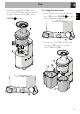
Description 3. Position the strainer unit (1) and rotating brush (2) inside the juice collector bowl (3) so as to insert the unit into the slots (4) on the bottom of the bowl. 4. Position the auger (5) by turning it so that it fits into the slots (6) on the rotating brush (2). 28 5. Place the hopper (7) onto the bowl, turning it clockwise until it locks into position.
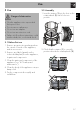
Use CLOSE position. 3.3 Using the slow juicer 1. Check that the juice density regulation lever (10) is in the CLOSE position before starting the appliance. 2. Place the juice jug (11) and the pulp container (12) under the relative outlets (13) and (14). 29 EN 6. Install the assembled unit (8) onto the motor body (9).
Use 3. Push the lever switch upwards (15) to start the juicer. 5. Open the juice outlet (18) before the juice collector bowl becomes full and move the juice density regulation lever (10) to the half-open position before adding the last ingredients. 4. Introduce the ingredients into the feed chute of the hopper (16) a little at a time using the pusher provided (17). 6. When juicing is complete, stop the juicer, placing the lever switch (15) to the middle position.
How to use the juice density regulation lever CLOSE position Use the lever in the CLOSE position during the initial phases of fruit or vegetable juice extraction. HALF-OPEN position Use the lever in the HALF-OPEN position during the last phases of juicing, when the final ingredients are introduced and when removing residues. If semi-hard ingredients are used such as grapes, pomegranates, blackberries, etc. move the lever into this position as soon as the juice starts to exit from the outlet.
Use How to use the REVERSE function Moving parts Risk of personal injury or damage to the appliance • Do not operate the appliance for more than 30 minutes at a time. Leave the appliance to cool down and wait 5 minutes before starting it again. • Do not insert fingers, forks or spoons into the juice and pulp outlets. This could cause personal injury or damage the appliance.
Cleaning and care 4.1 Instructions Improper use Danger of electrocution • Switch off and unplug the appliance before cleaning it and its parts. Improper use Risk of damage to surfaces • Do not use steam jets to clean the appliance. • Do not use cleaning products containing chlorine, ammonia or bleach on steel parts or parts with metallic finishes on the surface (e.g. anodizing, nickel- or chromium-plating). • Do not use abrasive or corrosive detergents (e.g.
Cleaning and care • Juice collector bowl seal: Grasp the seal on the bottom of the bowl and lift upwards to remove it. • Use the cleaning brush provided to clean the internal and external parts of the rotating brush unit under running tap water. • Rotating brush: Remove the blades as shown. Clean and wash the slow juicer immediately after use. Residues may dry out and make disassembly and cleaning difficult, as well as affect the operation of the appliance.
Cleaning and care 4.5 What to do if... Probable cause Solution The plug is not properly inserted into the power socket. Insert the plug into the power socket. Do not use adaptors or extension cords. Check that the main power switch is turned on. The appliance does not work EN Problem Make sure that the hopper The hopper has not been installed is installed properly properly. following the assembly instructions.
Cleaning and care Problem Probable cause The juice collector bowl does not fit onto the juicer Lever is in the OPEN position. body The juice collector bowl vibrates when the juice is being extracted Before fitting the bowl onto the juicer body make sure that the lever is in the CLOSE position. Hard ingredients (carrots, chicory, A slight vibration is normal, especially when processing beetroot, etc.) hard ingredients.