Contents 1.1 1.2 1.6 1.7 General safety instructions Appliance purpose Disposal How to read the user manual 2 Description 2.1 General Description 2.2 Control panel 3 Use 3.1 3.2 3.3 3.4 Instructions Cleaning the surfaces Ordinary weekly cleaning Food stains or residues What to do if... 5 Installation 5.1 5.2 5.3 5.4 5.5 5.6 30 33 34 35 36 36 37 38 Instructions Preliminary operations Switching on the hob for the first time Using the hob 4 Cleaning and maintenance 4.1 4.2 4.3 4.4 4.
Instructions 1 Instructions 1.1 General safety instructions Risk of personal injury • During use the appliance and its accessible parts become very hot. • Never touch the heating elements during use. • Protect your hands by wearing heatproof gloves during use. • Never try to put out a fire or flames with water: Turn off the appliance and smother the flames with a fire blanket or other appropriate cover.
• DO NOT USE AEROSOLS IN THE VICINITY OF THIS APPLIANCE WHILST IT IS IN USE. • Switch off the appliance immediately after use. • DO NOT MODIFY THIS APPLIANCE. • Always use any necessary/required personal protective equipment (PPE) before performing any work on the appliance (installation, maintenance, positioning or movement). • Before performing any work on the appliance, switch off the power supply.
Instructions • Do not place materials or substances that could melt or catch fire (paper, plastic or aluminium foil) on the appliance while it is in use. • Place the cookware directly on the glass ceramic surface. • Do not put empty pans or frying pans on switched on cooking zones. • Do not use rough or abrasive materials or sharp metal scrapers. • Do not use cleaning products containing chlorine, ammonia or bleach on parts made of steel or that have metallic surface finishes (e.g.
• Activate the controls lock when you have children or pets which could reach the hob. • After use the cooking zones remain hot for a certain period of time after they have been turned off. Do not touch the hob surfaces. • After use, switch off the plates. Never rely solely on the cookware detector. • Supervise children carefully as they cannot readily see the residual heat indication. After use the cooking zones remain hot for a certain period of time even if they have been turned off.
Instructions 1.4 Identification plate The identification plate bears the technical data, serial number and brand name of the appliance. Do not remove the identification plate for any reason. 1.5 This user manual This user manual is an integral part of the appliance and must therefore be kept in its entirety and within the user’s reach for the whole working life of the appliance. • Read this user manual carefully before using the appliance. 1.
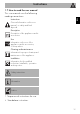
Instructions EN 1.7 How to read the user manual This user manual uses the following reading conventions: Instructions General information on this user manual, on safety and final disposal. Description Description of the appliance and its accessories. Use Information on the use of the appliance and its accessories, cooking advice. Cleaning and maintenance Information for proper cleaning and maintenance of the appliance.
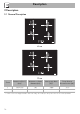
Description 2 Description 2.1 General Description 60 cm 70 cm Zones Dimensions (H x L) (mm) Minimum cookware diameter (mm) Max. power draw (W)* Power draw in Booster function (W)* 1 2 150 x 150 90 1200 1600 210 x 210 130 1500 2000 * Power levels are approximate and can vary according to the pan used or the settings made.
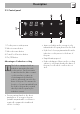
Description EN 2.2 Control panel 1 Cooking zones setting area 2 Value increase button 3 Value decrease button 4 Control lock function button 5 On/Off button Advantages of induction cooking The hob is equipped with an induction generator for each cooking zone. Each generator located under the glass ceramic cooking surface creates an electromagnetic field which induces a thermal current in the base of the pan.
Use 3 Use 3.1 Instructions High temperature Danger of burns • Protect your hands by wearing heatproof gloves during use. • Do not touch or clean the hob surface during operation or when the residual heat indicator lights are still on. • Do not put empty pans or frying pans on switched on cooking zones. • Keep children under the age of 8 away from the appliance when it is in use. • Activate the controls lock when you have children or pets which could reach the hob.
3.2 Preliminary operations 3.4 Using the hob In order to remove any moisture that could have accumulated during the manufacturing process and for the electronic circuits and control keypad to work properly: 1. Remove the protective films from the external surfaces of the appliance and accessories. 2. Remove any labels (apart from the technical data plate). 3. Place a pan full of water on each of the front cooking zones and switch them on to the maximum power setting for at least 30 minutes. 4.
Use Unsuitable cookware: • Copper, stainless steel, aluminium, fireproof glass, wood, ceramic and terracotta cookware. To see whether the pan is suitable, bring a magnet close to the bottom: if it is attracted, the pan is suitable for induction cooking. If you do not have a magnet, you can put a small amount of water in the pan, place it on a cooking zone and start the hot plate. If the symbol appears on the display, it means the pan is not suitable.
Use Under certain circumstances, if the hob and the oven are used at the same time, the maximum power limit of the electrical system might be exceeded. Switching the hob on and off Keep the On/Off button pressed in for at least 1 second to activate the hob. Keep the button pressed in for at least 2 seconds to deactivate the hob. If no power value is selected within a few seconds, the hob is automatically deactivated. Switching on the cooking zone After switching on the hob: 1.
Use Power levels Booster Function The power in the cooking zone can be adjusted to various levels. The table shows the levels suitable for various types of cooking. This function allows you to use the maximum possible power for the cooking zone. After activating the required cooking zone: Power level Suitable for: 0 OFF setting 1-2 Cooking small amounts of food (minimum power) 2. Press the button again; the symbol will be shown on the display.
Use while will appear on the display of the adjacent cooking zones. If one of the front zones has been selected, the digits of the countdown will appear on the displays of the rear zones and vice versa. 4. Use the and buttons to select the minutes (pressing continuously allows you to advance quickly). 5. Press any select cooking zone button or wait 10 seconds to start the timer. • The display of the timed zone now shows the previously set power level with a dot at the lower right (e.g. ).
Use Cooking guidelines Setting the power level of the appliance The table below shows the power values which can be set, together with the corresponding type of food. Settings may vary depending on the amount of food and consumer taste. Power level 1-2 3-4 5-7 8-9 P Suitable for: Reheating food, keeping small amounts of water on the boil, and whipping up sauces with egg yolk or butter.
Use EN • Press the and buttons at the same time to save the new power value. The appliance will switch off and you will have to switch it on again in order to use it with the new power limits. • If you do not wish to save the changes, simply do not use the display for at least 60 seconds. The following procedure can be used to adjust the maximum power from 2.8 to 1.0 kW (low power regime): 1. Follow the instructions described above as far as point 4. 2. Press the and buttons at the same time.
Cleaning and maintenance 4 Cleaning and maintenance 4.1 Instructions Improper use Risk of damage to surfaces • Do not use steam jets to clean the appliance. • Do not spill sugar or sweet mixtures on the hob during cooking. • Do not place materials or substances that could melt (plastic or aluminium foil). • Keep sensor buttons clean at all times and do not rest any object on them.
Cleaning and maintenance 4.5 What to do if... EN The hob does not work: • Make sure that the hob is connected and that the main switch is turned on. • Make sure that there is no power failure. • Make sure that the fuse has not blown. In this case replace the fuse. • Make sure that the circuit breaker of the residential electrical system has not tripped. In this case, reset the circuit breaker. The cooking results are unsatisfactory: • Make sure that the cooking temperature is not too high or too low.
Installation 5 Installation 5.1 Electrical connection Power voltage Danger of electrocution • Have the electrical connection performed by authorised technical personnel. • Use personal protective equipment. • The appliance must be connected to earth in compliance with electrical system safety standards. • Disconnect the mains supply. • Do not pull the cable to unplug the appliance. • Use cables withstanding a temperature of at least 90°C.
Installation Run the power cable in the rear part of the unit. Make sure that it does not come into contact with the lower part of the hob or a builtin oven below it. Be careful when connecting additional electrical appliances. Connection cables must not come into contact with hot cooking zones. Testing At the end of installation, carry out a brief inspection test.
Installation 5.4 Section cut from the countertop The following operation requires building and/or carpentry work and must therefore be carried out by a competent tradesman. Installation can be carried out on various materials such as masonry, metal, solid wood or plastic laminated wood as long as they are heat resistant (>90°C). Create an opening with the dimensions shown in the figure in the countertop of the piece of furniture.
Installation EN Mounting dimensions (semi-flush built-in model) opens on bottom and on rear A min. 500 B min. 460 L 600 - 700 C min. 750 X 560 D 30 - 50 E min. 50 Y 482 5.5 Mounting Over built-in oven unit The clearance between the hob and the kitchen units or other built-in appliances must be enough to ensure sufficient ventilation and air discharge. If installed above an oven, a space must be left between the bottom of the hob and the top of the appliance installed below.
Installation opens on bottom opens on rear Failure to install the double-layer wooden base exposes the user to possible accidental contact with sharp or hot parts. Ventilation The illustrations below show two examples of installation suitable for proper ventilation and one example of incorrect installation to be avoided. Hob seal To prevent leakage of liquid between the frame of the hob and the countertop, place the adhesive seal provided along the entire outer edge of the hob before assembly.
Installation There are two fastening options depending on the configuration of the unit in which the appliance will be installed: 1 Side holes. 2 Front and rear holes. To fasten the hob: 1. Unscrew the screws from the holes shown in the following figures, according to the fastening option chosen. 2. Fasten the hob to the structure using the screws that were removed by passing them through the holes in the fixing brackets (A). EN 5.