Contents 1.1 1.2 1.3 1.4 1.5 1.6 1.7 1.8 General safety instructions Instructions for using microwaves Manufacturer liability Appliance purpose Identification plate Disposal This user manual How to read the user manual 2 Description 2.1 2.2 2.3 2.4 2.5 General Description Control panel Other parts Microwaves Available accessories 3 Use 3.1 3.2 3.3 3.4 3.5 3.6 3.7 3.
Instructions 1 Instructions IMPORTANT SAFETY INSTRUCTIONS PLEASE READ CAREFULLY AND RETAIN FOR FUTURE USE. 1.1 General safety instructions Risk of personal injury • WARNING: If the door or the door seal is damaged, the oven must not be used until it has been repaired by authorised persons. • WARNING: It is hazardous for anyone other than a competent person to carry out any service or repair operation which involves the removal of a cover which offers protection against exposure to microwave energy.
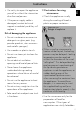
Instructions 1.2 Instructions for using microwaves • Check the appliance visually during the cooking of foods in plastic or paper containers. EN • Do not try to repair the appliance yourself or without the intervention of authorised persons. • If the power supply cable is damaged, contact technical support immediately and they will replace it. Improper use Danger of explosion Risk of damaging the appliance • Do not use abrasive or corrosive detergents on glass parts (e.g.
Instructions (e.g. drying clothes, warming slippers, sponges, wet cloths or the like, dehydrating foods) because they can lead to the risk of injury or fire. • Clean the appliance constantly and remove any food residue. • Do not use the microwave to dry food. • Do not use the microwave to heat oils or fry. • Do not use the appliance to heat foods or beverages containing alcohol. • Baby food should not be heated in sealed containers. Remove the cover or the teat (in the case of baby bottles).
1.3 Manufacturer liability 1.6 Disposal The manufacturer declines all liability for damage to persons or property caused by: • Use of the appliance other than the one envisaged; • Non-observance of the user manual provisions; • Tampering with any part of the appliance; • Use of non-original spare parts. This appliance must be disposed of separately from other waste (Directives 2002/95/EC, 2002/ 96/EC, 2003/108/EC).
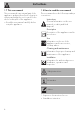
Instructions 1.7 This user manual 1.8 How to read the user manual This user manual is an integral part of the appliance and must therefore be kept in its entirety and within the user’s reach for the whole working life of the appliance. • Read this user manual carefully before using the appliance. This user manual uses the following reading conventions: Instructions General information on this user manual, on safety and final disposal. Description Description of the appliance and its accessories.
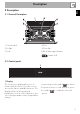
Description EN 2 Description 2.1 General Description 1 Control panel 2 LH light 3 Seal 4 Door 5 Oven fan 6 Rack/tray support frames Frame shelf 2.2 Control panel 1 Display The touchscreen display allows you to interact with the device. Press the icons to access the various available functions. The display will show all operational parameters, such as: selected function, preset cooking programs or time/temperature settings.
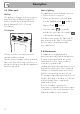
Description 2.3 Other parts Interior lighting Shelves The appliance's interior lighting comes on: • When the door is opened • When any function is selected, apart from the Sabbath mode and the The appliance features shelves to position trays and racks at different heights. The insertion heights are indicated from the bottom upwards (see 2.1 General Description). Cooling fan Vapour Clean • Press the symbol function. to manually activate the oven light or the symbol to deactivate it during use.
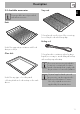
Description Tray rack EN 2.5 Available accessories Some models are not provided with all accessories. Rack To be placed over the top of the oven tray; for cooking foods which may drip. Boiling rod Useful for supporting containers with food during cooking. Glass dish To be placed in containers when heating liquids, necessary to avoid delayed boiling with resulting superheating.
Use 3 Use Improper use Risk of damage to enamelled surfaces 3.1 Instructions High temperature inside the oven during use Danger of burns • Keep the oven door closed during cooking. • Protect your hands wearing heat resistant gloves when moving food inside the oven. • Do not touch the heating elements inside the oven. • Do not pour water directly onto very hot trays. • Do not allow children to get near the oven when it is in operation.
NOT TO BE USED Metal • Aluminium foil • Aluminium trays These can lead to arcing or sparks. • Plates • Metal utensils • Freezer bags tie wraps Wood Crystal glasses Paper Risk of fire. Expanded polystyrene Risk of food contamination. containers *only if heat-resistant Dishes must be free of metal decorations. Testing dishes The microwave function can be used without any food inside the oven only for this test.
Use 3.3 Using the accessories Racks and trays Racks and trays have to be inserted into the side guides until they come to a complete stop. • The mechanical safety locks that prevent the rack from being taken out accidentally have to face downwards and towards the oven back. High temperature Danger of burns • When using any of the microwave functions the rack can become very hot. Use heat-resistant gloves for handling. Gently insert racks and trays into the oven until they come to a stop.
Boiling rod 3.4 Using the oven When using the microwave to heat or reheat liquids, the boiling process may be delayed while the liquids nevertheless exceed 100 degrees. To avoid this dangerous phenomenon, it is necessary to insert the supplied boiling rod (or a heatresistant plastic spoon) in the container while heating. First use EN Use On the first use, or after a power failure, will flash on the appliance’s display.
Use Home screen Press the time on the display. It is now possible to select the various available functions on the “home screen” of the appliance. Microwave functions Improper use Risk of damage to the appliance When using the microwave functions, food must be placed in a suitable container on the rack inserted in the first runner. DO NOT USE CONTAINERS/ ACCESSORIES (trays, glass dishes, etc.) PLACED DIRECTLY ON THE FLOOR OF THE OVEN.
Use 2. Select the cooking functions on the “home screen”. 4. Press the symbol cooking duration. to modify the EN 1. Place the food to be heated inside the oven. icon 5. Enter the required duration (for example 5 minutes: first touch the minutes box, then the numbers 0 and 5). 3. Select the required function. 6. Press the symbol to confirm. When cooking using only the microwave function, the appliance does not perform preheating. The food can be placed immediately inside the appliance.
Use 7. Press the symbol to change the microwave power level (from 100W to 1000W). 8. Press the symbols and to set the required temperature (e.g. 900 W). 9. Press the symbol 18 to confirm. 10. Press the symbol microwave cooking. to start 11. The chosen function, the selected power level, the current time and the time remaining until the end of the function will be shown on the display.
12. At the end of the cooking cycle, “microwave function ended” appears on the display and a buzzer will sound that can be deactivated by pressing the symbol or . QUICK START microwave function The QUICK START function allows the microwave to be started quickly. This is useful for heating small quantities of liquid or food. 1. Press screen”. on the “home 2. Press the symbol to confirm the QUICK START function.
Use Combined functions Combination cooking is a mix of traditional cooking and microwave operation. 1. Select the cooking functions on the “home screen”. icon Combination functions list Improper use Risk of damage to the appliance • Do not use the combined functions to heat or boil liquids. 2. Select the required “combined” function. Microwave + Grill The use of the grill results in perfect browning of the food’s surface.
It is now possible to modify: • The cooking duration (press the symbol ); 4. After placing the food in the oven, press the control knob to start cooking. • The cooking temperature (press the temperature value, 170° in the example figure); • The microwave power (press the symbol ). 3. After entering the required changes, press the symbol to start the type of combination cooking selected. The appliance will begin preheating.
Use Traditional cooking functions 1. Select the cooking functions on the “home screen”. icon 2. Press the symbol to access the traditional functions menu. 3. Select the required function. 22 4. The appliance will begin preheating. The display will show the chosen function, the pre-set temperature, the current time and the progress bar of the temperature reached (preheating). 5. When the preheating stage is over a buzzer will sound to indicate that the food can be placed inside the oven.
Changing a function during cooking 1. Press the symbol corresponding to the function you wish to modify. 2. Press the symbol to access the traditional functions menu. 4. The display will show the new function chosen, the preset temperature, the current time and the progress in reaching the new temperature (automatic pre-heat). Changing the preset temperature 1. Press the displayed temperature to change it. 3. Press the symbol of the new function required. 2. Press the symbols and required temperature.
Use 3. Press the symbol to confirm. Traditional functions list Eco The combination of the fan and the circular heating element, in ECO mode, is particularly indicated for cooking on a single shelf, with reduced power consumption. Interrupting a function Press the return symbol for approximately 2 seconds to interrupt a cooking function. Select the required option. Press and hold the return symbol for a few seconds to immediately interrupt cooking at any time and return to the main menu.
Fan grill The air produced by the fan softens the strong heatwave generated by the grill, perfectly grilling even very thick cuts of meat such as steaks, pork chops etc. Baker’s function The combination of the fan with just the bottom heating element allows cooking to be completed more rapidly. This system is recommended for sterilising or for finishing off the cooking of foods which are already well-cooked on the surface, but not inside, which therefore need a little more heat.
Use 3. Enter the required duration (for example 25 minutes: first touch the minutes box, then the numbers 2 and 5). 4. Press the symbol to confirm. 5. The countdown starts. Timed cooking Timed cooking is the function which allows a cooking operation to be started and then ended after a specific length of time set by the user. Activation of timed cooking cancels any minute minder timer which may previously have been set. 1. Press the symbol function. 2. Press duration. during a cooking 6.
Use Modifying the data set during timed cooking EN 4. Press the symbol to confirm. 5. Timed cooking starts. During operation, it is possible to modify timed cooking duration: 1. Press the symbol 2. Press duration. . 6. At the end of the cooking cycle, “function ended” appears on the display and a buzzer will sound that can be deactivated by pressing the symbol or . 3. Enter the new required duration and press the symbol to confirm.
Use 3. Enter the required end of cooking time (for example 19.30: first touch the hours box, then the numbers 1 and 9; next, touch the minutes box and then the numbers 3 and 0). 7. It will then proceed with the selected function. 8. At the end of the cooking cycle, “function ended” appears on the display and a buzzer will sound that can be deactivated by pressing the symbol 4. Press the symbol to confirm. 5. The appliance waits for the delay start time. 6.
Use After modifying the cooking duration, the end of cooking time must be re-set. During operation, it is possible to modify programmed cooking duration: 1. Press the symbol . 2. Enter the new duration required (for example 35 minutes) and press the symbol to confirm. Traditional cooking tips EN Modifying the data set during programmed cooking General advice • Use a fan assisted function to achieve consistent cooking at several levels.
Use Advice for cooking desserts/pastries and biscuits • Use dark metal moulds: They help to absorb the heat better. • The temperature and the cooking time depend on the quality and consistency of the dough. • To check whether the dessert is cooked right through: At the end of the cooking time, put a toothpick into the highest point of the dessert. If the dough does not stick to the toothpick, the dessert is cooked.
Proving The proving function, using the heat coming from the top, makes it possible to prove all types of dough, guaranteeing perfect results quickly. Timer The timer can be set from a minimum of 1 minute to a maximum of 4 hours. 1. Select timer from the “special functions” menu. Reheat This function allows you to reheat previously cooked food kept cool or in the refrigerator. Sabbath mode This function allows food to be cooked in accordance with the provisions of the Jewish religion day of rest. 2.
Use 5. Wait for the buzzer to indicate that the time has finished. The symbol flashes. Defrost by weight 1. Place the food inside the appliance. 2. Select defrost by weight from the “special functions” menu. Press the or symbol to turn off the buzzer. To select another timer, press the symbol again. 6. If you leave the timer setting screen, the symbol will be displayed at the top left, indicating that a timer is active. You must return the counter to zero to remove the special timer. 3.
Use 7. Press the symbol to start the defrost by weight function. 8. The defrost by weight function starts. 9. When finished “function ended” appears on the display and a buzzer will sound that can be deactivated by pressing the symbol . Pre-set parameters: Type Weight (kg) Time Meat 0.5 01h 45m Fish 0.4 00h 40m Fruit 0.3 00h 45m Bread 0.3 00h 20m EN 6. Select start to begin defrosting or select change to modify the set parameters. Defrost by time 1. Place the food inside the appliance.
Use 5. Press the symbol again in order to start the defrost by weight function. 6. Defrost by weight starts. 7. While the function is in progress, it is still possible to modify the duration of the defrosting (see “Timed cooking”). Press the symbol to make the required changes. 8. When finished “function ended” appears on the display and a buzzer will sound that can be deactivated by pressing the symbol .
Proving 4. Close the door and press the symbol to restart the function. 5. If necessary the appliance will again ask for rotation of the dish. The display will show the instruction “open door and rotate dish”. 6. For the second rotation the door will need to be opened and the dish turned by 180°. 1. Position the dough to prove on the second level. 2. Select proving from the “special functions” menu. 7. Close the door and press the symbol restart the function. 3. Press the symbol to start proving. 4.
Use 6. While the function is in progress, it is possible to set a timer for a maximum of 4 hours (see “Microwave functions”), a proving duration (see “Timed cooking”) or delayed proving (see “Delayed cooking”). Press the symbol to make the required changes. Unless otherwise set, the proving will have a maximum duration of 13 hours. Reheat This function allows you to heat previously cooked food which has been kept cool or in the refrigerator. 1. Place the food to be heated inside the oven. 2.
Sabbath mode This function results in the appliance operating in a particular way: • Cooking can proceed indefinitely, it is not possible to set any cooking duration. • No preheating will be performed. • The cooking temperature which can be selected varies between 60-100 °C. • Oven light turned off, any action such as opening the door or switching it on manually does not turn on the light. • The internal fan remains turned off. • Sound signals deactivated.
Use 3.6 Preset programs Starting a program This mode allows you to select a previously stored program for cooking food. The appliance will automatically calculate the optimum cooking parameters according to the weight selected. 1. Press the symbols and to select the type of dish required from the “preset programs” menu. Then press on the name of the dish to confirm. Select the preset programs icon on the “home screen”. 2.
4. Press the symbol weight of the dish. to modify the 5. Use the symbols and to set the weight (in kilograms) of the dish. 9. If you select the start option, cooking will start using the default program settings and all the set parameters will be shown on the display. The time indicated does not include the time required to reach the set temperature. Some of the predefined cooking parameters can be changed at any time, even after cooking has started. 6. Press the symbol to confirm. 7.
Use End of program 1. The appliance will warn the user when the program finishes via the buzzer and the flashing symbol. 2. To perform a new cooking cycle with the parameters that are already set up, press the symbol (press it twice if the buzzer is on). The appliance will restart cooking automatically if it is still at the correct temperature, otherwise it will also restart the preheating stage. Cooking dishes one after another is useful when cooking dishes of the same type.
• Cooking function 3. Make the required changes. 4. To save the program, press the symbol . You will be prompted to confirm the changes you have just made. • Cooking duration If you do not confirm the changes the program will remain unchanged. • Frame shelf 5. If you confirm the changes, the display will show a confirmation message.
Use Predefined programs table MEAT Subcategory Roast beef Pork loin Cooking Weight (Kg) Function MW (W) Shelf Temp. (°C) Time (minutes) rare 1 - 1 200 50 medium 1 - 1 200 60 well done 1 - 1 200 90 fresh 1 300 1 190 60 medium 1.2 300 1 190 55 Well done 1.2 300 1 190 60 Lamb Veal fresh 1 300 1 190 70 Pork spare ribs fresh 1 - 3 250 16 Pork chops fresh 1 - 3 250 15 Pork sausages fresh 1 - 3 250 12 Bacon fresh 0.
FISH Subcategory Cooking Weight (Kg) Function MW (W) Shelf Temp. (°C) Time (minutes) Fish fresh 0.5 300 1 160 30 Fish frozen 0.5 300 1 160 40 Firm fish fresh 0.5 300 1 160 20 Delicate fish fresh 0.5 300 1 160 35 Snapper fresh 1 300 1 160 40 Flounder fresh 0.5 300 1 160 30 MW (W) Shelf Temp. (°C) Time (minutes) VEGETABLES Subcategory Cooking Weight (Kg) Function Grilled vegetables fresh 0.
Use DESSERTS/PASTRIES Subcategory Cooking Weight (Kg) Function MW (W) Shelf Temp. (°C) Time (minutes) Ring cake fresh 1 - 1 160 60 Biscuits fresh 0.6 - 1 160 18 Muffins fresh 0.5 - 1 160 18 Profiteroles fresh 0.5 - 1 180 70 Meringues fresh 0.3 - 1 120 90 Sponge cake fresh 1 - 1 160 60 Strudel fresh 0.5 300 1 180 15 Tarts fresh 0.8 - 1 170 40 Brioche bread fresh 1 - 1 180 40 Croissants fresh 0.6 - 1 160 30 MW (W) Shelf Temp.
PIZZA Subcategory Cooking Weight (Kg) MW (W) Shelf Temp. (°C) Time (minutes) 1 - 1 250 9 Function Pan baked pizza fresh Pizza frozen 0.3 - 1 250 8 Stone baked pizza fresh 0.5 - 1 250 6 MW (W) Shelf Temp. (°C) Time (minutes) PASTA Subcategory Cooking Weight (Kg) Function Pasta bake fresh 2 - 1 220 40 Lasagne fresh 2 - 1 230 35 Lasagne frozen 0.3 500 1 230 9 Paella fresh 0.5 - 1 190 25 Quiche fresh 1 - 1 200 40 Soufflé fresh 0.
Use 3.7 Personal programs This menu allows you to enter a personal program with the parameters you wish to use. On first use, the appliance will only offer to let you add a new recipe. After storing your personal recipes, these will then be available in the relative menu. Select the personal programs All the parameters that can be modified are highlighted in yellow on the main screen. icon on the “home screen”. 2.
• Frame shelf • Weight of dish 3. Make the required changes. 4. To save the program, press the symbol . The appliance will ask you to enter a name for the recipe you have just created. The name must contain at least one character in order to store the recipe. 6. After having entered the name of the new recipe, press the symbol to confirm. 7. You will be prompted to confirm the changes you have just made. Select yes if you wish to save the recipe. Selecting no will result in the recipe not being saved.
Use Using a personal recipe Changing a personal recipe 1. Select a personal recipe from the “personal recipes” menu (in the example, the recipe recipe 1 has been stored). 1. Select a personal recipe from the “personal recipes” menu (in the example, the recipe recipe 1 has been stored). 2. Select start. 2. Select change. 3. Cooking will start with the parameters previously set for the recipe. 3. Repeat the same steps starting from point 2 in chapter “Adding a recipe”. Deleting a personal recipe 1.
2. Select delete. Delayed cooking 1. Select a personal recipe from the “personal recipes” menu (in the example, the recipe recipe 1 has been stored). 3. Confirm the deletion. Select yes to permanently delete the recipe. 2. Select function delayed. 4. If you confirm the deletion, the display will show confirmation of this. 3. Enter the required end of cooking time (for example 19.30: first touch the hours box, then the numbers 1 and 9; next, touch the minutes box and then the numbers 3 and 0).
Use 4. Press the symbol to confirm. 5. The appliance waits for the delay start time. Language Sets the interface language from those available. 1. Select language from the “settings” menu. 3.8 Settings The product’s configuration can be set using this menu. Select the settings 2. Press the symbols and the required language. icon on the “home screen”. 3. Confirm the selected language. If there is a temporary power failure, all personalised settings remain active.
Clock Control lock Sets the time displayed. 1. Press the symbols or and select clock from the “settings” menu. Allows the appliance to automatically lock the controls after one minute of normal operation without any intervention from the user. 1. Press the symbols or and select control lock from the “settings” menu. 2. Enter the current time. 2. To confirm activation of the control lock select yes. 3. Press the symbol to confirm.
Use Demo mode (for showrooms only) Eco-Logic Allows the appliance to turn off the heating elements, but at the same time to keep the control panel active. This mode allows the appliance to limit the power used. Suitable for simultaneous use with further home appliances. 1. Press the symbols or and select demo mode from the “settings” menu. If this option is active, the symbol will appear on the display next to the function. 1. Press the symbols or and select eco-logic from the “settings” menu. 2.
Sound The appliance makes a sound each time a symbol on the display is pressed. This setting disables these sounds. 1. Press the symbols or an select keep warm from the “settings” menu. 1. Press the symbols or and select sound from the “settings” menu. 2. To confirm the activation of the keep warm function select yes. 2. To disable the sound associated with the pressing of the symbols on the display select no.
Use Eco-Light For greater energy savings, the light is turned off automatically one minute after the start of cooking. Digital clock Displays the time in digital format. 1. Press the symbols or and select eco-light from the “settings” menu. 1. Press the symbols or and select digital clock from the “settings menu. 2. To confirm the activation of the eco-light mode select yes. 2. To confirm the activation of the digital clock select yes.
Cleaning and maintenance 4.1 Instructions High temperatures inside the oven after use Danger of burns • Perform cleaning only after letting the appliance cool down. Improper use Risk of damage to surfaces • Do not use steam jets to clean the appliance. • Do not use cleaning products containing chlorine, ammonia or bleach on steel parts or parts with metallic finishes on the surface (e.g. anodizing, nickel- or chromium-plating). • Do not use abrasive or corrosive detergents (e.g.
Cleaning and maintenance Drying 4.4 Cleaning the oven Cooking food generates moisture inside the appliance. This is a normal phenomenon and does not affect the appliance’s operation in any way. Each time you finish cooking: 1. Let the appliance cool down. 2. Remove any dirt from inside the appliance. 3. Dry the interior of the appliance with a soft cloth. 4. Leave the door open until the inside of the appliance has dried completely.
Removing racks/trays support frames Cleaning the top of the compartment Removing the guide frames enables the sides to be cleaned more easily. This operation should be performed each time the automatic cleaning cycle is used (on some models only). To remove the guide frames: 1. Unscrew the two fastening pins of the frame. The appliance is equipped with a tilting grill element that allows for easy cleaning of the upper part of the oven compartment. 1.
Cleaning and maintenance 4.5 Vapour Clean Vapour Clean is an assisted cleaning procedure which facilitates the removal of dirt. Thanks to this process, it is possible to clean the inside of the oven very easily. The dirt residues are softened by the heat and water vapour for easier removal afterwards. • Spray a water and washing up liquid solution inside the oven using a spray nozzle. Direct the spray against the side walls, upwards, downwards and towards the deflector.
Cleaning and maintenance 2. The duration and temperature of the cleaning cycle will appear on the display. 3. Press the symbol to confirm. The assisted cleaning cycle starts. EN 1. Select the Vapour Clean function from the “special functions” menu. 4. If the temperature inside the oven is too high, an acoustic signal will sound and a warning message on the display will indicate that you should wait for it to cool down. 5. A buzzer will indicate the end of the vapour clean cycle.
Cleaning and maintenance Programmed vapour clean cycle set-up End of the Vapour Clean cycle Like the other cooking functions the time at which the vapour clean cycle starts can be set. 1. After having selected the special function Vapour Clean, press the symbol . 1. Open the door and wipe away the less stubborn dirt with a microfibre cloth. 2. Use an anti-scratch sponge with brass filaments on tougher encrustations. 3. In case of grease residues use specific oven cleaning products. 4.
What to do if... The display is completely off: • Check the mains power supply. • Check whether an omnipolar switch upstream of the appliance supply line is in the “ON” position. The appliance does not heat up: • Check whether it has been set in “demo” mode (for further details see “Demo mode (for showrooms only)”). The controls do not respond: • Check whether it has been set in “control lock” mode (for further details see “Control lock”).
Installation 5 Installation 5.1 Electrical connection Power voltage Danger of electrocution • Have the electrical connection performed by authorised persons. • The appliance must be connected to earth in compliance with electrical system safety standards. • Disconnect the mains power supply. General information Check the grid characteristics against the data indicated on the plate. The identification plate bearing the technical data, serial number and brand name is visibly positioned on the appliance.
Installation Position of the power cable EN 5.3 Positioning Heavy appliance Crushing hazard • Position the appliance into the cabinet cutout with the help of a second person. Pressure on the open door Risk of damage to the appliance • Never use the oven door to lever the appliance into place when fitting. • Avoid exerting too much pressure on the oven door when open. Heat production during appliance operation Risk of fire • Check that the piece of furniture material is heat resistant.
Installation Fastening bushings Appliance overall dimensions (mm) Remove the bushing covers inserted on the oven front. (front view) Mount the appliance into the recess. Secure the appliance to the piece of furniture using screws. Cover the bushings with the covers removed previously.
Installation EN Mounting under worktops (mm) (side view) Make sure that the piece of furniture rear/bottom part has an opening of approx. 60 mm.
Installation Mounting into a column (mm) Make sure that the top/rear part of the piece of furniture has an opening approx. 35-40 mm deep.