
Instruction manual
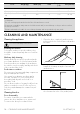
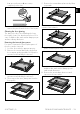
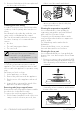
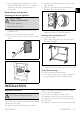

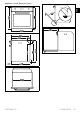
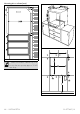
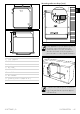
Table Of Contents

INSTALLATION - 41914779401/A
e
3. Put the heating element back into its seat
when finished. Wait until the oven cavity is
completely dry before putting back the
accessories.
Extraordinary maintenance
Replacing the internal light bulb
1. Completely remove all accessories from
inside the oven.
2. Remove the rack/tray support frames.
3. Use a tool (e.g. a spoon) to remove the bulb
cover.
4. Slide out and remove the light bulb.
5. Replace the light bulb with one of the same
type (40 W).
6. Refit the cover. Ensure the moulded part of
the glass (A) is facing the door.
7. Press the cover completely down so that it
attaches perfectly to the bulb support.
Installing and removing the seal
To remove the seal:
• Unhook the clips in the 4 corners then pull
the seal outwards.
To refit the seal:
• Hook the clips in the 4 corners onto the seal.
Seal maintenance tips
The seal should be soft and elastic.
• To keep the seal clean, use a non-abrasive
sponge and wash with lukewarm water.
INSTALLATION
Electrical connection
General information
Check the mains characteristics against the data
indicated on the plate.
The identification plate bearing the technical
data, serial number and brand name is visibly
positioned on the appliance.
Do not remove this plate for any reason.
The appliance must be connected to ground
using a wire that is at least 20 mm longer than
the other wires.
The appliance can work in the following modes:
Power voltage
Danger of electrocution
• Unplug the appliance.
• Wear protective gloves.
See General safety instructions.