.1 1.2 1.3 1.4 1.5 1.6 1.7 General safety warnings Purpose of the appliance Manufacturer's liability This User Manual Identification plate Disposal How to read the User Manual 2 Description 2.1 2.2 2.3 2.4 General description Control panel Other parts Available accessories 3 Use 3.1 3.2 3.3 3.4 3.5 4 4 8 8 8 8 8 9 10 10 12 14 14 16 Warnings First use Use of accessories Using the oven Cooking tips 16 16 17 18 20 4 Cleaning and maintenance 24 4.1 4.2 4.3 4.4 4.
Warnings 1 Warnings 1.1 General safety warnings Injury to persons • This appliance and its accessible parts get very hot during use. Do not touch the heating elements during use. • Protect your hands by wearing oven gloves when moving food inside the oven. • Never attempt to extinguish flames/fire with water. Turn off the appliance and cover the flame with a lid or a fire-proof blanket.
• Turn off the appliance after use. • DO NOT USE OR STORE FLAMMABLE MATERIALS NEAR THE APPLIANCE. • DO NOT USE AEROSOLS IN THE VICINITY OF THIS APPLIANCE WHILST IT IS IN USE. • DO NOT MODIFY THIS APPLIANCE. • Qualified personnel should carry out the installation and servicing in compliance with existing regulations. • Do not attempt to repair the appliance yourself or without the intervention of a qualified technician. • Do not pull the cable to remove the plug.
Warnings • Do not use plastic dishes or containers for cooking or baking food. • Do not place sealed tins or containers in the oven cavity. • Remove all trays and racks which are not required during cooking. • Do not cover the bottom of the oven with sheets of aluminum or tin foil. • Do not place pots or pans directly on the bottom of the oven. • If you wish to use greaseproof paper, place it so that it will not interfere with the hot air circulation inside the oven.
Warnings • Before any operation on the appliance (installation, maintenance, positioning or movement) always wear PPE. • Before performing any operation on the appliance, switch off the power supply. EN • After carrying out any operation, check that the tightening torque of gas connections is between 10 Nm and 15 Nm. • After installation is complete, check for any leaks with a soapy solution, never with a flame.
Warnings 1.2 Purpose of the appliance • This appliance is designed for cooking or baking food in the home. Any other use is inappropriate. • This appliance is not designed to work with external timers or remote control systems. 1.
Warnings Electric voltage Danger of shock • Turn off the main electrical power supply. • Unplug the power cord from the power outlet. • Take the appliance to a suitable recycling center for electric and electronic waste, or return it to the dealer when purchasing an equivalent product, as a one-on-one exchange. Please note that non-polluting, recyclable materials are used for the packaging of the appliance. • Take packaging materials to appropriate recycling centers.
Description 2 Description 2.
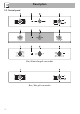
EN Description Gas / Gas grill oven models 1 Control panel 2 Light 3 Gasket 4 Door 5 Fan (on some models only) 6 Gas oven 7 Gas grill (on some models only) 8 Electric grill (on some models only) Frame rack 11
Description 2.
1 Electromechanical minute minder timer knob 2 Electric grill heating element bulb (gas grill models excluded) In order to use the minute minder timer, the buzzer must be set by turning the knob clockwise. The numbers correspond to minutes (maximum 90 minutes). Adjustment is progressive and you can set the timer at any intermediate position between the numbers. When the buzzer sounds to signal the end of cooking time, this does not interrupt the operation of the oven.
Description 2.3 Other parts 2.4 Available accessories Positioning shelves Rack The appliance has shelves for positioning trays and racks at various heights. The position heights go from the bottom upwards (see 2.1 General description). Cooling fan Used to hold containers containing food to be cooked. Tray rack (on some models only) The fan cools the oven and turns on during cooking or baking.
Description EN Tray (on some models only) Not all accessories are provided on all models. Oven accessories that may come into contact with food are made of materials that comply with the provisions of current laws. Used for collecting grease from foods on the rack above. Deep tray Original accessories supplied or optional can be purchased at authorized service centers. Only use original manufacturer’s accessories.
Description 3 Use 3.1 Warnings Improper use Risk of damage to surfaces • Do not cover the bottom of the oven with sheets of aluminum or tin foil. • If you wish to use greaseproof paper, place it so that it will not interfere with the hot air circulation inside the oven cavity. • Do not place pots or pans directly on the bottom of the oven. • Do not pour water directly on very hot trays. High temperature inside the oven during use Burn hazard • Keep the door closed while cooking or baking.
3.3 Use of accessories Tray rack (on some models only) Racks and trays The tray rack must be inserted into the tray. This way, the grease can be collected separately from the food being cooked or baked. Racks and trays must be inserted into the side guides until they stop. • The mechanical safety locks that prevent accidental removal of the racks must face downward and towards the rear of the oven. Insert the racks and trays gently into the oven and push back until they stop.
Use 3.4 Using the oven If the electrical power is off, the cooling fan will not work. Do not light the oven manually. Using the gas oven Electronic spark igniter: 1. Open the oven door fully. 2. Press and turn the temperature knob counterclockwise between the values and . This automatically activates the electric spark igniter. 3. After lighting, keep the knob pressed in for a few seconds to allow the thermocouple to heat up.
Using the electric grill (on some models only) List of features Gas burner The heat radiating only from the bottom allows you to complete the cooking/baking of foods that require a higher base temperature, without affecting their browning. Perfect for cakes, pies, tarts and pizzas. High temperature inside the oven while in use Danger of fire or explosion • Never exceed 60 minutes when cooking in grilling mode. Press and turn the temperature knob clockwise on the symbol / (depending on the models).
Use + Fan-assisted grill The air produced by the fan softens the strong heatwave generated by the grill element, grilling perfectly even very thick foods. Perfect for large cuts of meat (e.g. shank of pork). 3.5 Cooking tips General tips • Use a fan function to achieve uniform cooking at several levels. • Increasing the temperature does not shorten cooking or baking times (the food could be well cooked on the outside and undercooked on the inside).
Tips for baking cakes and cookies To save energy • It is preferable to use dark metal pans, which help to absorb the heat better. • The temperature and baking duration depend on the quality and consistency of the dough. • To check whether the cake is baked through, stick a toothpick into its highest point at the end of the baking time. If the dough does not stick to the toothpick, the dessert is cooked.
Use Cooking information table Dishes Lasagna Static oven Rack position from Temperature Time (Kg) the bottom (°C) (minutes) Convection oven Weight Temperature Time (°C) (minutes) 5 3 230 - 240 50 - 60 230 - 240 45 - 50 Cannelloni 2.5 2 220 - 230 25 - 30 220 - 230 25 - 30 Baked pasta 2.5 2 220 - 230 25 - 30 220 - 230 25 - 30 Roast chicken 1.2 2 200 - 210 80 - 90 200 - 210 70 - 80 Turkey breast 3 2 200 - 210 90 - 100 200 - 210 90 - 100 Pork loin 1.
Use Weight Measurement EN Table of conversions Volume Metric Imperial Metric Imperial Metric Imperial 15 g 25 g 40 g 50 g 75 g 100 g 150 g 175 g 200 g 225 g 250 g 275 g 350 g 375 g 400 g 425 g 450 g 550 g 675 g 750 g 900 g 1.5 kg 1.75 kg 2.25 kg 1/2 oz 1 oz 1 1/2 oz 2 oz 3 oz 4 oz 5 oz 6 oz 7 oz 8 oz 9 oz 10 oz 12 oz 13 oz 14 oz 15 oz 1 lb 1 1/4 lb 1 1/2 lb 1 3/4 lb 2 lb 3 lb 4 lb 5 lb 5 mm 1 cm 2.5 cm 5 cm 7.5 cm 10 cm 12.
Use 4 Cleaning and maintenance 4.1 Warnings Improper use Risk of damage to surfaces • Do not use steam jets to clean the appliance. • Do not use cleaning products containing chlorine, ammonia or bleach on the steel parts or those with metallic surface finishes (e.g. anodizing, nickel or chrome plating). • Do not use abrasive or corrosive detergents on the glass parts (e.g. powder products, stain removers and metal scouring pads). • Do not use rough or abrasive materials or sharp metal scrapers.
1. Open the door completely and insert two pins into the holes in the hinges, as shown in the image. Cleaning the door glazing We recommend always keeping the glass doors thoroughly clean. Use paper towels. If there are tough to clean spots, use a damp sponge and regular detergent. We recommend using cleaning products distributed by the manufacturer. Removing the inner glass 2. Grasp the door on both sides with both hands, lift it forming an angle of around 30° and remove it.
Cleaning and maintenance 3. Some models have an intermediate glass panel. Remove the intermediate panel by lifting it upwards. 4. Clean the external glass panel and the one you just removed. Use paper towels. If there are tough to clean spots, use a damp sponge and mild detergent. 5. Reinsert the glass panels in the reverse order of removal. 6. Reposition the inner glass panel. Make sure you center and insert the four pins into their grooves in the door, using a little pressure. 4.
Removal of the frame supports for racks/ trays Removing the guide frames makes it easier to clean the sides of the oven. This must be done each time you use the automatic cleaning cycle (only on some models). To remove the guide frames, pull the frame towards the inside of the oven to unhook it from its groove A, then slide it out of the seats at the back B. When you have finished cleaning the oven, repeat the procedures indicated above to reposition the guide frames. 4.
Cleaning and maintenance Replacing the oven light 4. Loosen and remove the light bulb. Live parts Danger of shock • Unplug the appliance. 1. Remove all accessories inside the oven. 2. Remove the frame supports for racks/ trays. 3. Remove the light cover using a tool (e.g. a screwdriver). Be careful not to scratch the enamel of the oven walls. Do not touch the halogen bulb with your fingers; cover them with an insulating cloth. 5. Replace the bulb with a similar one (40W). 6. Reattach the cover.
5 Installation 5.1 Gas connection Gas leakage Danger of explosion • After carrying out any operation, check that the tightening torque of gas connections is between 10 Nm and 15 Nm. • Where required, use a pressure regulator that complies with current regulations. • After installation is complete, check for any leaks with a soapy solution, never with a flame. • Installation using a hose must be carried out so that the length of the hose does not exceed 2 meters when fully extended for steel hoses and 1.
Cleaning and maintenance After having tightened the hose connector(s), push the gas hose 6 onto the hose connector and secure it with the clamp 5 that is compliant with the standard in force. Carefully tighten the connector 3 to the gas connector 1 of the appliance, inserting the seal 2 supplied. Connection with a steel hose with conical fitting Connection using a rubber hose complying with current standards is only permitted if the hose can be inspected along its entire length.
Connection to liquid gas Discharge of combustion products Use a pressure regulator and make the connection to the tank according to the provisions of current regulations. The combustion products may be extracted by means of hoods connected to a natural draft chimney whose efficiency is certain or via forced extraction. An efficient extraction system requires precise planning by a specialist who can install it in compliance with the positions and distances indicated in the regulations.
Installation A Single natural draft chimney B Single chimney with extractor fan C Directly outdoors with wall- or windowmounted extractor fan D Directly outdoors through wall 4. Loosen the screws A and B. 5. Remove the lock that connects the thermocouple and glow plug attached to the burner with the screw A.
Adjusting the minimum The oven thermostat is equipped with a screw to adjust the minimum. When changing the type of gas supply, the minimum must be adjusted as follows: 1. Switch off the electrical supply to the appliance. 2. Pull the oven slightly out of its housing, remove the knobs and remove the front by unscrewing the four screws (two upper and two lower) that attach it to the rest of the unit. 3. Push in the oven thermostat knob and light the oven burner.
Installation 5.2 Electrical connection Electric voltage Danger of shock • A qualified technician must complete the electrical connection. • The ground connection must be completed in the manner indicated in the regulations on electric installations. • Turn off the main electrical power supply. General information Check that the features of the electricity grid comply with the information shown on the identification plate.
Installation Location of the power cord EN 5.3 Positioning Heavy appliance Risk of crush injuries • Move the appliance into the desired position with the help of a second person. Pressure on the open door Risk of damage to the appliance • Do not use the open door as a lever to move the appliance into place. • Do not apply excessive pressure to the door when it is open.
Installation Fitting bushes 1. Remove the bushing caps inserted into the front of the appliance. 2. Insert the appliance into the opening. 3. Secure the appliance to the cabinetry with the screws. 4. Cover the bushings with the caps that were removed.
Installation EN Positioning under the countertop (mm) Make sure that the rear/bottom of the appliance has an opening of approximately 60 mm.
Installation Recessed position (mm) Make sure that the top/rear of the appliance has an opening of approximately 35-40 mm depth.