Contents 1.1 1.2 1.3 1.4 1.5 1.6 1.7 General safety instructions Appliance purpose Manufacturer’s liability This user manual Identification plate Disposal How to read the user manual 2 Description 2.1 2.2 2.3 2.4 2.5 2.6 General Description Control panel Other parts Advantages of steam cooking Available accessories Other cooking containers 3 Use 96 100 100 100 100 100 101 102 102 102 103 104 104 106 107 3.1 Instructions 3.2 Preliminary operations 3.3 Using the accessories 3.
Instructions 1 Instructions 1.1 General safety instructions Risk of personal injury • During use the appliance and its accessible parts become very hot. Never touch the heating elements during use. • Protect your hands by wearing oven gloves when moving food inside the oven. • Never try to put out a fire or flames with water: Turn off the appliance and smother the flames with a fire blanket or other appropriate cover.
• Keep the oven door closed during cooking. • If you need to move food or at the end of cooking, open the door 5 cm for a few seconds, let the steam come out, then open it fully. • DO NOT USE OR STORE FLAMMABLE MATERIALS NEAR THE APPLIANCE. • DO NOT USE AEROSOLS IN THE VICINITY OF THIS APPLIANCE WHILST IT IS IN USE. • Switch off the appliance immediately after use. • Do not clean the appliance immediately after turning it off – wait for it to cool down first. • DO NOT MODIFY THIS APPLIANCE.
Instructions • Do not use steam jets to clean the appliance. • Do not obstruct ventilation openings and heat dispersal slots. • Never leave the appliance unattended during cooking operations where fats or oils could be released, as these could then heat up and catch fire. Be very careful. • Never leave objects on the cooking surface. • DO NOT FOR ANY REASON USE THE APPLIANCE AS A SPACE HEATER. • Do not spray any spray products near the appliance.
Installation • THIS APPLIANCE MUST NOT BE INSTALLED IN BOATS OR CARAVANS. • The appliance must not be installed on a pedestal. • Position the appliance into the cabinet cut-out with the help of a second person. • To avoid potential overheating, the appliance must not be installed behind a decorative door or a panel. • Have the electrical connection performed by authorised technical personnel. • The appliance must be connected to earth in compliance with electrical system safety standards.
Instructions 1.2 Appliance purpose • This appliance is intended for cooking food in the home environment. Every other use is considered improper. • The appliance is not designed to operate with external timers or with remote-control systems. 1.
Instructions Plastic packaging Danger of suffocation • Do not leave the packaging or any part of it unattended. • Do not let children play with the plastic bags. 1.7 How to read the user manual This user manual uses the following reading conventions: Instructions General information on this user manual, on safety and final disposal.
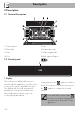
Description 2 Description 2.1 General Description 1 Control panel 2 Oven light 3 Seal 4 Door 5 Fan 6 Evaporation tray 7 Water supply tube 8 Rack support frames 2.2 Control panel 1 Display The touchscreen display allows you to interact with the appliance. Press the icons to access the various available functions. The display will show all operational parameters, such as selected function, time/temperature settings or pre-set cooking program settings.
2.3 Other parts Retractable handle • When no function is selected, or during a cooking function, press the symbol to manually activate the oven light or the symbol to deactivate it during use. In order to save energy, the light turns off after a minute at the start of cooking (this function can be deactivated via the secondary menu). The appliance is fitted with an automatic retractable handle (1). The handle will automatically move into the extended position during operation.
Description Cooling fan 2.
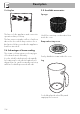
Description Tray rack EN Perforated tray Useful for steaming fish and vegetables. Tray To be placed over the top of the oven tray; for cooking foods which may drip. Deep tray Useful when cooking cakes (with cooking times of less than 25 minutes or without steam), rice, beans and cereals. It is also essential for collecting liquids produced by steaming or defrosting of foods contained in the perforated trays above.
Description Some models are not provided with all accessories. The appliance accessories intended to come into contact with food are made of materials that comply with the provisions of current legislation. Original supplied and optional accessories can be requested to Authorised Assistance Centres. Use only original accessories supplied by the manufacturer. 2.6 Other cooking containers • You may also use your own containers for cooking, as long as they are resistant to high temperatures.
Use 3.1 Instructions High temperature inside the oven during use Danger of burns • Keep the oven door closed during cooking. • Protect your hands by wearing oven gloves when moving food inside the oven. • Open the appliance door carefully during or after cooking. • Take care because steam may not be visible at certain temperatures. • Do not cook dishes containing large quantities of strong alcoholic beverages. Alcohol vapour inside the oven could ignite. • Do not touch the heating elements inside the oven.
Use High temperature inside the oven during use Danger of fire or explosion • Do not spray any spray products near the appliance. • Do not use or leave flammable materials near the appliance. • Do not use plastic cookware or containers when cooking food. • Do not put sealed tins or containers in the oven. • Do not leave the appliance unattended during cooking operations where fats or oils could be released. • Remove all trays and racks which are not required during cooking. 3.2 Preliminary operations 1.
Use 3.4 Using the retractable handle If you intend to use the perforated tray for steam cooking, this must be positioned on the second runner while the tray must be positioned on the first runner. This allows liquids to be collected separately from the food that is being cooked (2+1 configuration, see “Preset recipes table”). Extending the handle manually EN 2+1 configuration Press the “SMEG” logo on the “home screen” to extend the handle.
Use Retracting the handle manually If the handle is extended, press the “SMEG” logo again on the “home screen” to retract it. Obstruction of the handle area of operation If there is an obstruction in the area of operation of the handle when it is extending/retracting, the appliance will make several attempts to extend/retract it. Remove the obstruction immediately to allow the handle to operate correctly. Automatic recalibration If the door is open, the handle will be remain in the extended position.
Use Buzzers The appliance can emit a series of buzzes while the handle is moving: Manual extension/retraction from the “Home screen”. 1 Buzz 1 Prolonged buzz It is unusual for this to happen and this method should only be used if there is a fault. Initial handle calibration when the appliance is connected for the first time or after a power failure. Initial calibration procedure failed.
Use 3.5 Using the oven Home screen Press the time on the display. It is now possible to select the various available functions on the “home screen” of the appliance. In order to be able to start any cooking operation, the current time must be set (if the oven is being turned on for the first time, it is also recommended you set the required language). The appliance language is set to “English” by default.
Use Steam cooking settings Do not place food or any other object directly on the bottom of the oven. The base of the oven and the evaporation tray must always be left free. 3. Press the symbol to confirm.
Use 5. Enter the required duration (for example 25 minutes: first touch the minutes box, then the numbers 2 and 5). 6. Press the The display shows the screen for setting the steaming parameters. 7. Press the displayed temperature to change it. symbol to confirm. 8. Use the and symbols to set the required temperature. Even if a longer time is set, the appliance will set the cooking duration to the maximum time allowed. 114 The minimum temperature that can be set is 30°C.
9. Press the symbol to confirm the cooking temperature set (for example 90°C). 11. Enter the time at which you require cooking to end (for example 13:30: first touch the hours box, then the numbers 1 and 3; touch the minutes box, then the numbers 3 and 0). 10. If you wish to set an end of cooking time, press the symbol “function delayed”. and select 12. Press the symbol to confirm the end of cooking time (for example 13:30).
Use The appliance waits for the delay start time. Filling the reservoir • Use cold tap water which is not too hard, softened water or still mineral water. • Do not use distilled water, tap water with a high chloride content (> 40 mg/l), or other liquids. If programmed cooking has been set (in our example ending at 13:30), cooking will start at a time according to the set parameters. Cooking can be interrupted at any time by pressing and holding the return symbol for a few seconds.
Use 17. Press the symbol to start filling the reservoir with water. EN 16. Extract the tube from its seat and immerse its end into the jug (or container) until it reaches the bottom. The appliance will automatically draw the quantity of water necessary for cooking on the basis of the set duration. In the event that the water runs out, the appliance will automatically stop the cooking process, a buzzer will sound and the display will show a request to fill the reservoir with water. 18.
Use 19. Shake the tube in order to remove any remaining water. If programmed cooking has been set (in our example ending at 13:30), cooking will start at a time according to the set parameters. Cooking can be interrupted at any time by pressing and holding the return symbol for a few seconds. Each time the door is opened, the function in progress will stop and then automatically restart when the door is closed again. 20. Return the tube to its seat and remove the jug or container.
Use Steaming is always preceded by a preheating stage, which allows the appliance to heat up to cooking temperature. This stage is indicated by a progressive increase in the temperature level reached. A buzzer sounds to indicate that cooking starts automatically. EN Preheating stage End of steam cooking At the end of preheating the temperature reaches the maximum set level.
Use Removing the residual water At the end of steaming, the water can be emptied from the reservoir. 26. Extract the tube from its seat and insert the end of it into the jug (or container). We recommend emptying the reservoir each time you finish using the appliance to avoid scale build-up. 22. When the steam function has ended, press the return symbol : the appliance prompts you to drain water from the reservoir. 23.
It is only possible to drain the water when the door is open. Always ensure you have extracted the tube from its seat and inserted its end into the jug/container before pressing the symbol to begin draining. 30. Place the tube back into its seat and remove the jug. 31. Remove the cover from the evaporation tray inside the oven cavity and dry it with the sponge provided. When complete, the display will indicate that the residual water removal process is complete.
Use Advice for steam cooking • Pasta and rice: upon reaching 100°C, the cooking time will be the same as with cooking on a hob. Place the pasta or rice in a metal tray and cover with around a centimetre of water. For best results when cooking rice, place a lid on the container or cover with aluminium foil. This procedure allows the rice to absorb all the water, and it can then be served directly to the table. • Eggs: these may be boiled, scrambled or poached by using the steam function at 100°C.
Use Combination functions Combination cooking functions are ideal for preparing moist cakes and bread and for tender roast meats. Combination functions list Steam + circulaire + fan The combination of the fan, the circulaire heating element and the steam is particularly suitable for preparing roast meats, chicken and baked goods such as bread and leavened sweets.
Use Combination cooking functions 5. Press the symbol to confirm. 1. Press the time on the display to activate the appliance. 2. Select the cooking functions on the “home screen”. icon Even if a longer time is set, the appliance will set the cooking duration to the maximum time allowed. 3. Select a combination cooking function. 4. Enter the required duration (for example 25 minutes: first touch the minutes box, then the numbers 2 and 5).
Use 9. Use the and symbols to set the required temperature. The minimum temperature that can be set is 50°C. The value changes by 5°C each time the and symbols are pressed. 10. Press the symbol to confirm the cooking temperature set (for example 200°C). 11. Press the symbol to change the percentage of steam used for cooking. 12. Use the symbols and to change the percentage of steam used for cooking. The minimum percentage that can be set is 20%.
Use 13. Press the symbol to confirm the percentage of steam set (for example 50%). 15. Enter the time at which you require cooking to end (for example 13:30: first touch the hours box, then the numbers 1 and 3; touch the minutes box, then the numbers 3 and 0). 14. If you wish to set an end of cooking time, press the symbol “function delayed”. and select 16. Press the symbol to confirm the end of cooking time (for example 13:30). 17. The appliance waits for the delay start time.
Use Combination cooking functions are preceded by a preheating stage, which allows the appliance to heat up to cooking temperature. This stage is performed without using steam and is indicated by the progressive increase in the temperature level reached. Steam percentage Type of food 25% Breads and cakes 30% Duck 40% Beef, veal and lamb 50% Chicken and chops 70% Whole fish EN Preheating stage End of combination function At the end of preheating the temperature reaches the maximum set level.
Use Traditional cooking functions 1. Select the cooking functions on the “home screen”. icon 2. Press the symbol to access the traditional cooking functions menu. 3. Select the required function. 4. The appliance will begin preheating. The display will show the chosen function, the preset temperature, the current time and the progress bar of the temperature reached (preheating). 5. When the preheating stage is over a buzzer will sound to indicate that the food can be placed inside the oven.
Traditional functions list Circulaire The combination of the fan and the circulaire heating element (incorporated in the rear of the oven) allows you to cook different foods on several levels, as long as they need the same temperatures and same type of cooking. Hot air circulation ensures instant and even distribution of heat. It will be possible, for instance, to cook fish, vegetables and biscuits simultaneously (on different levels) without odours and flavours mingling.
Use Fan with grill The air produced by the fan softens the strong heatwave generated by the grill, perfectly grilling even very thick cuts of meat such as steaks, pork chops, etc. Circulaire + fan + lower element Fan assisted cooking is combined with the heat coming from below and allows you to brown food slightly at the same time. Ideal for pies/flans, quiches and pizza.
Use Modifying the preset temperature This function only activates the buzzer, without stopping cooking. EN 1. Press the displayed temperature to change it. Timer during function 1. Press the symbol during a cooking function. 2. Press on timer. 2. Use the and symbols to set the required temperature. The duration of the minute minder timer can be from a minimum of 1 minute to a maximum of 4 hours. 3. Press the symbol to confirm. 3.
Use 4. Press the symbol to confirm. Timed cooking is the function which allows a cooking operation to be started and then ended after a specific length of time set by the user. 5. The countdown will start. 6. Wait for the buzzer to indicate that the time has finished. The flashes. Timed cooking Activation of timed cooking cancels any minute minder timer which may previously have been set. symbol Press the or symbol to deactivate the buzzer. Press the symbol again to select another timer. 1.
Use symbol to confirm. 5. Timed cooking begins. Modifying the data set during timed cooking During operation, it is possible to modify timed cooking duration: 1. Press the symbol. 2. Press on duration. 6. When cooking finishes, “function ended” appears on the display and a buzzer sounds, which can be deactivated by pressing on one of the modifiable zones on the display (temperature, function, and ) or by opening the door. 3. Enter the new duration required and press the symbol to confirm.
Use 3. Enter the time at which you require cooking to end (for example 19:30: first touch the hours box, then the numbers 1 and 9; touch the minutes box, then the numbers 3 and 0). 7. When cooking finishes, “function ended” appears on the display and a buzzer sounds, which can be deactivated by pressing on one of the modifiable zones on the display (temperature, function, and 4. Press the symbol to confirm. 5. The appliance waits for the delay start time. 6.
Use After modifying the cooking duration, the end of cooking time must be re-set. During operation, it is possible to modify delay cooking duration: 1. Press the symbol. 2. Enter the new duration required (for example 35 minutes) and press the symbol to confirm. 3. Press the symbol again. 4. Enter the new cooking end time required (for example 19:00) and press the symbol to confirm. 3.
Use Advice for steam cooking Advice for defrosting • Cooking times depend on the density of foods and not their quantity. For example, one piece of broccoli will take the same time as 20 florets. Increasing the quantity of a casserole also increases its density, and so the cooking time will also increase. • Where possible, use a perforated container to allow the steam to circulate around the food from all sides. • Steam cooking significantly reduces the migration of flavours between different foodstuffs.
Use 3.7 Special functions The special functions menu contains some functions like the timer with the oven off, defrosting or cleaning functions. Select the special functions Timer This function sounds a buzzer when the time set has elapsed. icon on the “home screen”. Defrost by time This function allows you to defrost food on the basis of a selectable time.
Use Timer Vapor Clean This function facilitates cleaning using the steam produced by a small quantity of water poured onto the bottom of the oven. (See “Cleaning and maintenance”). The duration of the minute minder timer can be from a minimum of 1 minute to a maximum of 4 hours. 1. Select timer from the “special functions” menu. Descaling This function allows you to descale the oven. (See “Cleaning and maintenance”). Clean reservoir This function allows you to clean the reservoir.
Use time has finished. The flashes. symbol Defrost by time 1. Place the food inside the appliance. 2. Select defrost by time from the “special functions” menu. Press the or symbol to deactivate the buzzer. Press the symbol again to select another timer. 6. If you leave the timer setting screen, the symbol will be displayed at the top left, indicating that a timer is active. You must return the counter to zero to remove the special timer. 3. Enter the required duration (for example 35 minutes). 4.
Use 5. Press the symbol to confirm. A request to fill the reservoir with water is shown on the display. 6. Fill the reservoir as described in chapter “Filling the reservoir”. 7. When the reservoir is full, close the door. The appliance starts the defrost by time function. 8. While the function is in progress, it is possible to further modify the defrosting duration (see “Timed cooking”). Press the symbol to make the desired changes.
Use 3. Enter the required duration (for example 35 minutes). 4. Press the symbol to confirm. The display shows the main screen with the set duration. 5. Press the symbol to start the proving function. A request to fill the reservoir with water is shown on the display. EN Proving 1. Position the dough to prove on the second level. 2. Select proving from the “special functions” menu. 6. Fill the reservoir as described in chapter “Filling the reservoir”. 7. When the reservoir is full, close the door.
Use 9. While the function is in progress, it is possible to set a timer for a maximum of 4 hours (see “Timer during function”), a proving duration (see “Timed cooking”) or delayed proving (see “Delay cooking”). Press the the desired changes. symbol to make Unless otherwise set, the proving will have a maximum duration of 13 hours. Reheat This function allows you to heat previously cooked food which has been kept cool or in the refrigerator. 1. Place the food to be heated inside the oven. 2.
Use 8. It will then proceed with the selected function. EN 4. Press the symbol to confirm. The display shows the main screen with the set duration. 5. Press the symbol to confirm. The fill reservoir screen will appear on the display. 6. Fill the reservoir as described in chapter “Filling the reservoir”. 7. When the reservoir is full, close the door. The appliance will begin preheating.
Use Sabbath This function results in the appliance operating in a particular way: • Cooking can proceed indefinitely, it is not possible to set any cooking duration. • No preheating will be performed. • The cooking temperature which can be selected varies between 60-100 °C. • Oven light disabled, any operation such as opening the door or manual activation will not activate the light. • The internal fan remains turned off. • Buzzers disabled.
Use Fill reservoir EN 1. Select fill reservoir from the “special functions” menu. 5. Extract the tube from its seat and immerse its end into the jug (or container) until it reaches the bottom. The fill reservoir screen will appear on the display. 2. Fill the jug supplied (or container) with a sufficient amount of water for the cooking that you wish to perform. 3. Open the oven door. 4. Place the jug (or container) on the open door. 6. Press the symbol to start filling the reservoir with water.
Use 7. When finished, press “ok” to confirm that you have finished filling the reservoir. Empty reservoir 1. Select empty reservoir from the “special functions” menu. 8. Shake the tube in order to remove any remaining water. The ‘empty reservoir’ screen will appear on the display. 2. Place the jug provided or a container on the open door. 9. Place the tube back into its seat, remove the jug (or container) and close the door.
Use When complete, the display will indicate that the residual water removal process is complete. EN 3. Extract the tube from its seat and insert the end of it into the jug (or container). 5. Press “ok” to confirm. 6. Shake the tube in order to remove any remaining water. 4. Press the symbol to start draining off the water into the jug/container. 7. Place the tube back into its seat, remove the jug and close the door. It is only possible to drain the water when the door is open.
Use 3.8 Preset recipes Starting a preset recipe This mode allows you to select a previously stored program for cooking food. The appliance will automatically calculate the optimum cooking parameters based on the weight entered. 1. Press the and symbols to select the type of dish required from the “preset recipes” menu. Then press the name of the dish to confirm. Select the preset recipes icon on the “home screen”. 2.
Use At this point it is possible to start the selected preset recipe, permanently modify the settings or perform delay cooking. 5. Use the and symbols to enter the weight (in kilograms) of the dish. 7. If you choose the start option, cooking will start with the preset recipe’s predefined settings and the display will show all the parameters set. EN 4. Press the symbol to change the weight of the dish. 6. Press the symbol again to move to the next screen.
Use 8. A buzzer will sound and a message will be displayed to indicate when to place the food in the oven and enable the start of cooking. 9. Press the symbol to start cooking. Preset recipe end 1. At the end of the preset recipe, the appliance will notify the user with a buzzer and the symbol will flash. 2. Press the symbol to perform cooking with the same parameters currently set (press the symbol twice if the buzzer is active).
Use Changing a preset recipe permanently • Cooking function EN 1. Inside the selected preset recipe, select change from the menu of the selected dish. • Cooking time All parameters which can be changed will be highlighted in yellow on the main screen. • Frame shelf 2.
Use 3. Make the required changes. 4. Press the symbol to store the recipe. The appliance will ask to confirm the changes which have just been made. If the changes are not confirmed, the preset recipe will remain unchanged. 5. If the change is confirmed the display will show confirmation of this.
Use Preset recipes table Subcategory Cooking Weight Function (Kg) Steam % Shelf Temp. (°C) Time (minutes) Rare 1 40 2 180 60 Medium 1 40 2 180 80 Well done 1 40 2 180 90 Pork spare ribs Fresh 1 50 2 150 140 Pork chops Fresh 1 - 3 250 15 Pork sausages Fresh 1 - 3 250 12 Bacon Fresh 0.5 - 3 250 7 Chicken breast Fresh 0.5 100 2+1 100 18 Wurstel Precooked 0.
Use FISH Subcategory Cooking Weight Function (Kg) Steam % Shelf Temp. (°C) Time (minutes) Baked fish Fresh 0.5 - 1 160 35 Seabass fillet Fresh 0.5 100 2+1 85 5 Cod fillet Fresh 1 100 2+1 100 6 Salmon fillet Fresh 0.8 100 2+1 100 5 Prawns Fresh 1 100 2+1 90 5 Fish (whole) Fresh 1 70 2+1 200 25 Steam % Shelf Temp. (°C) Time (minutes) VEGETABLES Subcategory Cooking Weight Function (Kg) Chips frozen 0.
Use Subcategory Cooking Weight Function (Kg) Steam % Shelf Temp. (°C) Time (minutes) Bundt cake Fresh 1 - 1 160 60 Biscuits/Muffins Fresh 0.6 - 1 160 18 Profiteroles Fresh 0.5 - 1 180 70 Meringues Fresh 0.3 - 1 120 90 Tart Fresh 0.8 - 1 170 40 Croissants Fresh 0.6 - 1 160 30 Apple compote Fresh 0.5 100 2+1 100 8 Syrup pudding Fresh 0.2 100 1 100 50 Strudel Fresh 1 25 1 200 40 Sponge cake Fresh 1 25 1 165 35 Steam % Shelf Temp.
Use PIZZA Subcategory Pan baked pizza Cooking Fresh Weight Function (Kg) 1 Steam % Shelf Temp. (°C) Time (minutes) - 1 250 9 Steam % Shelf Temp. (°C) Time (minutes) PASTA/RICE Subcategory Cooking Weight Function (Kg) Pasta bake/Lasagne Fresh 2 - 1 220 40 Paella Fresh 2 100 2 100 35 Quiche Fresh 0.5 - 1 200 40 Soufflé Fresh 0.5 - 1 180 25 Basmati rice Fresh 0.5 100 2+1 100 12 Steam % Shelf Temp.
Use Adding a recipe This menu allows you to enter a personal program with the parameters you wish to use. On first use, the appliance will only offer you to add a new recipe. After storing your recipes, these will then be available in the relative menu. 1. Select add from the “personal programs” menu. Select the personal programs EN 3.9 Personal programs icon on the “home screen”. All parameters which can be changed will be highlighted in yellow on the main screen.
Use • Cooking function 3. Make the required changes. 4. Press the symbol to store the recipe. The appliance will ask you to enter a name for the recipe you have just created. • Cooking time • Frame shelf 5. Enter the name of the recipe. The character deletes the previous letter (in the example, the recipe, recipe 1 has been stored). The recipe name can contain a maximum 10 characters, including spaces. The name must contain at least one character in order to store the recipe. • Weight of dish 6.
Use If you select no you will lose all changes made. Starting a personal recipe 1. Select a previously saved personal recipe from the “personal programs” menu (in the example the recipe, recipe 1 has been stored). 2. Select the start option. 8. If saving the recipe is confirmed the display will show confirmation of this. 3. Cooking will start with the parameters previously set for the recipe.
Use Modifying a personal recipe Deleting a personal recipe 1. Select a previously saved personal recipe from the “personal programs” menu (in the example the recipe, recipe 1 has been stored). 1. Select a previously saved personal recipe from the “personal programs” menu (in the example, recipe 1 has been stored). 2. Select the change option. 2. Select the delete option. 3. Repeat the same steps starting from point 2 in chapter “Adding a recipe”. 160 3. Confirm the deletion.
4. If you confirm the deletion, the display will show confirmation of this. 3. Enter the time at which you require cooking to end (for example 19:30: first touch the hours box, then the numbers 1 and 9; touch the minutes box, then the numbers 3 and 0). Delay cooking 1. Select a previously saved personal recipe from the “personal programs” menu (in the example the recipe, recipe 1 has been stored). 4. Press the symbol to confirm. 5. The appliance waits for the delay start time. 2.
Use 3.10 Settings Language The product configuration can be set using this menu. Select the settings Sets the interface language from those available. icon on the “home screen”. In the event of a temporary power cut, all personal settings will remain stored. 1. Select language from the “settings” menu. 2. Press the and symbols to scroll through the list of available languages. 3. Select the required language. 4. Select yes to confirm.
Use Controls lock Allows you to change time displayed. 1. Press the or symbol and select clock from the “settings” menu. Allows the appliance to automatically lock the controls after one minute of normal operation without any intervention from the user. 1. Press the or symbol and select controls lock from the “settings” menu. 2. Enter the current time 2. To confirm the activation of the controls lock, select yes. 3. Press the symbol to confirm.
Use Demo mode (for showrooms only) This mode deactivates all the appliance’s heating elements, while keeping the control panel active. 1. Press the or symbol and select demo mode from the “settings” menu. Eco-Logic This mode allows the appliance to limit the power used. Suitable for simultaneous use with further home appliances. If this option is enabled, the symbol will appear next to the function on the display. 1. Press the or symbol and select eco-logic from the “settings” menu. 2.
Use Keep warm Whenever one of the display symbols is pressed, the appliance beeps. This setting disables these sounds. 1. Press the or symbol and select sound from the “settings” menu. This mode allows the appliance to keep cooked food warm (at low temperatures) after cooking finishes with a cooking cycle for which a duration has been set (if this is not manually interrupted), without altering the taste and smell obtained during cooking. 1. Press the or symbol and select keep warm from the “settings” menu.
Use 2. To confirm the activation of the keep warm function, select yes. Eco-Light For greater energy savings, the light is automatically deactivated one minute from the start of cooking. 1. Press the or symbol and select eco-light from the “settings” menu. The keep warm function will be activated as soon as cooking is finished; this is indicated by a series of beeps (see cooking or function finished). The screen below will be shown on the display after a few minutes. 2.
Use available. Press the symbol, when available, to manually 2. To confirm the activation of the digital clock, select yes. EN Manual on/off control is always activate the oven light or the symbol to deactivate it. The eco-light function is ”on” by default (factory setting). Digital clock 3. When no appliance function is active, the display will show the current time in digital format. Displays the time in digital format. 1. Press the or symbol and select digital clock from the “settings” menu.
Use Water hardness The appliance is factory set for water of medium hardness (3). This mode allows you to set the water hardness value in order to optimise the descaling process. 1. Press the or symbol and select water hardness from the “settings” menu. If your mains water supply is too hard, we recommend using a water softener. Request information on the hardness of your water from your local water board.
Cleaning and maintenance 4.1 Instructions Improper use Risk of damage to surfaces • Do not use steam jets to clean the appliance. • Do not use cleaning products containing chlorine, ammonia or bleach on parts made of steel or that have metallic surface finishes (e.g. anodizing, nickelor chromium-plating). • Do not use abrasive or corrosive detergents (e.g. scouring powders, stain removers and metallic sponges) on glass parts. • Do not use rough or abrasive materials or sharp metal scrapers.
Cleaning and maintenance Removing the internal glass panes For easier cleaning the internal glass panes of the door can be removed. 1. Open the door completely and insert two pins into the holes on the hinges indicated in the figure. This allows the door to be locked in position to make the removal of the glass panes easier. 3. Then pull the front part upwards. This way, the 4 pins attached to the glass detach from their housings in the oven door. 4. Some models have an intermediate glass unit.
Cleaning and maintenance 7. Reposition the internal glass pane. Insert the front part into the relative seats (1). Then lower the rear part and insert the 2 pins into their housings in the oven door by applying slight pressure (2). 4.4 Cleaning the oven cavity For the best oven upkeep, clean it regularly after having allowed it to cool. Take out all removable parts. Clean the oven racks with warm water and non-abrasive detergents. Carefully rinse and dry damp parts.
Cleaning and maintenance Descaling The presence of scale due to lack of descaling can compromise correct operation of the appliance in the long term. 3. Pour approximately 250 ml of white vinegar into the evaporation tray, thus also covering part of the base of the oven. The following message will appear on the display from time to time to indicate that you should carry out the descaling of the evaporation tray on the bottom of the oven. 4. Press the symbol descaling function. to start the 1.
Cleaning and maintenance We recommend performing descaling every time this is indicated on the display in order to keep the boiler in perfect operating condition. Manual descaling When you wish to perform descaling in advance, you can run the function manually: 1. Select manual descaling from the “special functions” menu. EN 8. When you have finished cleaning, close the door again. Note: The descaling process can be skipped three consecutive times. 2.
Cleaning and maintenance Removing rack/tray support frames Removing the guide frames enables the sides to be cleaned more easily. To remove the guide frames: 1. Unscrew the frame fastening pins. 2. Pull the frame towards the inside of the oven to free it from the fastening pins. Vapor Clean Vapor Clean is an assisted cleaning procedure which facilitates the removal of dirt. Thanks to this process, it is possible to clean the inside of the oven very easily.
• Pour approx. 40 cc of water onto the floor of the oven. Make sure it does not overflow out of the cavity. Vapor Clean cycle setting • Spray a water and washing up liquid solution inside the oven using a spray nozzle. Direct the spray towards the side walls, upwards, downwards and towards the deflector. 1. Select the Vapor Clean function from the “special functions” menu.
Cleaning and maintenance 2. The duration and temperature of the cleaning cycle will appear on the display. 5. A buzzer will indicate the end of the Vapor Clean cycle. Setting programmed Vapor Clean The duration and temperature parameters cannot be changed by the user. It is possible to program the Vapor Clean start time, like any cooking function. 1. After selecting the Vapor Clean special function, press the symbol . 3. Press the symbol to confirm. The assisted cleaning cycle will start. 4.
Cleaning and maintenance symbol to confirm. The appliance waits until the set start time to start the cleaning cycle. End of the Vapor Clean cycle 1. Open the door and wipe away the less stubborn dirt with a microfibre cloth. 2. Use a non-scratch sponge with brass filaments on hard to remove deposits. 3. In case of grease residues use specific oven cleaning products. 4. Remove the residual water inside the oven.
Cleaning and maintenance 2. Fill the jug (or container) provided with a solution of water and citric acid. 6. Press the symbol to start drawing the solution into the appliance’s reservoir. We recommend mixing 30 g of citric acid with 1.5 litres of water. 3. Open the oven door. 4. Place the jug (or container) on the open door. Note: the jug or container with the mixture must have a gross weight lower than 5 kg. 5.
Cleaning and maintenance 8. Press the symbol to start draining the solution into the jug (or container). EN The display will show the time left until the end of the cleaning cycle. When the cleaning process is complete, a buzzer will sound and the display will show the solution draining screen. When finished “reservoir cleaning complete” appears on the display. 9. Press “ok” to confirm the end of the reservoir cleaning procedure.
Cleaning and maintenance 10. Shake the tube to remove any remaining solution. 4.6 Extraordinary maintenance Live parts Danger of electrocution • Unplug the appliance. Replacing the internal light bulb 1. Completely remove all accessories from inside the oven. 2. Remove the rack/tray support frames. 3. Remove the bulb cover using a tool (e.g. a screwdriver). Pay attention not to scratch the oven cavity enamel. 11. Place the tube back into its seat, remove the jug (or container) and close the door.
Cleaning and maintenance Do not touch the halogen light bulb directly with your fingers, but wrap it in insulating material. 5. Replace the light bulb with one of the same type (40W). 6. Refit the cover. Ensure the moulded part of the glass (A) is facing the door. What to do if... The display is completely off: • Check the mains power supply. • Check whether an all-pole switch upstream of the appliance supply line is in the “ON” position.
Installation 5 Installation 5.1 Electrical connection Power voltage Danger of electrocution • Have the electrical connection performed by authorised technical personnel. • The appliance must be connected to earth in compliance with electrical system safety standards. • Disconnect the mains power supply. Fixed connection Fit the power line with an all-pole circuit breaker in compliance with installation regulations.
Installation 5.2 Positioning Position of the power cable EN Heavy appliance Crushing hazard • Position the appliance into the cabinet cut-out with the help of a second person. Pressure on the open door Risk of damage to the appliance • Never use the oven door to lever the appliance into place when fitting. • Avoid exerting too much pressure on the oven door when open. Heat production during appliance operation Risk of fire • Check that the carcase material is heat resistant.
Installation Fastening bushings Appliance overall dimensions (mm) Remove the bushing covers on the front of the oven. Mount the appliance into the recess. Secure the appliance to the carcase using the screws. Cover the bushings with the previously removed covers.
Installation EN Mounting under worktops (mm) (side view) Make sure that the carcase rear/ bottom section has an opening of approx. 60 mm.
Installation Mounting into a column (mm) Make sure that the carcase top/ rear section has an opening approx. 35-40 mm deep.