Instructions for Use Bedienungsanweisung
EN Contents Safety Information .............................................................................................................................. 2 The advantages of microwaves ......................................................................................................... 7 Description of your oven.................................................................................................................... 8 Basic settings ........................................................
EN Safety Information Before the installation and use of the appliance, carefully read the supplied instructions. The manufacturer is not responsible if an incorrect installation and use causes injuries and damages. Always keep the instructions with the appliance for future reference. CHILDREN AND VULNERABLE PEOPLE SAFETY Warning! Risk of suffocation, injury or permanent disability.
EN Safety Information Only use utensils that are suitable for use in microwave ovens. When heating food in plastic or paper containers, keep an eye on the appliance due to the possibility of ignition. The appliance is intended for heating food and beverages. Drying of food or clothing and heating of warming pads, slippers, sponges, damp cloth and similar may lead to risk of injury, ignition or fire.
EN Safety Information For toasting, use just the grilling function and watch the oven all the time. It you use a combined function to toast bread it will catch fire in a very short time. Make sure you never catch the power cables of other electrical appliances in the hot door or the oven. The cable insulation may melt. Danger of short-circuiting! Take care when heating liquids! When liquids (water, coffee, tea, milk, etc.
EN Safety Information Do not use harsh abrasive cleaners or sharp metal scrapers to clean the glass door since they can scratch the surface, which may result in shattering of the glass. Do not use a steam cleaner to clean the appliance. The door contact surfaces (the front of the cavity and the inside part of the doors) must be kept very clean in order to ensure the oven functions correctly. Please follow the instructions regarding cleaning in the section "Oven Cleaning and Maintenance".
EN Safety Information Do not cover or obstruct the ventilation openings. Use only dishes suitable for microwaves. Before using dishes and containers in the microwave, check that these are suitable (see the section on types of dishes). Never remove the mica cover on the ceiling of the oven interior! This cover stops fat and pieces of food damaging the microwave generator. Do not keep any inflammable object inside the oven as it may burn if the oven is switched on. Do not use the oven as a pantry.
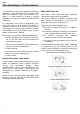
EN The advantages of microwaves In conventional ovens, heat radiated by electrical elements or gas burners slowly penetrates the food from outside to inside. On account of this there is a major amount of energy is wasted heating the air, the oven components and the food containers. In a microwave oven, heat is generated by the food itself and the heat travels from inside to outside.
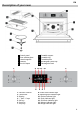
EN Description of your oven Control panel Door window glass Lateral supports Catches Hot Air Output Turntable support Turntable ring Turntable plate Rectangular Glass tray Rectangular Rack 9 10 11 12 1 13 14 3 8 4 1. Function Selector 2. Thermostat 3. Display 4. “-” and “+“ keys 5. OK key 6. Start key 7. Stop key 2 5 6 7 8. Power level indicator light 9. Operating time indicator light 10. Defrost indicator light 11. Clock indicator light 12. Child lock indicator light 13.
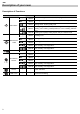
EN Description of your oven Description of Functions Function Microwaves Power Microwave Foods 200 W Slow defrosting for delicate foods; keeping food hot 400 W Cooking with little heat; boiling rice. Rapid defrosting 600 W Melting butter. Heating baby food 800 W Cooking vegetables and food. Cooking and heating carefully. Heating and cooking small portions of food.
EN Basic settings Setting the clock After your microwave oven is first plugged-in or after a power failure, the clock display will flash to indicate that the time shown is not correct. Before using the microwave oven, adjust the clock through the procedure described below but starting on Step 3. 2 1 3 4 5 6 7 To set the clock, proceed as follows: 1. Press the “+” (4) key until the Clock Indicator Light starts to flash. 2. Press the OK (5) key. 3.
EN Basic settings Child lock The oven functioning can be blocked (for example to stop it being used by children). 2 1 3 4 5 6 7 1. To Block the oven, press the Stop key (7) for 3 seconds. When a key is pressed the display shows a Key symbol and the oven performs no function. 2. To unblock the oven press again the Stop key (7) for 3 seconds. Timer 2 1 3 4 5 6 7 1. Press the “+” key (4) until the Timer indicator flashes. 2. Press the OK key (5). 3. The numbers flash.
EN Basic Functions Microwaves Use this function to cook and heat vegetables, potatoes, rice, fish and meat. 2 1 3 4 5 6 7 1. Rotate the Function Selector (1) to the position corresponding to the Microwave 6. The Power Level Indicator Light will start to flash. Function 2. The Operating Time Indicator Light flashes. 7. Using the “+” (4) and “-” (3) keys set the required microwave power level. 3. Press the OK key (5). 8. Press the OK key (5). 4.
EN Basic Functions Microwaves + Grill Use this function to cook lasagne, poultry, roast potatoes and toasted foods. 2 1 3 4 5 6 7 1. Rotate the Function Selector (1) to the position corresponding to the Microwave + Grill Function 4. Press the OK key (5). 5. The Power Level Indicator Light will flash. 6. Using the “+” (4) and “-” (3) keys select the required microwave power level. . 2. The Operating Time Indicator Light will flash and the Power Level Indicator Light will be on.
EN Basic Functions Microwaves + Hot-Air Use this function to rapidly bake the foods. 2 1 3 4 5 6 7 1. Rotate the Function Selector (1) to the position corresponding to the Microwave + HotAir Function . 5. The Power Level Indicator Light will flash. 6. With the “+” (4) and “-” (3) keys set the desired microwave power level. 7. Press the OK key (5). 2. The Operating Time Indicator Light will flash and the Power Level Indicator Light will be on. The operating time will flash in the display. 8.
EN Basic Functions Defrosting by time (manual) Use this function to defrost any type of food quickly. 2 1 3 4 5 6 7 1. Rotate the Function Selector (1) to the position corresponding to the Microwave 6. The Power Level Indicator Light will start to flash. Function 2. The Operating Time Indicator Light flashes. 7. Using the “+” (4) and “-” (3) keys set the required microwave power level. 3. Press the OK key (5). 8. Press the OK key (5). 4.
EN When the oven is working... Interrupting a cooking cycle Altering parameters You can stop the cooking process at any time by pressing the Stop key once or by opening the oven door. The function and temperature can be altered when the oven is operating or when the cooking process has been interrupted by simply turning the respective knob to the new setting. In both cases: Microwave emission is stopped immediately. The grill is de-activated but is still very hot.
EN Defrosting General instructions for defrosting 1. When defrosting, use only dishes that are appropriate for microwaves (china, glass, suitable plastic). 2. The defrost function by weight and the tables refer to the defrosting of raw food. 3. The defrosting time depends on the quantity and thickness of the food. When freezing food keep the defrosting process in mind. Distribute the food evenly in the container. 4. Distribute the food as best as possible inside the oven.
EN Defrosting To defrost food you should select Microwave function with one of the following Power Levels: Position Power Level Power Defrost / Keep Warm 200 W Defrost 400 W Food Portions of meat, veal, beef, pork Goulash Minced meat Sausages Poultry (portions) Chicken Poularde Fish fillet Trout Prawns Fruit Bread Butter Cream cheese Creams Weight (g) 100 200 500 1000 1500 2000 500 1000 100 500 200 500 250 1000 2500 200 250 100 500 200 300 500 200 500 800 250 250 250 The table below shows diff
EN Cooking with a microwave oven Warning! Read the section “Microwave Safety” before cooking with your microwave. Follow these recommendations when cooking with your microwave: Before heating or cooking foods with peel or skin (e.g. apples, tomatoes, potatoes, sausages) prick them so that they do not burst. Cut the food up before starting to prepare it. Before using a container or dish make sure that it is suitable for microwave use (see the section on types of ovenware).
EN Cooking with a microwave oven Tables and suggestions – Cooking vegetables Cauliflower Broccoli Mushrooms Peas & carrots 500 300 250 300 Addition of liquids 100 ml 50 ml 25 ml 100 ml Frozen carrots Potatoes 250 250 25 ml 25 ml 800 800 8-10 5-7 2-3 2-3 Paprika Leek Frozen Brussel sprouts Sauerkraut 250 250 300 25 ml 50 ml 50 ml 800 800 800 5-7 5-7 6-8 2-3 2-3 2-3 250 25 ml 800 8-10 2-3 Food Quantity (g) Power (Watt) 800 800 800 800 Time (min.
EN Cooking with the grill For good results with the grill, use the grid iron supplied with the oven. IMPORTANT POINTS: 1. When the microwave grill is used for the first time there will be some smoke and a smell coming from the oils used during oven manufacture. 2. The oven door window becomes very hot when the grill is working. Keep children away. 3. When the grill is operating, the cavity walls and the grid iron become very hot. You should use oven gloves. 21 4.
EN Cooking with the Grill Tables and suggestions – Grill without microwave Fish Fish Bass Sardines/gurnard Meat Sausages Frozen hamburgers Spare rib (approx. 3 cm thick) Others Toast Toasted sandwiches Quantity (g) Time (min.) Instructions 800 6-8 fish. 18-24 15-20 Spread lightly with butter. After half of cooking time turn and spread with seasoning. 6-8 units 3 units 400 22-26 18-20 25-30 Prick after half cooking time and turn. 4 units 2 units 1½-3 5-10 Watch toasting. Watch toasting.
EN Cooking with the Grill Tables and suggestions – Microwave + Grill The microwave + grill function is ideal for cooking quickly and, at the same time, browning foods. Furthermore, you can also grill and cook cheese covered food. The microwave and the grill work simultaneously. The microwave cooks and the grill toasts. Food Quantity (g) Dish Cheese topped pasta Cheese topped potatoes Lasagne Grilled cream cheese 2 fresh chicken legs (grilled) Chicken Cheese topped onion soup 500 800 approx.
EN Cooking with Microwaves + Hot-Air Tables and suggestions – Roasting Quantity (g) Power (Watt) Temperature ºC Time (min) Standing Time (min) Beef stew 1000 200 160/170 80/90 10 Pork loin 500/600 200 180/190 35/40 10 Whole chicken 100/1200 400 230/250 30/40 10 Chicken portions 800 400 230/250 25/35 10 1500/1700 200 220/240 70/80 10 Type Duck Advice for roasting meat Turn the pieces of meat halfway through the cooking time.
EN Cooking with Hot-Air Tables and suggestions – Cakes Type Container Level Temperature Time (min) Walnut cake Spring-form type tin 1 170/180 30/35 Fruit tart Spring-form type tin 2 150/160 35/45 Fruit cakes Cake tin with central hole 1 170/190 30/45 Savoury tarts Spring-form type tin 2 160/180 50/70 Simple cake (sponge cake) Spring-form type tin 1 160/170 40/45 Cake tray Cake tray 2 2 110 170/180 35/45 35/45 Almond cakes Puff pastry Advice on cake baking ware If the cak
EN What kind of ovenware can be used? Microwave function For the microwave function, keep in mind that microwaves are reflected by metal surfaces. Glass, china, clay, plastic, and paper let microwaves pass. For this reason, metal pans and dishes or containers with metal parts or decorations cannot be used in the microwave. Glass ware and clay with metallic decoration or content (e.g. lead crystal) cannot be used in microwave ovens.
EN What kind of ovenware can be used? Table of Ovenware The table below gives you a general idea of what type of ovenware is suitable for each situation.
EN Oven Cleaning and Maintenance Cleaning is the only maintenance normally required. Warning! Your microwave oven should be cleaned regularly, with all food remains being removed. If the microwave is not kept clean its surfaces may deteriorate, reducing the oven’s working life and possibly resulting in a dangerous situation. Warning! Cleaning should be done with the oven power switched off. Take the plug out of the socket or switch off the oven’s power circuit.
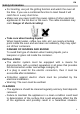
EN Oven Cleaning and Maintenance Oven ceiling If the oven ceiling is dirty, the grill can be lowered to make cleaning easier. To avoid the danger of burning, wait until the grill is cold before lowering it. Proceed as follows: 1. Turn the grill support by 180º (1). 2. Lower the grill gently (2). Do not use excessive force as this may cause damage. 3. After cleaning the ceiling, put the grill (2) back in its place, carrying out the previous operation.
EN What should I do if the oven doesn’t work? WARNING! Any type of repair must only be done by a specialised technician. Any repair done by a person not authorised by the manufacturer is dangerous. You do not need to contact Technical Assistance to resolve the following questions: The display is not showing! Check if: - The time indication has been switched off (see section on Basic Settings). Nothing happens when I press the keys! Check if: - The Safety Block is active (see section on Basic Settings).
EN Technical characteristics Specifications AC Voltage .......................................................................................... Power required .................................................................................... Grill power. .......................................................................................... Hot-Air power....................................................................................... Microwave output power. ..........................
EN Installation instructions Before installation Check that the input voltage indicated on the characteristics plate is the same as the voltage of the power outlet you are going to use. Open the oven door and take out all the accessories and remove the packing material, including the white polystyrene part that holds the turntable plate. Do not remove the mica cover on the ceiling of the interior! This cover stops fat and pieces of food damaging the microwave generator.
Installation / Einbau EN Push oven completely cabinet and centre it. into the Open microwave door and fasten the appliance to the cabinet using the four screws provided. Insert the screws through the front holes. DE Die Mikrowelle in die Nische einschieben und entsprechend anpassen. Die Tür der Mikrowelle öffnen und das Gerät mit den vier mitgelieferten Schrauben am Küchenmöbel wie im Bild dargestellt befestigen.
1630107-c