Brugsanvisn‐ Bruksanvisn‐ User Manual ing ing Køleskab S4L100F Refrigerator Kjøleskap
16 CONTENTS Safety information Safety instructions Installation Control panel Daily use Hints and tips 16 18 20 22 22 23 Care and cleaning Troubleshooting Noises Technical data Information for test institutes 24 25 28 28 29 CUSTOMER CARE AND SERVICE Always use original spare parts. When contacting our Authorised Service Centre, ensure that you have the following data available: Model, Serial Number. The information can be found on the rating plate.
17 • • • • Children of less than 3 years of age should be kept away from the appliance unless continuously supervised. Do not let children play with the appliance. Children shall not carry out cleaning and user maintenance of the appliance without supervision. Keep all packaging away from children and dispose of it appropriately.
18 • • • When the appliance is empty for long period, switch it off, defrost, clean, dry and leave the door open to prevent mould from developing within the appliance. Do not store explosive substances such as aerosol cans with a flammable propellant in this appliance. If the supply cord is damaged, it must be replaced by the manufacturer, its Authorised Service Centre or similarly qualified persons in order to avoid a hazard.
19 • Do not pull the mains cable to disconnect the appliance. Always pull the mains plug. Use WARNING! Risk of injury, burns, electric shock or fire. The appliance contains flammable gas, isobutane (R600a), a natural gas with a high level of environmental compatibility. Be careful not to cause damage to the refrigerant circuit containing isobutane. • Do not change the specification of this appliance. • Do not put electrical appliances (e.g.
20 • The refrigerant circuit and the insulation materials of this appliance are ozonefriendly. • The insulation foam contains flammable gas. Contact your municipal authority for information on how to discard the appliance correctly. • Do not cause damage to the part of the cooling unit that is near the heat exchanger. INSTALLATION WARNING! Refer to Safety chapters. WARNING! Fix the appliance in accordance with installation instruction document to avoid a risk of instability of the appliance.
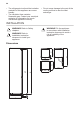
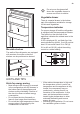
21 Overall dimensions ¹ H1 mm 1021 W1 mm 548 D1 mm 549 ¹ the height, width and depth of the appliance without the handle and feet Space required in use ² H2 (A+B) mm 1066 W2 mm 548 D2 mm 551 A mm 1030 B mm 36 ² the height, width and depth of the appliance including the handle, plus the space necessary for free circulation of the cooling air Overall space required in use ³ H3 (A+B) mm 1066 W3 mm 548 D3 mm 1071 ³ the height, width and depth of the appliance including the hand
22 5 cm Door reversibility min. 200 cm2 Please refer to the separate document with instructions on installation and door reversal. min. 200 cm2 CAUTION! At every stage of reversing the door protect the floor from scratching with a durable material. CAUTION! Refer to the installation instructions for the installation. CONTROL PANEL Switching on 1. Insert the plug into the wall socket. 2. Turn the temperature regulator clockwise to a medium setting.
23 Do not move the glass shelf above the vegetable drawer to ensure correct air circulation. Vegetable drawer There is a special drawer in the bottom part of the appliance suitable for storage of fruits and vegetables. Temperature indicator For proper storage of food the refrigerator is equipped with the temperature indicator. The symbol on the side wall of the appliance indicates the coldest area in the refrigerator.
24 Hints for fresh food refrigeration • The medium temperature setting ensures good preservation of fresh food. Higher temperature setting inside the appliance may lead to shorter shelf life of food. • Cover the food with packaging to preserve its freshness and aroma. • Always use closed containers for liquids and for food, to avoid flavours or odours in the compartment. • To avoid the cross-contamination between cooked and raw food, cover the cooked food and separate it from the raw one.
25 Defrosting of the refrigerator Period of non-operation Frost is automatically eliminated from the evaporator of the refrigerator compartment during normal use. The defrost water drains out through a trough into a special container at the back of the appliance, over the motor compressor, where it evaporates.
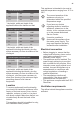
26 Problem Possible cause Solution The compressor operates continually. Temperature is set incor‐ rectly. Refer to "Control Panel" chapter. Many food products were put in at the same time. Wait a few hours and then check the temperature again. The room temperature is too high. Refer to "Installation" chap‐ ter. Food products placed in the appliance were too warm. Allow food products to cool to room temperature before storing. The door is not closed cor‐ rectly.
27 Problem Possible cause Solution There is too much con‐ densed water on the rear wall of the refrigerator. Door was opened too fre‐ quently. Open the door only when necessary. Door was not closed com‐ pletely. Make sure the door is closed completely. Stored food was not wrap‐ ped. Wrap food in suitable pack‐ aging before storing it in the appliance. Food products prevent the water from flowing into the water collector. Make sure that food prod‐ ucts do not touch the rear plate.
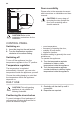
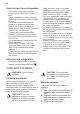
28 1. Pull the left side of the lamp cover with your fingers to unlock it. Remove the cover by pulling it towards yourself. 1 2. Replace the bulb with one of the same power and shape, specifically designed for household appliances. 3. Install the lamp cover. 4. Connect the plug to the mains socket. 5. Open the door. Make sure that the light switches on. Closing the door 2 1 1. Clean the door gaskets. 2. If necessary, adjust the door. Refer to installation instructions. 3.
29 of the appliance in the EU EPREL database. Keep the energy label for reference together with the user manual and all other documents provided with this appliance. It is also possible to find the same information in EPREL using the link https://eprel.ec.europa.eu and the model name and product number that you find on the rating plate of the appliance. See the link www.theenergylabel.eu for detailed information about the energy label.