ISTRUZIONI E CONSIGLI PER L’USO, L’INSTALLAZIONE E LA MANUTENZIONE DEI PIANI DI COTTURA DA INCASSO ELETTRICI IN VETROCERAMICA Gentile Cliente, lei ha acquistato un nostro prodotto e sentitamente la ringraziamo. Siamo certi che questo nuovo apparecchio, moderno, funzionale e pratico, costruito con materiali di primissima qualità, soddisferà nel modo migliore le sue esigenze.
ATTENZIONE: questo apparecchio e le sue parti accessibili diventano molto caldi durante l’uso. Bisogna fare attenzione ed evitare di toccare gli elementi riscaldanti. Tenere lontani i bambini inferiori agli 8 anni se non continuamente sorvegliati.
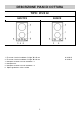
DESCRIZIONE PIANI DI COTTURA TIPO: PFVZ 02 S232CX S232TCX 1 Elemento elettrico riscaldante “hi-light” Ø 140 mm 2 Elemento elettrico riscaldante “hi-light” Ø 180 mm 3 Manopola comando elemento riscaldante n. 1 4 Manopola timer 5 Manopola comando elemento riscaldante n.
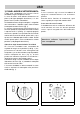
USO 1) PIANO LAVORO IN VETROCERAMICA Timer Il timer consente agli elementi riscaldanti di spegnersi automaticamente con avvisatore acustico. Esso ha anche funzione di contaminuti e può essere regolato per un periodo massimo di 60’. I piani sono equipaggiati con elementi elettrici riscaldanti “hi-light” con potenze diverse. Le zone di cotture sono indicate chiaramente sul piano (vedi figura paragrafo descrizione) e le loro potenze sono elencate nella tabella 1.
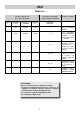
USO TABELLA 1 Posizioni di regolazione delle manopole comando Potenza e dimensioni delle zone di cottura Zona n° Diametro in mm. Elemento riscaldante Potenza W 1 145 “hi-light” 1200 2 180 “hi-light” 1800 Cotture effettuabili Regolatori d’energia 1 1-4 4-8 8 - 10 Per riscaldare piccole quantità di liquido e per mantenere calde le vivande. Per riscaldare vivande solide, scongelare i surgelati e per cuocere frutta e legumi.
USO AVVERTENZE: - Non tentare di modificare le caratteristiche tecniche del prodotto, in quanto può essere pericoloso.
PULIZIA Prima di effettuare qualsiasi operazione di pulizia, disinserire l’apparecchio dalla rete d’alimentazione elettrica. - Le tracce dei liquidi traboccati dalle pentole si eliminano con aceto o limone. - Attenzione a non lasciare cadere sul piano zucchero ed alimenti zuccherati durante la cottura. In questa evenienza spegnere il piano e pulire subito con acqua calda ed usare un raschietto sulle macchie ancora calde.
INSTALLAZIONE NOTIZIE TECNICHE DEDICATE AI SIGNORI INSTALLATORI 3) INSERIMENTO Dopo aver tolto l’imballo esterno e gli imballi interni delle varie parti mobili, assicurarsi dell’integrità dell’apparecchio. In caso di dubbio non utilizzare l’apparecchio e rivolgersi a personale qualificato. Gli elementi dell’imballaggio (cartone, sacchetti, polistirolo espanso, chiodi...) non devono essere lasciati alla portata dei bambini in quanto potenziali fonti di pericolo.
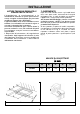
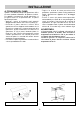
INSTALLAZIONE 4) FISSAGGIO DEL PIANO - Togliere la striscia di carta protettiva della guarnizione, posizionare il piano nel foro praticato sul mobile e bloccarlo con le apposite viti “F” di fissaggio (vedi fig. 9). - Poiché il carter del piano cottura potrebbe surriscaldarsi per effetto di un uso prolungato, si rende necessario l’inserimento di un piano di separazione in legno, bloccato da viti, che deve essere installato sotto il piano ad una distanza minima di 70 mm dal top, come indicato fig.
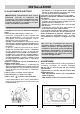
INSTALLAZIONE 5) ALLACCIAMENTO ELETTRICO - Non utilizzare per il collegamento riduzioni, adattatori o derivatori in quanto potrebbero provocare falsi contatti con conseguenti pericolosi surriscaldamenti. - Ad incasso avvenuto la presa deve essere accessibile. Quando il collegamento è effettuato direttamente alla rete elettrica: - interporre tra l’apparecchio e la rete un interruttore onnipolare, dimensionato al carico dell’apparecchio, con apertura minima fra i contatti di 3 mm.
MANUTENZIONE In caso di sostituzione del cavo d’alimentazione, l’installatore dovrà tenere il conduttore di terra più lungo rispetto ai conduttori di fase e rispettare le avvertenze riportate nel paragrafo “ALLACCIAMENTO ELETTRICO”. Per rimontare il piano ripetere in modo inverso le operazioni più sopra elencate. Prima d’effettuare qualsiasi operazione di manutenzione, disinserire l’apparecchio dalla rete di alimentazione.
DATI TECNICI MODELLO 2 ELEMENTI RISCALDANTI (2 “HI-LIGHT”) Voltaggio 230 – 240 V ~ Frequenza 50/60 Hz Potenza totale nominale 3000 W ASSISTENZA TECNICA E RICAMBI Questa apparecchiatura, prima di lasciare la fabbrica, è stata collaudata e messa a punto da personale esperto e specializzato, in modo da garantire i migliori risultati di funzionamento. I ricambi originali si trovano solo presso i nostri Centri di assistenza Tecnica e negozi autorizzati.
USE, INSTALLATION AND MAINTENANCE INSTRUCTIONS FOR ELECTRICAL BUILT-IN HOT PLATES Dear User, we are sincerely grateful to you for purchasing one of our products. We are sure that the appliance modern, functional and easy to use, built with the finest materials and components will satisfy all your needs. We would ask that you read the instructions within this booklet very carefully so as to enable you to obtain quality results from the outsets.
WARNING: the appliance and its accessible parts become hot during use. Care should be taken to avoid touching heating elements. Children less than 8 years of age shall be kept away unless continuously supervised.
DESCRIPTION OF THE HOT PLATES TYPE: PFVZ 02 S232CX S232TCX 1 2 3 4 5 6 “Hi-light” electric heating element Ø 140 mm “Hi-light” electric heating element Ø 180 mm 1200 W 1800 W Switch for electric element n. 1 Timer control knob Switch for electric element n.
USE 1) ELECTRIC HOB Timer Timer allows to heating elements to turn off automatically by acoustic warning. It can be used also as timer (without turning off) and can be set for a period of max. 60 minutes. The hot plates are equipped with “hi-light” heating elements with different powers and diameters. Cooking zones are aesily identifiables thanks to the circles (see illustration in description) on the top; relative powers are listed in the scheme n. 1.
USE SCHEME 1 Position for regulation of the knobs Power and dimensions of the cooking zones Zone n° Diameter in mm Heating element Power W 1 145 “hi-light” 1200 2 180 “hi-light” Possible cookings Energy regulators 1 1800 1-4 4-8 8 - 10 To heat small quantities of liquid and to keep dishes warm. To heat foods, thaw deep-frozen foods, to cook fruits and pulses. To cook meat, fish, pulses with sauce. 10 - 12 To cook roast of meat, fish; to cook steaks and eggs.
USE WARNINGS: - If you should not to use this appliance any more (or replace an old model), before disposing of it, make it inoperative in conformity with current law on the protection of health and the prevention of environmental pollution by making its dangerous parts harmless, especially for children who might play on an abandoned appliance. for a correct use, please look at fig. 3 and remind: - switch on the electricity only after having placed the pot on the cooking zone.
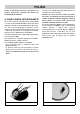
CLEANING Before any cleaning operation, disconnect the appliance from the electric circuit. - Marks of liquid, overflowed from the pot, can be removed using vinegar or lemon. - Pay attention to not let fall sugar or element with sugar. In this case turn the switch off and clean the surface with hot water and the razor blade scraper. - After a period of time may appear metal reflex and scratches (fig. 5) due to the wrong cleaning and the wrong use of the pots.
INSTALLATION TECHNICAL INFORMATION FOR THE INSTALLER 3) INSERTING Check that the appliance is in a good condition after having removed the outer packaging and internal wrappings from around the various loose parts. In case of doubt, do not use the appliance and contact qualified personnel. Never leave the packaging materials (cardboard, bags, polystyrene foam, nails, etc.) within children’s reach since they could become potential sources of danger.
INSTALLATION 4) FIXING - Since the casing of the hob may overheat due to a prolonged use, it is necessary to insert a separation plane wood, blocked by screws, which must be installed under the cooktop at a minimum distance of 70 mm from the top, as shown in fig.6. A special sealing strip underneath the hob for damage. Make sure it is correctly positioned with no gaps; it avoids any water infiltration.
INSTALLATION 5) ELECTRICAL CONNECTION - The input cable has to be located so that never reach the temperature of 90 °C. - Please do not use in the connection any reduction, adaptation that may provoke a false contact with following dangerous overheatings. - The outlet must be accessible after the built-in.
MAINTENANCE longer than "live" ones, and must respect the cautions in paragraph "ELECTRICAL CONNECTION". To reassemble the appliance repeat the inverse process. Before doing any action, disconnect the appliance from the input power. 6) COMPONENTS SUBSTITUTION To replace the components lodged in the internal part, is necessary to take the appliance up from the furniture, overturn it, loosen the screws and take away the bottom.
TECHNICAL DATA MODEL 2 HEATING ELEMENTS (2 “HI-LIGHT”) Voltage 230 – 240 V ~ Frequency 50/60 Hz Tot. Rating 3000 W TECHNICAL ASSISTANCE AND SPARE PARTS This appliance, before leaving the factory, has been carefully tested and regulated by expert and specialized personnel in order to guarantee the best performances. Any repairs or adjustments which may be subsequently required may only be carried out by qualified personnel with the utmost care and attention.