Libretto d’ uso User manual Manuel d’utilisation Gebrauchsanleitung Gebruiksaanwijzing Manual de uso Livro para utilização Brugsvejledning Användningshandbok Руководство по эксплуатации Instrukcja użytkowania Bruksveiledning KSET66E - KSET66VSE KSET66VNE - KSET66VBE - KSET96E
INDICE IT CONSIGLI E SUGGERIMENTI.............................................................................................................................................. 5 CARATTERISTICHE.............................................................................................................................................................. 6 INSTALLAZIONE ..............................................................................................................................................
ÍNDICE PT CONSELHOS E SUGESTÕES............................................................................................................................................ 41 CARACTERÍSTICAS ........................................................................................................................................................... 42 INSTALAÇÃO......................................................................................................................................................
SA اﻟﻔﻬﺮس .............................................................................................................................................. 77اﻗﺘﺮاﺣ ﺎت و ارﺷ ﺎدات ........................................................................................................................................................... 78اﻟﺨﺼ ﺎﺋﺺ .......................................................................................................................................................
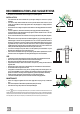
RECOMMENDATIONS AND SUGGESTIONS The Instructions for Use apply to several versions of this appliance. Accordingly, you may find descriptions of individual features that do not apply to your specific appliance. INSTALLATION • The manufacturer will not be held liable for any damages resulting from incorrect or improper installation.
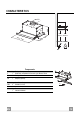
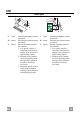
CHARACTERISTICS 260 ø150 598 0 - 89 52 8 28 Min. Min. 650mm 650mm 1 0÷ Components Ref. 1 20 10 Q.ty 1 1 1 Product Components Hood Body, complete with: Controls, Light, Blower, Filters Closing element Damper (optional) Ref. 12a Q.ty Installation Components 4 Screws 4,2 x 44,4 10 Q.
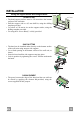
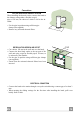
INSTALLATION Drilling the Support surface and Fitting the Hood SNAP-ON FITTING • The hood can be installed either directly on the bottom surface of the wall units using snap-on side supports. • Cut a fitted opening in the bottom surface of the wall unit, as shown. • Insert the hood until the side supports snap into place. • Lock in position by tightening the screws Vf from underneath the hood. 220 SCREW FITTING • The hood support surface must be 220 mm above the bottom surface of the wall units.
Connections DUCTED VERSION AIR EXHAUST SYSTEM When installing the ducted version, connect the hood to the chimney using either a flexible or rigid pipe ø 150 mm, the choice of which is left to the installer. • Fix the pipe in position using sufficient pipe clamps (not supplied). • Remove any activated charcoal filters. RECIRCULATION VERSION AIR OUTLET • Cut a hole ø 150 mm in the wall unit over the hood.
USE Control panel L M-V 0 1 3 2 1 0 M-V L L Light M Motor V Speed EN Switches the lighting system L on and off. Switches the extractor motor M on and off. V Sets the operating speed of the extractor: 1. Low speed, used for a continuous and silent air change in the presence of light cooking vapour. 2. Medium speed, suitable for most operating conditions given the optimum treated air flow/noise level ratio. 3.
MAINTENANCE Grease filters CLEANING METAL SELF- SUPPORTING GREASE FILTERS • The filters must be cleaned every 2 months of operation, or more frequently for particularly heavy usage, and can be washed in a dishwasher. • Remove the filters one at a time by pushing them towards the back of the group and pulling down at the same time. • Wash the filters, taking care not to bend them. Allow them to dry before refitting. • When refitting the filters, make sure that the handle is visible on the outside.