Libretto istruzioni Instructions Manual Manuel d’Instructions Bedienungsanleitung Gebruiksaanwijzing Manual de instrucciones Manual de Instruções Brugsvejledning Bruksanvisning Руководство по эксплуатации Instrukcja Obsługi Bruksanvisning Käyttöohje KIR37XE
INDICE IT CONSIGLI E SUGGERIMENTI.............................................................................................................................................. 5 CARATTERISTICHE.............................................................................................................................................................. 8 INSTALLAZIONE ..............................................................................................................................................
ÍNDICE PT CONSELHOS E SUGESTÕES............................................................................................................................................ 77 CARACTERÍSTICAS ........................................................................................................................................................... 80 INSTALAÇÃO......................................................................................................................................................
SISÄLTÖ FI OHJEET JA SUOSITUKSET ............................................................................................................................................. 149 MITAT JA OSAT ................................................................................................................................................................ 152 ASENNUS ................................................................................................................................................
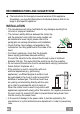
RECOMMENDATIONS AND SUGGESTIONS The Instructions for Use apply to several versions of this appliance. Accordingly, you may find descriptions of individual features that do not apply to your specific appliance. INSTALLATION • The manufacturer will not be held liable for any damages resulting from incorrect or improper installation.
• If the instructions for installation for the gas hob specify a greater distance specified above, this has to be taken into account. Regulations concerning the discharge of air have to be fulfilled. • Use only screws and small parts in support of the hood. Warning: Failure to install the screws or fixing device in accordance with these instructions may result in electrical hazards. • Connect the hood to the mains through a two-pole switch having a contact gap of at least 3 mm.
• “CAUTION: Accessible parts may become hot when used with cooking appliances.” MAINTENANCE • Switch off or unplug the appliance from the mains supply before carrying out any maintenance work. • Clean and/or replace the Filters after the specified time period (Fire hazard). • The Grease filters must be cleaned every 2 months of operation, or more frequently for particularly heavy usage, and can be washed in a dishwasher.
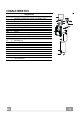
CHARACTERISTICS Components Ref. 1 2 7.1 7.1a 7.1b 9 10 10a 15 25 Q.ty 1 1 1 1 1 1 1 1 1 2 Product Components Hood Body, complete with: Controls, Light, Blower, Filters Chimney Upper Telescopic frame complete with extractor, consisting of: Upper frame Lower frame Reducer Flange ø 150-120 mm Flange ø 120 mm Dumper Recirculation Air Outlet Connection Pipe clamps (not included) Ref. 11 12c 12f 12g 12h 21 22 23 Q.
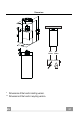
* ** Dimensions Min. Min. 550mm 550mm * Dimensions of the hood in ducting version. ** Dimensions of the hood in recycling version.
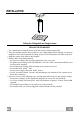
INSTALLATION Drilling the Ceiling/shelf and fixing the frame DRILLING THE CEILING/SHELF • Use a plumb line to mark the centre of the hob on the ceiling/support shelf. • Place the drilling template 21 provided on the ceiling/support shelf, making sure that the template is in the correct position by lining up the axes of the template with those of the hob. • Mark the centres of the holes in the template.
PREPARATION OF THE FRAME FOR THE HOOD IN RECYCLING VERSION A In case the hood is used in recycling version it is necessary to prepare the frame with all the necessary connection pieces. In order to make the installation easier it is necessary to lengthen the frame: • Unscrew the two screws 2.1 fixing the upper chimney to the frame and pull the chimney out. • Unscrew the four safety screws placed at the top in the frame separation area. (A).
FIXING THE FRAME • Lift the frame up, making sure that the index over the frame plate is turned forwards. • Fit the frame slots onto the two screws inserted in the ceiling as above, and turn until reaching the centre of the adjustment slot. • Tighten the two screws and fasten the other two screws provided; before locking the screws completely, it is possible to adjust the frame by turning it, making sure that the screws do not come out of their housing in the adjustment slot.
Installing of the chimney and fixing of the hood When the hood is installed in recycling version the chimney has to be positioned with the slots upwards. When the hood is installed in ducting version it has to be positioned in the opposite way. • Place the chimney on the frame and fix it to the upper part of it with the earlier removed screws. When installing the hood in recycling version make sure that the slots correspond to the air outlet of the recycling air outlet piece 15.
USE L T1 L1 T2 L2 T3 L3 T4 L4 Control panel Button L Function Led Turns the lighting system on and off. - Press and hold for approx. 2 seconds to turn the lighting system on and off at reduced intensity. T1 Turn the suction motor on and off at speed one. On. Press and hold the button for approximately 2 seconds, After 100 working hours all the with all the loads turned off (Motor and Lights), to reset LEDs (L1-L2-L3-L4) will light up the Filters and turn off the Leds that are lit.
MAINTENANCE Metal grease filters These can also be washed in the dishwasher, and need to be cleaned when all the command LEDs light up in a continuous manner or at least once every 2 months use, or more frequently if use is particularly intensive. Resetting the alarm signal • Press button T1 (see the paragraph on Use). Cleaning the Filters • Open the lighting unit by pulling on the nocth. • Remove the Filters one at a time, pushing them towards the back of the unit and at the same time pulling downward.
Activated Charcoal Filter (Recirculation Version) • This cannot be washed or regenerated, and must be changed when all the command LEDs start to flash, or at least once every 4 months. Activating the alarm signal • In Recirculation Version Hoods, the Filter Saturation Alarm must be activated on installation or at a later date.