Contents 1.1 1.2 1.3 1.4 1.5 1.6 General safety instructions Identification plate Manufacturer liability Appliance purpose This user manual How to read the user manual 2 Description 2.1 2.2 2.3 2.4 2.5 General Description Cooking hob Control panel Other parts Available accessories 3 Use 3.1 3.2 3.3 3.4 3.5 3.6 4 8 8 9 9 9 10 10 11 11 12 13 14 Instructions First use Using the accessories Using the cooktop Using the oven Cooking advice 4 Cleaning and maintenance 4.1 4.2 4.3 4.4 4.5 4.6 4.
Instructions 1 Instructions 1.1 General safety instructions Risk of personal injury • During use the appliance becomes hot. Care should be taken to avoid touching heating elements inside the oven. • Protect your hands by wearing oven gloves when handling food inside the oven cavity. • Never try to put out a fire or flames with water: turn off the appliance and smother the flames with a fire blanket or other appropriate cover.
be operated by means of external timer or separate remote control system. • Cleaning and maintenance must not be carried out by unsupervised children. • Be aware of how rapidly the cooking zones heat up. Do not place empty pans on the heat. Danger of overheating. • Fats and oils can catch fire if they overheat. Do not leave the appliance unattended while preparing foods containing oils or fats. If fats or oils catch fire, never put water on them.
Instructions yourself or without the intervention of authorised persons. • Do not pull the cable to remove the plug. • If the power supply cable is damaged, contact technical support immediately and they will replace it. Risk of damaging the appliance • Do not use abrasive or corrosive detergents (e.g. scouring powders, stain removers and metallic sponges) on glass parts. • Use wooden or plastic utensils. • Racks and trays must be inserted as far as they will go into the side guides.
cooktop. • Take care not to spill acidic substances such as lemon juice or vinegar onto the cooktop. • Do not put empty pans or frying pans on switched on cooking zones. • Do not use rough or abrasive materials or sharp metal scrapers. • Do not use cleaning products containing chlorine, ammonia or bleach on steel parts or parts with metallic surface finishes (e.g. anodizing, nickel- or chromiumplating). • Do not use abrasive or corrosive detergents (e.g.
Instructions • Have the electrical connection performed by authorised persons. • The appliance must be connected to earth in compliance with electrical system safety standards. • If the electrical supply is restricted, means of allpole disconnection must be accessible and incorporated in the fixed wiring in accordance with the wiring rules.
1.4 Appliance purpose • This appliance is intended for cooking food in the home environment. Every other use is considered improper. • The appliance is not designed to operate with external timers or with remote-control systems. 1.5 This user manual This user manual is an integral part of the appliance and must therefore be kept in its entirety and in an accessible place for the whole working life of the appliance. Read this user manual carefully before using the appliance. 1.
Instructions 1.7 How to read the user manual This user manual uses the following reading conventions: Instructions General information on this user manual, on safety and final disposal. Description Description of the appliance and its accessories. Use Information on the use of the appliance and its accessories, cooking advice. Cleaning and maintenance Information for proper cleaning and maintenance of the appliance. Installation Information for authorised persons: installation, operation and inspection.
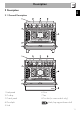
Description EN 2 Description 2.
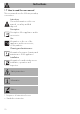
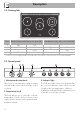
Description 2.2 Cooking hob Zone 1 2 3 4 Outside diameter (mm) Max. power draw (W)* Inside diameter (mm) Max. power draw (W)* 150 210 oval plate 195 1200 2000 2200 2000 120 170 - 750 1400 - * Power levels are approximate and can vary according to the pan used or the settings made. 2.3 Control panel 1 Minute minder timer knob 3 Indicator light Allows you to set manual cooking or a timer with automatic oven switch off at the end of cooking.
4 Function knob Interior lighting The oven's various functions are suitable for different cooking modes. After selecting the required function, set the cooking temperature using the temperature knob. The appliance interior lighting comes on: • When the door is opened • When any function is selected. EN Description 5 Cooking zone control knobs Useful for switching on and adjusting the cooking zones of the cooktop.
Description 2.5 Available accessories Deep tray Some models are not provided with all accessories. Rack Useful for collecting fat from foods placed on the rack above and for cooking sweets, biscuits, etc. Useful for supporting containers with food during cooking. Tray rack To be placed over the top of the oven tray; for cooking foods which may drip. 14 The accessories intended to come into contact with food are made of materials that comply with the provisions of current legislation.
Use 3.1 Instructions High temperature inside the oven during use Danger of burns • Keep the oven door closed during cooking. • Protect your hands wearing heat resistant gloves when moving food inside the oven. • Do not touch the heating elements inside the oven. • Do not pour water directly onto very hot trays. • Do not allow children younger than 8 years old to come near the appliance when in operation.
Use High temperature inside the oven during use Danger of fire or explosion • Do not spray any spray products near the oven. • Do not use or leave flammable materials near the oven or the storage compartment. • Do not use plastic kitchenware or containers when cooking food. • Do not put sealed tins or containers in the oven. • Do not leave the oven unattended during cooking operations where fats or oils could be released. • Remove all trays and racks which are not required during cooking. 3.2 First use 1.
Tray rack Switching on the cooking zones The tray rack has to be inserted into the tray. In this way fat can be collected separately from the food which is being cooked. The appliance has cooking zones of different diameters and power levels. Their positions and the edges of the heated area are shown by the markings on the glass. The cooking zones are of the HIGHLIGHT type, they turn on after a few seconds and the heating is adjustable using the controls on the control panel, from low to high.
Use Practical advice for using the cooktop 3.5 Using the oven • The diameter of the base of the pan must correspond to the diameter of the cooking zone. Switching on the oven • When buying a saucepan, check whether the diameter indicated is that of the base or the top of the container, as the top is almost always larger than the base. • The base of the cookware must be thick and completely flat. It should also be clean and dry. The cooktop should be clean and dry as well.
Functions list Fan forced The combination of the fan and the circular heating element (incorporated in the rear of the oven) allows you to cook different foods on several levels, as long as they need the same temperatures and same type of cooking. Hot air circulation ensures instant and even distribution of heat. It will be possible, for instance, to cook fish, vegetables and biscuits simultaneously (on different levels) without odours and flavours mingling.
Use 3.6 Cooking advice General advice • Use a fan assisted function to achieve consistent cooking at several levels. • It is not possible to shorten cooking times by increasing the temperature (the food could be overcooked on the outside and undercooked on the inside). Advice for cooking meat • Cooking times vary according to the thickness and quality of the food and to consumer taste. • Use a meat thermometer when roasting meat, or simply press on the roast with a spoon.
Use EN Cooking information table Lasagne Pasta bake 3-4 3-4 Convection Convection Runner position from the bottom 1 1 Roast veal Pork Sausages Roast beef Roast rabbit Turkey breast Roast pork neck Roast chicken 2 2 1.5 1 1.5 3 2-3 1.
Cleaning and maintenance 4 Cleaning and maintenance 4.1 Instructions Improper use Risk of damage to surfaces • Do not use steam jets to clean the appliance. • Do not use cleaning products containing chlorine, ammonia or bleach on steel parts or parts with metallic finishes on the surface (e.g. anodizing, nickel- or chromium-plating). • Do not use abrasive or corrosive detergents (e.g. scouring powders, stain removers and metallic sponges) on glass parts.
Weekly cleaning 4.3 Removing the door Clean and maintain the cooktop once a week using an ordinary glass ceramic cleaning product. Always follow the manufacturer’s instructions. The silicon in these products creates a protective, waterrepellent membrane which also resists dirt. All marks stay on the membrane and can therefore be removed easily. After cleaning, dry the surface with a clean cloth.
Cleaning and maintenance 3. To reassemble the door, put the hinges in the relevant slots in the oven, making sure that grooved sections A are resting completely in the slots. Lower the door and once it is in place remove the pins from the holes in the hinges. 4.5 Removing the internal glass panes For easier cleaning the door internal glass panes can be disassembled. 1. Remove the internal glass pane by pulling the rear part gently upwards, following the movement indicated by the arrows (1). 2.
4. Clean the external glass pane and the panes previously removed. Use absorbent kitchen roll. In case of stubborn dirt, wash with a damp sponge and neutral detergent. Removing racks/trays support frames Removing the guide frames enables the sides to be cleaned more easily. This operation should be performed each time the automatic cleaning cycle is used (on some models only).
Cleaning and maintenance 4.6 Vapour Clean Vapour Clean is an assisted cleaning procedure which facilitates the removal of dirt. Thanks to this process, it is possible to clean the inside of the oven very easily. The dirt residues are softened by the heat and water vapour for easier removal at a later stage. • Pour approximately 40 cc of water into the tray. Make sure it does not overflow out of the cavity.
Cleaning and maintenance 1. Turn the function knob to the symbol the temperature knob to the symbol and . 2. Set a cooking time of 18 minutes using minute minder timer knob. The Vapour Clean cycle starts. 3. At the end of the Vapour Clean cycle, the timer will deactivate the oven heating elements, the buzzer will start to sound and the numbers on the programmer clock dial will flash. End of the Vapour Clean cycle 4. Open the door and wipe away the less stubborn dirt with a microfibre cloth. 5.
Cleaning and maintenance 4. Slide out and remove the light bulb. Removing and installing the oven seal To remove the oven seal: • Unhook the clips in the 4 corners and in the centre, then pull the oven seal. Do not touch the halogen light bulb directly with your fingers, but wrap it in insulating material. 5. Fit the new light bulb. 6. Refit the cover. Ensure the moulded part of the glass (A) is facing the door.
Cleaning and maintenance EN What to do if... The appliance does not work. • The circuit breaker is faulty: look in the fuse box and check that the circuit breaker is in working order. • Power cut: check whether the kitchen light works. The oven does not heat up. • Faulty fuse: check and, if required, replace the circuit breaker. • The function knob has not been set: set the function knob. All dishes that are prepared in the oven burn within an extremely short period of time.
Installation 5 Installation 5.1 Positioning Heavy appliance Danger of crush injuries • Place the appliance into the piece of furniture with the aid of a second person. Pressure on the open door Risk of damages to the appliance • When positioning the appliance during installation, do not use the door handle to lift up or move this appliance. • Never use the oven door to lever the appliance into place when fitting. • Avoid exerting too much pressure on the oven door when open.
Positioning and levelling Heavy appliance Risk of damage to the appliance • Insert the front feet first and then the rear ones. • After making the gas and electrical connections, screw on the four feet supplied with the appliance. B - Class 2 subclass 1 (Built-in appliance) The appliance must sit level on the floor to ensure stability. • Screw or unscrew the bottom part of the foot until the appliance is stable and level on the floor.
Installation Fastening to the wall 3. Assemble the fastening bracket. The anti-tip devices must be installed in order to prevent the appliance tipping over. 1. Screw the wall fastening plate to the rear of the appliance. 4. Align the base of the hook on the fastening bracket with the base of the slot on the wall fastening plate. 2. Adjust the height of the 4 feet.
Installation 6. Use 50 mm for the distance from the side of the appliance to the bracket holes. 7. Move the bracket onto the wall and mark the position of the holes to be drilled in the wall. EN 5. Align the base of the fastening bracket with the ground and tighten the screws to fix the measurements. 8. After drilling the holes in the wall, use wall plugs and screws to fasten the bracket to the wall. 9.
Installation Wall fixing 1. Turn the screw placed behind the cooktop near the gas connection. 4. Mark the wall in the position where the hole is to be drilled. 5. Drill the hole and insert a wall plug. 2. Attach the chain to the cooker with the screw just removed. 3. Stretch it out horizontally so that the other end of the chain touches the wall. 34 6. Attach the chain and push the appliance to the wall.
Assembling the upstand The upstand provided is an integral part of the product. It must be fastened to the appliance prior to installation. The upstand must always be positioned and secured correctly on the appliance. 1. Unscrew the 2 nuts B on the back of the worktop. 2. Position the upstand above the worktop, taking care to align the pins C with the holes D. 3. Secure the upstand to the worktop by tightening the screws A.
Installation 5.2 Electrical connection Power voltage Danger of electrocution • Have the electrical connection performed by authorised technical personnel. • Use personal protective equipment. • The appliance must be connected to earth in compliance with electrical system safety standards. • Disconnect the mains supply. • Do not pull the cable to remove the plug. • Use cables withstanding a temperature of at least 90°C. • The tightening torque of the screws of the terminal board conductors must be 1.
Fixed connection 5.3 For the installer Fit the power line with an all-pole circuit breaker with a contact separation distance sufficient to provide complete disconnection in category III overvoltage conditions, pursuant to installation regulations. The disconnection incorporated in the fixed wiring must be compliant to AS/NZS 3000 regulations. • The plug must remain accessible after the installation is complete. Do not kink or trap the mains connection cable.