
User manual

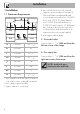


Installation
10
1.3 Unpacking, moving and
positioning the range
• It is recommended that the grates, the
griddle plate and burner heads, burner
caps, front kick panel and oven racks be
removed to facilitate handling. This will
reduce the weight for moving.
• When positioning the appliance during
installation,
do not use the door handle
to lift up or move this appliance.
• Remove the outer carton and packing
material from the shipping base.
• Remove angle-mounting brackets from
the range.
• Due to the weight, a dolly/fork lift with
soft rubber tread wheels should be used
to move this unit. The weight must be
supported uniformly across the bottom.
• The floor under the legs should be
protected (wood, strips, carpet,
paneling, etc.) before pushing the unit
into position.
• The anti-tip device must be installed, and
the gas and electrical connections
should be made before the range is
placed in its final position.
• Ensure that the burner caps are correctly
positioned on the burner bases on the
rangetop.
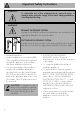
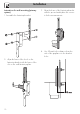
• Legs should be installed near to where
the appliance will be used as they are
not secure for long transit. Keep the unit
raised so the legs can be screwed into
their couplings, then lower the range
gently to prevent the legs and mounting
hardware from being subject to any
undue strain. Instead of tilting the unit, it is
recommended that a pallet or lift jack be
used.
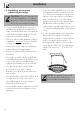
• For proper performance the range must
be leveled. The range is leveled by
adjusting the four legs to ensure that the
unit is on a perfectly level plane. To
accomplish this, screw or unscrew the
second part of the legs. The adjustment
range of the screw is 1.37 inches (35
mm).
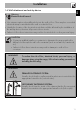
CAUTION: This unit is designed as
a cooking appliance. For safety
purposes, never use it for warming
the room or as a space heater.
NOTE: this appliance must only
use the specific leveling legs
provided by the manufacturer.