
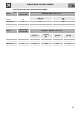
Technical data


54
•
Instructions for the installer
•
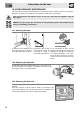
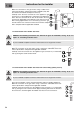
Make the connection to the gas mains using a rubber hose
whose specifications comply with current standards (verify that
the reference standard is stamped on the hose).
Carefully screw the hose connector 3 to the appliance’s gas
connector 1 (½” thread ISO 228-1), placing the seal 2 between
them. The hose connector 4 can also be screwed to the hose
connector 3, depending on the diameter of the gas hose used.
After having tightened the hose connector(s), push the gas
hose 6 onto the hose connector and secure it with the clamp 5
that is compliant with the applicable standard.
•
•
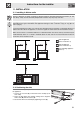
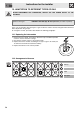
11.5.2Connection with a flexible steel hose
• •
• • • •
WARNING: The following instructions are valid for all types of installation, see fig. A, B, C in
chapter “11.1 Installing in kitchen units”.
Only use standards-compliant continuous wall steel hoses no longer than 2 metres.
• • • •
•
This type of installation can be used for both built-in and free-standing appliances.
Make the connection to the gas mains using a continuous wall flexible steel hose
whose specifications comply with the applicable standard.
Carefully screw the connector 3 to the appliance’s gas connector 1 (½” thread ISO
228-1), placing the seal 2 between them.
•
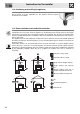
11.5.3Connection with a flexible steel hose with conical fitting (where present)
• • • •
WARNING: The following instructions are valid for all types of installation, see fig. A, B, C in
chapter “11.1 Installing in kitchen units”.
Only use standards-compliant continuous wall steel hoses no longer than 2 metres.
• • • •
•
This type of installation can be used for both built-in and free-standing appliances.
Make the connection to the gas mains using a continuous wall flexible steel hose
whose specifications comply with the applicable standard.
Carefully screw the connector 3 to the appliance’s gas connector 1 (½” thread ISO
228-1), placing the seal 2 between them. Apply insulating material to the thread of
the connector 3, and then tighten the flexible steel hose 4 to the connector 3.
3
2
1
4
3
6
5
2
1
3
2
1
4
3