EN User Manual Fridge Freezer C7176DNPHSG
CONTENTS Safety information Safety instructions Operation Daily use Hints and tips 2 3 5 8 10 Care and cleaning Troubleshooting Installation Technical data 11 12 15 16 Subject to change without notice. SAFETY INFORMATION Before the installation and use of the appliance, carefully read the supplied instructions. The manufacturer is not responsible for any injuries or damages that are the result of incorrect installation or usage.
• • • • • • • Do not use mechanical devices or other means to accelerate the defrosting process, other than those recommended by the manufacturer. Do not damage the refrigerant circuit. Do not use electrical appliances inside the food storage compartments of the appliance, unless they are of the type recommended by the manufacturer. Do not use water spray and steam to clean the appliance. Clean the appliance with a moist soft cloth. Only use neutral detergents.
• Make sure not to cause damage to the electrical components (e.g. mains plug, mains cable, compressor). Contact the Authorised Service Centre or an electrician to change the electrical components. • The mains cable must stay below the level of the mains plug. • Connect the mains plug to the mains socket only at the end of the installation. Make sure that there is access to the mains plug after the installation. • Do not pull the mains cable to disconnect the appliance. Always pull the mains plug.
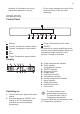
authority for information on how to discard the appliance correctly. • Do not cause damage to the part of the cooling unit that is near the heat exchanger. OPERATION Control Panel 1 8 1 2 3 4 5 6 7 Display Freezer Temperature warmer button Freezer Temperature colder button OK Mode Fridge Temperature warmer button 6 5 4 3 2 7 Fridge Temperature colder button 8 ON/OFF It is possible to change predefined sound of buttons by pressing together Mode and temperature colder button for a few seconds.
If "dEMo" appears on the display, refer to "Troubleshooting" . Switching off 1. Press the appliance ON/OFF for 5 seconds. The display switches off. 2. Disconnect the mains plug from the power socket. Temperature regulation Set the temperature of the appliance by pressing the temperature regulators. Default set temperature: • +5°C for the fridge • -18°C for the freezer The temperature indicators show the set temperature. The set temperature will be reached within 24 hours.
The Holiday indicator flashes. The temperature indicator shows the set temperature. 2. Press the OK to confirm. The Holiday indicator is shown. This mode switches off after selecting a different temperature. FastFreeze function The FastFreeze function accelerates the freezing of fresh food and, at the same time, protects foodstuffs already stored from undesirable warming. 1. To activate this function press the Mode button until the corresponding icon appears. The FastFreeze indicator flashes. 2.
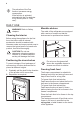
The activation of the Fan function increases energy consumption. If the function is activated automatically the Fan indicator is not shown (refer to "Daily use"). DAILY USE WARNING! Refer to Safety chapters. Cleaning the interior Movable shelves The walls of the refrigerator are equipped with a series of runners so that the shelves can be positioned as desired.
The freezing process lasts 24 hours: during this period do not add other food to be frozen. It is located in the lower part, directly above of the vegetable conservation drawer. When the freezing process is completed, return to the required temperature (see "FastFreeze Function"). Fan In this condition, the refrigerator compartment temperature might drop below 0°C. If this occurs reset the temperature regulator to a warmer setting.
Cold accumulators The freezer contains at least one cold accumulator which increases storage time in the event of a power cut or breakdown. Frozen Food Calendar The symbols show different types of frozen goods. The numbers indicate storage times in months for the appropriate types of frozen goods. Whether the upper or lower value of the indicated storage time is valid depends on the quality of the foods and treating before freezing.
• do not allow fresh, unfrozen food to touch food which is already frozen, thus avoiding a rise in temperature of the latter; • lean foods store better and longer than fatty ones; salt reduces the storage life of food; • water ices, if consumed immediately after removal from the freezer compartment, can possibly cause the skin to be freeze burnt; • it is advisable to show the freezing in date on each individual pack to enable you to keep tab of the storage time.
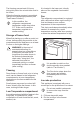
It is important to periodically clean the defrost water drain hole in the middle of the refrigerator compartment channel to prevent the water overflowing and dripping onto the food inside. Periods of non-operation When the appliance is not in use for long periods, take the following precautions: 1. Disconnect the appliance from electricity supply. 2. Remove all food. 3. Clean the appliance and all accessories. 4. Leave the door/doors open to prevent unpleasant smells.
Problem Possible cause Solution The temperature in the ap‐ pliance is too high. Refer to "High temperature alarm". The door is left open. Close the door. Refer to "Door open alarm" The temperature in the ap‐ pliance is too high. Contact a qualified electrician or contact the nearest Author‐ ised Service Centre. A or symbol is shown instead of numbers on the Temperature Display. Temperature sensor prob‐ lem.
Problem Possible cause Solution Water flows on the floor. The melting water outlet is not connected to the evap‐ orative tray above the compressor. Attach the melting water outlet to the evaporative tray. Temperature cannot be set. The "FastFreeze function" or "Shopping function" is switched on. Switch off "FastFreeze func‐ tion" or "Shopping function" manually, or wait until the function resets automatically to set the temperature. Refer to "FastFreeze function" or "Shopping function".
INSTALLATION Electrical Connection Location Refer to the assembly instructions for the installation. To ensure best performance, install the appliance well away from sources of heat such as radiators, boilers, direct sunlight etc. Make sure that air can circulate freely around the back of the cabinet. Positioning Install the appliance in a dry, well ventilated indoors where the ambient temperature corresponds to the climate class indicated on the rating plate of the appliance.
3. Connect the wire coloured brown to the terminal either marked with the “L“ or coloured red. 4. Check that no cut, or stray strands of wire is present and the cord clamp (E) is secure over the outer sheath. Make sure the electricity supply voltage is the same as that indicated on the appliance rating plate. 5. Switch on the appliance. The appliance is supplied with a 13 amp fuse (B). In the event of having to change the fuse in the plug supplied, a 13 amp ASTA approved (BS 1362) fuse must be used.
not dispose of appliances marked with the symbol with the household waste. Return the product to your local recycling facility or contact your municipal office.
222374536-A-402017