
Datasheet


1. If air leakage increases or equipment does
not operate properly, stop operation.
After mounting is completed, confirm that it has been done
correctly by performing a suitable function test.
2. Do not apply external force to the coil
section.
When tightening is performed, apply a wrench or other tool to
the outside of the piping connection parts.
3. Do not warm the coil assembly with a heat
insulator, etc.
Use tape and heaters, etc., for freeze prevention on the piping
and body only. They can cause the coil to burn out.
4. Secure the product except in the case of steel
piping and copper fittings.
5. Avoid sources of vibration, or set the arm
from the body to the minimum length so that
resonance will not occur.
6. Instruction manual
Mount the product after reading the manual carefully and
understanding its contents. Also keep the manual where it can
be referred to as necessary.
7. Painting and coating
Warnings and specifications printed or pasted on the product
should not be erased, removed or covered up.
Mounting
Warning
1. Preparation before piping
Before piping is connected, it should be thoroughly blown out
with air (flushing) or washed to remove chips, cutting oil and
other debris from inside the pipe.
2. Wrapping of pipe tape
When connecting pipes and fittings, etc., be sure that chips from
the pipe threads and sealing material do not get inside the
valve.
Furthermore, when pipe tape is used, leave 1.5 to 2 thread ridg-
es exposed at the end of the threads.
3. Avoid connection of ground lines to piping,
as this may cause electric corrosion of the
system.
4. Always tighten threads with the proper
tightening torque.
When screwing fittings into valves, tighten with the proper tight-
ening torque as shown below.
Piping
Caution
5. Connection of piping to the product
When connecting piping to the product, refer to its instruction
manual to avoid mistakes regarding the supply port, etc.
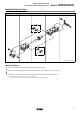
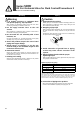
Winding
direction
Pipe tape
Expose approx. 2 threads
Connection threads
M5
Rc 1/8
Rc 1/4
Rc 3/8
1.5 to 2
7 to 9
12 to 14
22 to 24
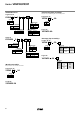
∗ Reference
Tightening of M5 fitting threads
After tightening by hand, tighten approximately 1/6 turn further with a tightening
tool. However, when using miniature fittings, tighten an additional 1/4 turn after
tightening by hand. (In cases where there is a gasket in two places such as a
universal elbow or universal tee, double the additional tightening to 1/2 turn.)
Proper tightening torque N⋅m
Tightening torque for piping
Series VDW
2/3 Port Solenoid Valve for Fluid Control/Precautions 2
Be sure to read before handling.
18