
User Manual


9.HOW TO REPLACE
! WARNING
・Before replacement, ensure that the air combination assembly is not pressurized.
・Rotate the pressure adjusting handle of the regulator and filter-regulator to zero.
・Replace refering to "10. DISASSEMBLY DRAWING" (P21 to P22).
・After replacement, ensure that specified function is satisfied and external leakage is not found before starting operation.
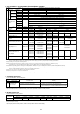
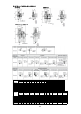
○ Air combination
Process
Disassembly
①
Remove the connected piping as necessary.
②
Nominal :
AC10-A
AC20-B
AC25,30-B 4
AC40(-06)-B 5
AC50,55,60-B 6
③
Remove the component.
Assembly
④
⑤
⑥
Nominal : Tightening torque :
AC10-A AC10-A
AC20-B AC20-B
AC25,30-B 4 AC25,30-B
1.5±0.05 N・m
AC40(-06)-B 5 AC40(-06)-B
AC50,55,60-B 6 AC50,55,60-B
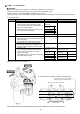
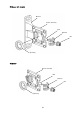
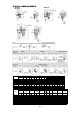
【 Modular connection ( Assembly ) 】
○For individual product troubleshooting, refer to the operation manual of each product.
3
0.6±0.05 N・m
3.0±0.1 N・m
20
Remove the nut and retainer.
Inset a hexagon wrench into the hexagon
socket of the nut and rotate it anticlockwise to
remove the nut and retainer.
Make sure to hold the parts removed by hand
to prevent them from dropping.
Tighten the nut.
Insert a hexagon wrench into the hexagon
socket of the nut and tighten the nut by
rotating it clockwise.
The tightening torque of the lock nut is shown
in the right side as a guide.
Mount the retainer to the spacer bolt and
tighten them temporarily by rotating the nut
clockwise while holding the product by hand.
Procedure
-
Hexagon wrench
Tools
-
Hexagon wrench
-
-
Mount a spacer to the product.
Align the groove of the product with the raised
part of the spacer.
Pay attention to the IN and OUT direction.
3
Check item
-
-
-
-
-
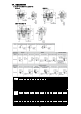
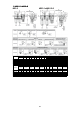
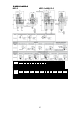
【 Precautions for modular connection ( Assembly ) 】
Tightening
Installing
Installing
No distortion.
Align the rear surface of bracket.
Each equipment has to be on the same
straight line without misalignments.