
Switch User Manual


M
OUNTING
3-7
3. If installing a single switch only, turn to Connecting to a Power Source
on page 3-7.
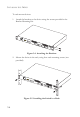
4. If installing multiple switches, mount them in the rack, one below the
other, in any order.
Desktop or Shelf Mounting
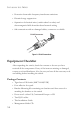
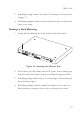
1. Attach the four adhesive feet to the bottom of the first switch.
Figure 3-6 Attaching the Adhesive Feet
2. Set the device on a flat surface near an AC power source, making sure
there are at least four inches of space on all sides for proper air flow.
3. If installing a single switch only, go to Connecting to a Power Source at
the end of this chapter.
4. If installing multiple switches, attach four adhesive feet to each one.
Place each device squarely on top of the one below, in any order.
100 240V 50 60Hz 1A--
Console
1
2
3
4
5
6
7
8
9
10
11
12
14
13
15
16
17
E
O
18
E
O
Power
Fault
Diag
Mgmt
Line
Mgmt
O
E
17
O
E
18
POTS
ESD PORT
SMC7816M VSW/
TigerAccess EE Switch
TM