ALB U M MIN MAX VOLUME PDF wurde mit pdfFactory-Prüfversion erstellt. www.context-gmbh.
Using the Instruction Manual Thank you for purchasing this high quality Digital Piano. Your new Piano is easy to use and easy to transport. It has powerful and useful features that make it perfect for real-time performance or as a versatile instrument for your home.
Main Features Keyboard: 88 Hammer Action Keys Modifying Parameters: Use the round DIAL and the [+] / the [-] buttons or numeric keypad to select Menus and Parameters Program (Voice): There are 350 incredible sound presets (including user-editable presets) Synth: You can use the SYNTH feature to create your own sounds Demo: Three built-in demos Style: 130 built-in Music Styles Language: The large LCD display screen can be viewed in several languages The piano has a friendly interface, especially the menu ope
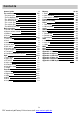
Contents General guide The connectors - The power jack - The headphone jack - The AUX.OUT jack - The AUX.IN jack - The sustain jack - The volume jack - The MIDI IN/OUT jack Basic operation 1. Default and Reset setting 2. Master volume control 3. Brilliance 4. Demo Voice effect 1. Voice select 2. Dual 3. Lower voice 4. Sustain effect 5. DSP effect 6. Harmony effect 7. Touch response 8. Transpose 9. Pitch bend/modulation joystick Style 1. Style select 2. Style start 3. Fill in A/B 4. Style stop 5.
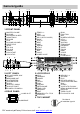
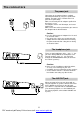
General guide 6 17 19 5 7 24 26 16 18 23 25 34 36 38 31 32 33 3 5 37 39 40 41 ALBUM MIN MAX VOLUME 8 9 10 11 12 13 14 15 20 21 22 27 2 9 28 30 43 42 1.FR ONT PANEL 1 2 3 4 5 6 7 8 9 10 11 12 13 14 MASTER VOLUME ACCOMP BRILLIANCE SLIDER SONG TRACK RECORD PLAY ACCOMP VOLUME +/START/STOP INTRO FILL-IN A FILL-IN B ENDING SYNC START SYNC STOP 15 16 17 18 19 20 21 22 23 24 25 26 27 28 TEMPO +/HELP SMC LOAD A.B.
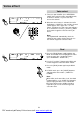
The connectors The power jack Your piano can be powered from a standard household wall outlet by using the specified AC adaptor. The power jack is located on the left panel of the piano body. Make sure that only the AC adaptor specified for this piano is used. The adaptor shall be 12V DC output, and center positive type. Make sure to turn off the piano before you connect the adaptor into the AC wall outlet. DC 12V Caution: Use of a different type of adaptor risks fire and/ or electrical shock.
The AUX.IN jack C D Player The audio output from a CD player or other audio equipment can be connected to the AUX IN jack on the left panel so it can be mixed with the sound of your piano. This function is convenient when you want to play along with a favorite song. The volume of the external signal is adjusted with the MASTER VOLUME button. The sustain jack An optional footswitch can be plugged into the SUSTAIN jack for sustain control. The footswitch functions like the sustain pedal on a piano.
Basic operation Default and Reset setting 1. To reset the instrument to the FACTORY DEFAULT (Including Memory data, Record data, Language set, SYNTH data etc.), press the [+]/[-] button synchronously. 2. To clear the record data, press the [RECORD] and the [PLAY] button at the same time. 1 2 3. To set all the memory data to default settings, press the [STORE] and the [M1] button at the same time. 4. To reset all the SYNTH parameters, press the [STORE] and the [SYNTH] button at the same time.
Voice effect Voice select 1. There are 350 VOICES. (See "APPENDIX 1 VOICE LIST") which includes 293 GM Sounds, 35 Chinese Sounds, 13 percussion Sets and 9 User Sounds. 2. When the voice feature is activated, the LCD highlights the "VOICE R1" icon and the selected sound appears in the upper line. ex: "001 Piano). It displays the style name "001 8 Beat 1" on a second line. Use the [+] and the [-] button and numeric keypad to select the voice you desire.
Lower voice 1. Press the [LOWER VOICE] button. LCD lights the lower icon and "VOICE L" . The LCD highlights the Voice name on upper line "144 Sound Track1". L OWER VOICE LOWER 2. Use the [+] and the [-] button or the DIAL and numeric keypad to select the LOWER VOICE. 3. In LOWER VOICE mode, press the [VOICE] button to switch to other voice modes ( VOICE R1/DUAL). Note: The piano will check the validity of your number input when you use the numeric keypad to select the voice.
Note: Turning the DSP ON/OFF while you're playing will interfere with the sound Harmony effect 1. There are 8 Harmony types. (See FUNCTION menu for details) HARMONY 2. The default HARMONY setting is OFF. Take Harmony duet, one of 8 harmony types as an example. Press the [HARMONY] button to turn on the HARMONY effect and the LCD lights the Harmony icon. It displays "Harmony Duet" temporarily.
Style Style select 1. There are 130 styles at all. (See "APPENDIX 3 STYLE LIST") 2. When power is on, the LCD displays the style name "001 8 Beat 1" at the bottom line. 3. Press the [STYLE] button to illuminate the STYLE icon. Style name "001 8 Beat 1"at the upper line will appear. STYLE 4. Use the [+] and [-] button, the DIAL and the numeric keypad to select the style. Note: The piano will check the validity of number input when you use the numeric keypad to select the style. Style start 1.
Fill in A/B 1. In NORMAL mode, press the [FILL-IN A] button to insert a 1-measure fill and LCD flashes "NOR" icon. Then, it returns to the NORMAL style playing. 2. In VARIATION mode, press the [FILL-IN B] button to insert a 1-measure fill and LCD flashes "VAR" icon. Then, it returns to the VARIATION style playing. 3. In NORMAL mode, press the [FILL-IN B] button to insert a 1-measure fill and LCD flashes "VAR" icon. Then, it changes to the VARIATION style playing. 4.
ACCOMP volume 1. Press the [ACCOMP VOLUME +] or the [ACCOMP VOLUME-] button. LCD displays "Accomp Volume = 021 ". Press the [ACCOMP VOLUME +] and the [ACCOMP VOLUME -] button or the [+] and [-] button and the DIAL can adjust the accompaniment volume from 0 ~ 31. 2. Press the [ACCOMP VOLUME +] and the [ACCOMP VOLUME -] synchronously or the [+] and the [-] button synchronously can mute the accompaniment. LCD displays "Accomp Volume= off ". Auto bass chord 1. Press the [A.B.
Tempo 1. Press the [TEMPO+] or the [TEMPO-] button to adjust the tempo. The tempo value will flash. It can be adjusted in the range of 30-280. 2. Press the [TEMPO+] and the [TEMPO-] simultaneously to return to the default tempo. 3. When the pedal is assigned as TAP TEMPO (See Function menu for details), the pedal can adjust the tempo by double clicking the pedal. (See Pedal for details) Function 1. Press the [FUNCTION] button to enter the Function menu.
Metronome Press the [FUNCTION] button to enter the metronome menu. Press the [NEXT] button to enter its sub-menu. LCD displays "metronome OFF". Use the [+] and [-] or DIAL to select the metronome type. It includes "Metronome:Voice" and "Metronome:Pad" Note: Metronome can be turned while the style is playing. Digital effect Press the [FUNCTION] button to enter the "Digital Effect" menu. Press the [NEXT] button to enter its sub-menu. LCD highlights "Reverb Type" and displays "Reverb Level".
5. Harmony Type You can add a variety of harmony notes to your performance in the right-hand section. A total of 8 different harmony types are available. Use the dial, the [+] button or the [-] button to select the harmony type. LCD takes to turns display Duet/1+5/Country/Trio/Block/ 4 Close1/4 Close2/4 Open. The default type is Duet. Utility Press the [FUNCTION] button. Select "Utility" menu.
TEMPO TEMPO TEMPO TEMPO VEL VEL VEL VEL MEASURE MEASURE MEASURE MEASURE BEA T BEA T BEA T BEA T 4.VOICE R2 OCTAVE In the voice R2 octave setting, LCD displays the current octave value. Use the dial, the [+] button or the [-] button to adjust the voice R2 octave value. This function can apply to the right area of keyboard. The parameter range -1 to 1. The default value is 0. Press the [+] button and the [-] button simultaneously will set the octave value to the default one.
TEMPO VEL MEASURE BEA T 8. PEDAL ASSIGN In the pedal assign setting, the LCD displays the current pedal assign name. A total of 5 different assigned pedals are available. Use the dial, the [+] button or the [-] button to select the pedal assign. The LCD displays Sustain Pedal、Soft Pedal、Start/Stop Pedal、 Tempo/tap Pedal、Memory Select Pedal circularly. The default value is Sustain Pedal. ME MO RY TICK O.T.S. MIDI Press the [FUNCTION] button and select "Midi" menu.
TEMPO VEL MEASURE BEAT M EM ORY TICK O.T.S. TEMPO VEL MEASURE BEAT M EM ORY TICK O.T.S. 2.Keyboard In the keyboard setting, the LCD displays Voice R1 Volume、Voice R2 Volume、Voice L Volume value circularly. The default value is 27、28、 12 respectively. Set the value with the dial, the [+] button or the [-] button from 0 to 31. In this mode, press the [+] and the [-] simultaneously to turn off the volume value. Press them again to resume the default value. Language 1.
Note: The memory data can be reserved even if the piano is switched off. To clear all memory data and restore the default setting, press the [STORE] ,[M1] simultaneously before turning on the piano. Pressing the [+],[-] button simultaneously can also clear the memory data, but it will clear all other saved setting such as recorded data as well. Date store in memory 1.
Pedal Various functions can be assigned to the footswitch connected to the SUSTAIN jack. The polarity of the footswitch can also be selected. Foot switch Press the [FUNCTION] button to enter the "UTILITY " menu. Press the [NEXT] button to select the pedal assign menu. Press the [NEXT] button. LCD displays the " sustain pedal " . Use the dial, the [+] button or the [-] button to select the Soft Pedal, Start/Stop Pedal, Tempo/ Tap Pedal, Memory Select Pedal. 1.
Synth The SYNTH function provides the tools for creating new tones. Simply select one of the 328 tones and edit its parameters to create your own original sound. 1.Press the [SYNTH] button. The SYNTH icon appears on the LCD. The User Voice number "USER Voice = 342 " displays on the lattice area. Then, select the desired number with the dial, the [+]/[-] button between 342-350 for storing your own voice. 2.Press the [NEXT] button. The PCM Voice number "PCM Voice = 001 " is highlighted on the lattice area.
Album There are 100 album songs at all (see "APPENDIX 6 album list" ). These parameters cannot be changed. They include VOICE R1/R2, DSP, accompaniment type, OCTAVE, HARMONY etc. Flash ALBUM 1. Press the [ALBUM] button. The ALBUM icon on the LCD is illuminated. ABC mode is turned on and placed in the SYNC START state. The number and its name of the current song is highlighted on the top line of lattice area. You can select songs with the dial,[+],[-] and [0]-[9] button.
Record There are 2 songs named User Song 1and User Song 2 that can be recorded. Every song includes 1 ACCOMP track and 4 MELODY tracks. Recorded data can be stored while power is off. Press the [RECORD] and the [PLAY] button at the same time before turning on the power. All the recorded data will be erased. Note: Record function does not function while it is in user voice mode. The recordable voice range is 001~341. PCM voice can be recorded..
Record stop 1. Stop Automatically Press the [ENDING] button when the style is playing during recording. It will stop recording automatically after the ending playing is over. If the capacity is full during recording, it will stop recording automatically with displaying "Full Record Data!" on LCD. 2. Stop Manually Press the [RECORD] button again during recording to stop recording immediately. The cursor of the recorded track is lightened.
SMC There is a standard SMC (SmartMedia Card) external interface which supports cards of 16 MB/32MB/64MB/128MB capability on the piano. It is compatible with the file system format of the MS-DOS FAT 12/16. Press the [LOAD], [SAVE], [UTILITY] button separately to enter the relative function. The SMC Icon is illuminated on the LCD. If there is no card, "NO SM Card" will display for three seconds, then exit and return to the previous status. 3.3V SMC FAUCET 3.3V CAR D Load file Press the [LOAD] button.
Note: If the track number of the file is over 24,"File Track Error" will be displayed temporarily on LCD and it will exit SMC status. If the tick number of one beat is over 960 or below 24, "File Format Error" will be displayed temporarily on LCD and it will exit SMC status. If the file is not a MIDI format, "Not Midi File" will be displayed temporarily on the LCD and it will exit SMC status. 2. Load Memory File Select the menu "Load Memory File" and press the [NEXT] button.
Save file Press the [SAVE] button. The SMC icon is lightened on LCD. Two file types that can be saved are displayed on the lattice area with two lines, the current type is highlighted. You can select them with dial or the [+] and the [-] button. 1. Save Memory Data Select the "menu Save Memory Data" and press the [NEXT] button, "A_______.MEM" is displayed on the lattice area .The letter A flashes which indicates the input state (input method see "3.file name input" below).
3. You can edit the characters input with the [SHIFT], [DELETE], [BACK ], [NEXT] button when inputting the character. 4. Press the [NEXT] button to end the filename input, "Operation Completed" is displayed temporarily on LCD and it will exit the SMC function to return to the previous status Note: If the filename input is same as the name that is in the card, "Exist File Name" is displayed temporarily on the lattice area and it will exit the SMC mode and return to the previous status.
MIDI 1. What is MIDI MIDI is the abbreviation for "Musical instrument Digital Interface". It is a standard interface for communication between computers, peripherals and digital music instruments. There are two MIDI connections on your piano, including MIDI IN and MIDI OUT ports. 2. MIDI Connection Connection rules Midi connection is the equipment called "Host equipment", which controls another one called "affiliated equipment".
Help The HELP function provides you a simple operation guide for the current status just press and hold the [HELP] button. Relative contents are displayed on the lattice area and then it goes to the next screen automatically. You may browse the next or previous contents with the [NEXT], [BACK] button or dial. Release the [HELP] button to exit HELP and back to the previous status. Status DEMO Procedure Press the [DEMO] button to enter Demo status Display Press [+],[-] or use dial to select demo.
Press the [UTILITY] button to enter UTILITY mode. Press [+],[-] button to select in current menu level. Press [NEXT] to turn into current option; Press [BACK] to back the higher level menu; Press the [NEXT] and [BACK] will simultaneously exit the SMC menu. Delete the file. Press [+],[-] or use dial to select the file. Press [NEXT]/[+] to confirm deleting or formatting the file. Format the SMC. Press [NEXT] to confirm the operation, press [BACK] to exit the operation.
Appendix 1- Voice list Piano 001 Piano 1 002 Piano Soft 003 Piano Tender 004 String and Piano 1 005 String and Piano 2 006 Piano MEL 007 Bright Piano 008 Stereo Piano 009 Honky Tonk 010 Dual Piano 011 AD EP 1 012 4P Piano1 013 Coffer Piano 014 Last Year EP 015 EP Cup 016 EP Air 017 Image EP 018 Snow EP 019 Electric Piano 020 EP wr 021 HandH EP 022 Digital Piano 023 El Piano 024 U Style EP 025 Digital EP 026 Wind EP 027 Silence EP 028 Oh! Sweet EP 029 KMS EP 030 Mr.
Appendix 2- Style list 8 Beat 039 Tec hno 077 Mambo 2 116 Dai Minority 001 8 Beat 1 Sw ing and Jazz 078 Bounce 117 Weiwuer Minority 002 8 Beat 2 040 Big B and Bal lad 079 Foxt rot 118 Tibat Mi nority 003 8 Beat 3 041 Jazz B al lad 080 Quick Ste p 119 Korea Mi norit y 004 8 Beat 4 042 Big BandBoogie 081 Jive 120 Mongol ia 005 8 Beat 5 043 Boog ie Trad ition al 121 Dongbei Yan gge 006 8 Beat 6 044 S wi ng1 082 March 1 122 Dongbei Errenzhuan 007 8 Beat Rock
Appendix 3- Chord list Chord Name [Abbreviation] Normal Voicing Chord(C) Display 0 Major[M] 1-3-5 C C 1 Major sixth [6] 1-(3)-5-6 C6 C6 2 Major seventh [M7] 1-3-(5)-7 CM7 CM7 3 Major seventh add sharp eleventh [M7(#11)] 1-(2)-3-#4-(5)-7 CM7(#11) CM7(#11) 4 Major add ninth [M9] 1-2-3-5 CM(9) CM(9) 5 Major seventh ninth [M7(9)] 1-2-3-(5)-7 CM7(9) CM7(9) 6 Sixth ninth [6(9)] 1-2-3-(5)-6 C6(9) C6(9) 7 Augmented [aug] 1-3-#5 Caug Caug 8 Minor [m] 1-b3-5 Cm Cm 9 Minor sixth
Appendix 4- Demo list NO 01 Name World 02 Jazz 03 Trance Appendix 5- Album list 001 Blessing 002 The Moon Represents My Heart 003 May I Hug You? 03 6 004 005 Whether I Should Go Away Quietly Beautly And T he B eas t 006 Londonderry Air 007 Serenade 008 Swan Lake 009 Joy To The World 010 Pizzicato Polka 011 It Will Be Better Tomorrow 012 Canon 013 Pianosonatan Op8 IN Cm IN Pathetique 014 Ghost 015 Will You Still Love Me Tomorrow 016 I Only Mind You 017 Foolish C hild 01
Appendix 6- MIDI implemention chart Function Basic Default Channel Recognized 1ch Changed Default Mode Transmitted Messages ALL 1- 16ch 1- 16ch × 3 × 3 × *********** Altered Note Number : True voice Velocity : Note on Note off Remarks 0— 127 0— 127 *********** 0— 127 〇 9nH,V=1 - 127 〇 9nH,V=1 - 127 × ( 9nH,V=0 ) × (9nH,V=0; 8nH,V=0 - 127) After key ' s Touch Ch's × × × × Pitch Bend 〇 〇 Control 0 ○ ○ Bank Select Change 1 ○ ○ Modulation 5 × ○ Portamento Time 6