
User's Manual


SMCSM01-Z Smoke Sensor Quick Start Guide
Copyright
©
2010 SMC Networks
Page 2
All Rights Reserved
I/M SMCSM01-Z rev. 1.0
8/19/10
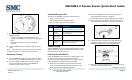
Placing the SMCSM01-Z
When choosing a location to install the SMCSM01-Z, consider:
Use of structure and type of construction
Contents you want to protect and their burning
characteristics
Human occupancy
Total area to be monitored
Ceiling height and surface condition
Air movement and vent locations
Obstructions
Deflections
After considering these factors, choose a location:
Where the temperature range is between 40° and 100° F
(4.4° and 37.8° C).
Where the humidity is between 0 and 90%
noncondensing.
Away from ventilation sources that can prevent smoke
from reaching the SMCSM01-Z.
That is at least 5 feet (1.5 m) from bathrooms.
When placing the SMCSM01-Z on a ceiling, mount it in the
center of the room or hallway, at least 4 inches (10cm) away
from any walls or partitions.
When mounting the SMCSM01-Z on a wall, place it so the top
is 4 to 12 inches (10 to 31cm) below the ceiling.
In rooms with sloped, peaked, or gabled ceilings, locate
SMCSM01-Z sensors 3 feet (.9 m) down or away from the
highest point of the ceiling.
If mounting to suspended ceiling tile, secure the tile with
the appropriate fastener to prevent tile removal.
Locations to Avoid
Areas where normal ambient temperature exceeds 100°
F (37.8° C).
Dirty, dusty, insect infested areas.
In or near areas with combustion particles (kitchens, gar-
ages, furnaces, hot-water heaters, gas space heaters).
On the ceiling in rooms next to kitchens, where there is
no transom between the kitchen and such rooms.
Damp or humid areas, or near bathrooms with showers.
Near fresh-air inlets or returns or very drafty areas.
Near heating/air conditioning vents, fans, and fresh air
intakes, which can drive smoke away from the sensor.
In dead-air spaces at the top of peaked ceilings or in
corners where walls and ceiling meet. Dead air can
prevent smoke from reaching a smoke alarm/detector.
Within 10 feet (3 m) of fluorescent light fixtures.
4B
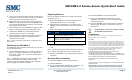
Installing the SMCSM01-Z
A.
Slide the battery compartment cover away from the
SMCSM01-Z to unsnap it and lift it off.
B.
Observing proper polarity, insert two 3V lithium
batteries into the SMCSM01-Z battery compartment and
replace the battery compartment cover.
C.
Remove the red plastic dust cover from the SMCSM01-Z.
The sensor ships with a dust cover for protection on
construction sites with dusty environments.
D.
Disconnect alarm-notification appliances, service-release
devices and extinguishing systems. Test communications
between the control panel and the SMCSM01-Z before
permanently mounting the sensor as follows:
-
Hold the SMCSM01-Z where you plan to install it.
-
Press the SMCSM01-Z test button for 8-to-10 seconds.
The SMCSM01-Z sends a signal to the control panel.
-
At the control panel, verify the signal was received
and that RF signal strength is adequate. If no signal is
received or the RF signal is low, relocate the
SMCSM01-Z and retest.
E.
Using two supplied screws and anchors, mount the base.
F.
Attach the SMCSM01-Z to the mounting base as follows:
-
Line up the raised alignment tab on the lip of the
SMCSM01-Z with the arrow on the mounting base.
-
Insert the SMCSM01-Z into the base and turn clockwise
about 15 degrees until it snaps into place.
Note: The SMCSM01-Z cannot be attached to the mounting
base if no batteries are installed.
continued on next page