
User's Manual


C
HAPTER
2
| Installing the Router
Configuring the TCP/IP Protocols
– 26 –
3. For Windows NT, click the “Protocols” tab.
4. Select “TCP/IP” from the list of network protocols; this may include
details of adapters installed in your computer.
5. Click “Properties.”
6. Check the option “Obtain an IP Address.”
WINDOWS 2000
1. Click “Start/Settings/Network/Dial-up Connections.”
2. Click “Local Area Connections.”
3. Select “TCP/IP” from the list of network protocols.
4. Click on “Properties.”
5. Select the option “Obtain an IP Address.”
WINDOWS XP
1. Click “Start/Control Panel/Network Connections.”
2. Right-click the “Local Area Connection” icon for the adapter you want to
configure.
3. Highlight “Internet Protocol (TCP/IP).”
4. Click on “Properties.”
5. Select the option “Obtain an IP address automatically” and “Obtain DNS
server address automatically.”
WINDOWS VISTA
1. Click Start/Control Panel.
2. Double-click “Network and Sharing Center.”
3. Click “View status.”
4. Click “Properties.” If the “User Account Control” window appears, click
“Continue.”
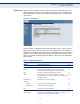
5. Highlight “Internet Protocol Version 6 (TCP/IPv6)” or “Internet Protocol
Version 4 (TCP/IPv4),” and click “Properties.”
6. Select the option “Obtain an IP address automatically” and “Obtain DNS
server address automatically.”
MAC OS
1. Pull down the Apple Menu. Click “Control Panels” and select “TCP/IP.”