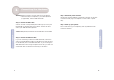
4-port ADSL Router with built-in ADSL Modem (Annex A) 4-port ADSL Router with built-in ADSL Modem Routeur ADSL 4 ports avec modem ADSL intégré Router ADSL de 4 puertos con módem ADSL integrado 4-poorts ADSL-router met ingebouwde ADSL-modem Router ADSL de 4 Portas com Modem ADSL Integrado Quick Installation Guide Guide d’installation rapide Guía de inicio rápido Beknopte installatiehandleiding Manual de instalação rápida Model Number: SMC7204BRA SMC7204BRA
1 Package Contents English 2 - 21 Français 22 - 41 Español 42 - 61 Nederlands 62 - 81 Português 82 - 101 Compliances & Information 102 - 110 • • • • • • One ADSL BarricadeTM. One Power adapter. One RJ-45 Ethernet cable. One RJ-11 Standard phone/DSL line cable. One Installation utility and Documentation CD. Quick Installation Guide. Note: ADSL splitters/microfilters are included with some models.
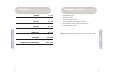
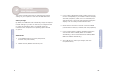
System Requirements In order to use the ADSL BarricadeTM, you must have the following: Front Panel • LED Label Power Link TX/RX Color Status Green Green Green ADSL service up and running on your telephone line, with at least one public Internet address for your LAN. One or more computers, each containing an Ethernet 10/100 Base-T network interface card (NIC). • An Ethernet hub/switch, if you are connecting the device to more than one computer on an Ethernet network.
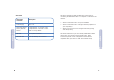
5 Rear Panel Connector Description Power Supply 12V, 1.2A Reset and Restore Factory Defaults Button If depressed for 1-2 seconds: reset. If depressed for 5 seconds or more: reset to factory default. DSL Port RJ-11 phone connector Ethernet Port Four 10/100M RJ-45 connectors This Quick Installation Guide provides basic instructions for connecting the ADSL BarricadeTM to a computer or LAN and to the Internet. • • • Section 1 describes how to set up the hardware.
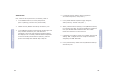
1 Connecting the Hardware Warning: Before you begin, turn the power off for all devices. These include your computer(s), your LAN hub/switch (if applicable), and the ADSL BarricadeTM. Step 1. Connect the ADSL cable Connect one end of the provided phone cable (RJ-11) to the port labeled DSL on the Rear Panel of the device. Connect the other end to your ADSL Microfilter/Splitter*. Step 3.
2 Configuring Your Computers This section provides instructions for configuring the Internet settings on your computers to work with the ADSL BarricadeTM. Before you begin By default, the ADSL BarricadeTM automatically assigns all required Internet settings to your PCs. You need only to configure the PCs to accept the information when it is assigned. Follow the instructions that correspond to the operating system installed on your PC. English 1.
Windows 2000 First, check for the IP protocol and, if necessary, install it. 1. In the Windows task bar, click the [Start] button, point to [Settings], and then click [Control Panel]. 5. In the [Select Network Component Type] dialog box, select [Protocol], and then click [Add…]. 2. Double-click the [Network and Dial-up Connections] icon. 6. Select [Internet Protocol (TCP/IP)] in the [Network Protocols] list, and then click [OK].
9. In the [Network and Dial-up Connections] window, right-click the [Local Area Connection] icon, and then select [Properties]. 10. In the [Local Area Connection Properties] dialog box, select [Internet Protocol (TCP/IP)], and then click [Properties]. 12. Click [OK] twice to confirm and save your changes, and then close the [Control Panel]. 13 1. In the Windows task bar, click the [Start] button, point to [Settings], and then click [Control Panel]. 2.
4. If [Internet Protocol (TCP/IP)] does not appear as an installed component, click [Add…]. 9. In the [Control Panel], double-click the [Network and Dial-up Connections] icon. 5. In the [Select Network Component Type] dialog box, select [Protocol], and then click [Add…]. 10. In the [Network and Dial-up Connections] window, right-click the [Network] icon, and then select [Properties]. 6. Select [Microsoft] in the [Manufacturers] box. 11.
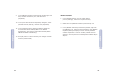
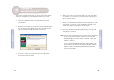
3 Configuring the ADSL BarricadeTM This section provides instructions on how to use the Auto Setup utility for configuration of the ADSL BarricadeTM for your ISP. 1. Insert the Installation utility and Documentation CD into your CD drive. 2. Browse to the location of your CD drive and run AutoSetup.exe. This will start the Auto Setup utility, which provides an easy way to configure the ADSL BarricadeTM for your ISP. 4. Select your country from the drop down list, then click [Next] to continue.
7. Finally click [Finish]. The AutoSetup utility will now configure the ADSL BarricadeTM with the settings you have entered. This may take a few moments. When the setup is complete you will see the following message: Custom If your Country or ISP is not listed, you will be required to manually enter your ISP settings. This is done using the option [Custom].
Contenu de l’emballage 1. Select/enter the values corresponding to the above settings supplied by your ISP. • • • • • • Routeur BarricadeTM ADSL. Un cordon d’alimentation. Un câble Ethernet RJ-45. Un câble téléphonique/DSL RJ-11 standard. CD-ROM avec l’utilitaire d’installation et la documentation. Guide d’installation rapide. Français English Remarque : Des diviseurs/microfiltres ADSL sont fournis avec certains modèles. 2. Go back to Step 6.
Configuration requise Pour pouvoir utiliser le routeur BarricadeTM ADSL, vous devez disposer des éléments suivants : Panneau avant • Un service ADSL opérationnel sur votre ligne téléphonique, avec au moins une adresse Internet publique pour votre réseau local.
25 Ce Guide d’installation rapide fournit des instructions de base pour la connexion du routeur BarricadeTM ADSL à un ordinateur ou un réseau local et à Internet. Connecteur du panneau arrière Description Alimentation 12 V, 1,2 A Bouton de réinitialisation et de restauration des valeurs par défaut Enfoncé pendant 1 à 2 secondes : réinitialisation. Enfoncé pendant au moins 5 secondes : restauration des valeurs par défaut.
1 Connexion du matériel Avertissement : Avant de commencer, mettez tous les appareils hors tension. Cela inclut vos ordinateurs, votre concentrateur/commutateur sur le réseau local (s’il y a lieu), et le routeur BarricadeTM ADSL. Étape 3. Raccordez le cordon d’alimentation Raccordez une extrémité du cordon d’alimentation au connecteur d’alimentation situé à l’arrière de l’appareil et l’autre extrémité à une prise murale ou une ligne d’alimentation. Étape 1.
2 Configuration de vos ordinateurs Cette section contient les instructions qui vous permettront de configurer les paramètres Internet sur vos ordinateurs pour pouvoir utiliser le routeur BarricadeTM ADSL. Windows® XP 1. Dans la barre des tâches Windows, cliquez sur [Start] (Démarrer), puis cliquez sur [Control Panel] (Panneau de configuration). 2. Double-cliquez sur l’icône [Network Connections] (Connexions réseau). 4.
Windows 2000 Commencez par vérifier la présence du protocole IP et, si nécessaire, installez-le. 5. Dans la boîte de dialogue [Select Network Component Type] (Sélection du type de composant réseau), sélectionnez [Protocol] (Protocole), puis cliquez sur [Add…] (Ajouter). 2. Double-cliquez sur l’icône [Network and Dial-Up Connections] (Connexions réseau et accès à distance). 6.
9. Dans la fenêtre [Network and Dial-up Connections] (Connexions réseau et accès à distance), cliquez avec le bouton droit de la souris sur l’icône [Local Area Connection] (Connexion au réseau local), puis sélectionnez [Properties] (Propriétés). Windows 98/Me/SE 10. Dans la boîte de dialogue [Local Area Connection Properties] (Propriétés de Connexion au réseau local), sélectionnez [Internet Protocol (TCP/IP)] (Protocole Internet TCP/IP) et cliquez sur [Properties] (Propriétés). 2.
4. Si l’élément [Internet Protocol (TCP/IP)] (Protocole Internet TCP/IP) n’apparaît pas comme composant installé, cliquez sur [Add…] (Ajouter). 9. Dans le Panneau de configuration, double-cliquez sur l’icône [Network and Dial-up Connections] (Connexions réseau et accès à distance). 5. Dans la boîte de dialogue [Select Network Component Type] (Sélection du type de composant réseau), sélectionnez [Protocol] (Protocole), puis cliquez sur [Add…] (Ajouter). 10.
3 Configuration du routeur BarricadeTM ADSL Cette section contient des instructions qui vous permettront d’utiliser l’utilitaire Auto Setup pour configurer automatiquement le routeur BarricadeTM ADSL pour votre FAI. 1. Insérez le CD-ROM contenant l’utilitaire d’installation et la documentation dans votre lecteur de CD-ROM. 5. Sélectionnez votre FAI/fournisseur réseau dans la liste déroulante, puis cliquez sur [Next] pour continuer.
7. Enfin, cliquez sur [Finish] (Terminer). L’utilitaire Auto Setup va maintenant configurer le routeur BarricadeTM ADSL avec les paramètres que vous avez saisis. Cette opération peut durer quelques minutes. Lorsque la configuration est terminée, le message suivant s’affiche : Personnalisé Si votre pays ou votre FAI ne figure pas dans la liste, vous devrez entrer manuellement vos paramètres de FAI. Cette opération s’effectue en utilisant l’option [Custom] (Personnalisé).
Contenido del paquete 1. Sélectionnez/entrez les valeurs correspondant aux paramètres ci-dessus fournis par votre FAI. • • • • • • Un ADSL BarricadeTM. Un adaptador de corriente. Un cable Ethernet RJ-45. Un cable RJ-11 para la línea DSL o la línea telefónica estándar. Un CD con la utilidad de instalación y la documentación. Manual de instalación rápida. Español Français Nota: Algunos modelos incluyen divisores o microfiltros ADSL. 2. Revenez à l’Étape 6.
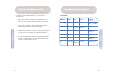
Requisitos del sistema Panel frontal • Etiqueta LED Power Link (Alimentación) (Enlace) TX/RX Ethernet 1 2 3 4 Color Verde Verde Verde Verde / 100 Mbps Amarillo / 10 Mbps Uno o más ordenadores, cada uno con una tarjeta de interfaz de red (NIC) Ethernet 10/100 Base-T. Verde fijo Encendido Línea ADSL preparada DSL transmitiendo Enlace o recibiendo • Un switch o hub Ethernet, si va a conectar el dispositivo a más de un ordenador de una red Ethernet.
Panel trasero Conector del panel trasero Este Manual de instalación rápida contiene las instrucciones básicas para conectar el ADSL BarricadeTM a un ordenador o a una LAN, y a Internet. Descripción 45 Botón para restablecer y restaurar los ajustes predeterminados en fábrica. Si se pulsa durante 1 ó 2 segundos: se reinicia. Si se pulsa durante 5 segundos o más: se restauran los valores de fábrica.
1 Conexión del hardware Advertencia: Antes de empezar, desconecte la corriente de todos los dispositivos. Desconecte el ordenador u ordenadores, el hub o switch de la LAN (si procede) y el ADSL BarricadeTM. Paso 3. Enchufar el cable de alimentación de corriente Conecte el adaptador de CA a la toma de alimentación de la parte trasera del dispositivo y enchufe el adaptador a una toma de pared o a una regleta de enchufes. Paso 1.
2 Configuración de los ordenadores Esta sección proporciona instrucciones para configurar los ajustes de Internet del ordenador y poder trabajar con el ADSL BarricadeTM. Windows® XP 1. En la barra de tareas de Windows, pulse el botón [Start] (Inicio) y luego [Control Panel] (Panel de control). 2. Haga doble clic en el icono [Network Connections] (Conexiones de red). 4.
Windows 2000 En primer lugar, hay que comprobar la existencia del protocolo IP e instalarlo, en caso de ser necesario. 5. En el cuadro de diálogo [Select Network Component Type] (Seleccionar tipo de componente de red), seleccione [Protocol] (Protocolo) y luego seleccione [Add…] (Agregar). 2. Haga doble clic en el icono [Network and Dial-up Connections] (Conexiones de red y de acceso telefónico). 6.
9. En la ventana [Network and Dial-up Connections] (Conexiones de red y de acceso telefónico), haga clic con el botón derecho del ratón en el icono [Local Area Connection] (Conexión de área local) y seleccione [Properties] (Propiedades). 10. En el cuadro [Properties] (Propiedades) de [Local Area Connection] (Conexión de área local), seleccione [Internet Protocol (TCP/IP)] (Protocolo Internet (TCP/IP)) y luego haga clic en [Properties] (Propiedades). Español 1.
4. Si [Internet Protocol (TCP/IP)] (TCP/IP) no aparece como componente instalado, haga clic en [Add…] (Agregar). 5. En el cuadro de diálogo [Select Network Component Type] (Seleccionar tipo de componente de red), seleccione [Protocol] (Protocolo) y luego seleccione [Add…] (Agregar). 6. Seleccione [Microsoft] en la lista de [Manufacturers] (Fabricantes). Español 8. Si el sistema se lo pide, pulse [OK] (Aceptar) para reiniciar el ordenador con la nueva configuración.
3 Configuración del ADSL BarricadeTM Esta sección proporciona instrucciones sobre cómo emplear la utilidad de configuración automática del ADSL BarricadeTM para su ISP. 1. Introduzca el CD con la documentación y la utilidad de instalación en la unidad de CD. 5. Seleccione su proveedor ISP o de red en la lista despegable y luego pulse [Next] (Siguiente) para continuar. Si su proveedor ISP o de red no aparece en la lista, pulse [Custom] (Personalizado) y vaya a la sección Personalización. 6.
7. Pulse [Finish] (Finalizar) para terminar. La utilidad de configuración automática configurará el ADSL BarricadeTM con la configuración introducida. Puede que tarde unos minutos. Una vez completada la configuración, aparecerá el siguiente mensaje: Personalización Si su país o ISP no aparece en la lista, deberá introducir manualmente la configuración de su ISP. Esto se hace mediante la opción [Custom] (Personalizado).
Inhoud van de verpakking 1. Seleccione o introduzca los valores correspondientes de los ajustes mencionados proporcionados por su ISP. • • • • • • Eén ADSL BarricadeTM Eén voedingsadapter Eén RJ-45 Ethernet-kabel Eén RJ-11 standaard telefoon/DSL-kabel Een cd met installatieprogramma en documentatie Quick Installation Guide Español Nederlands Opmerking: Bij sommige modellen worden ADSL-splitters/ microfilters meegeleverd. 2. Vuelva al paso 6.
Systeemvereisten Teneinde de ADSL BarricadeTM te kunnen gebruiken, moet u over het volgende beschikken: Voorpaneel • Opschrift LED Aan/uit Link TX/RX Ethernet 1 2 3 4 Kleurstatus Groen Groen Groen Groen / 100 Mbps Geel / 10 Mbps Groen brandend DSL ADSL-lijn Systeem ingeschakeld is getraind. verzendt/ ontvangt Groen knipperend N.v.t. Werkende ADSL-service op uw telefoonlijn, met minimaal één openbaar internetadres voor uw LAN.
Achterpaneel Deze Quick Installation Guide biedt basisinstructies voor het aansluiten van de ADSL BarricadeTM op een computer of LAN en op internet. Beschrijving Voeding 12V, 1,2A Knop voor Reset en herstellen van fabrieksinstellingen Indien gedurende 1-2 seconden ingedrukt: reset. Indien gedurende 5 seconden of langer ingedrukt: herstel van fabrieksinstellingen.
Nederlands 1 De hardware aansluiten Waarschuwing: Schakel, voordat u begint, de stroom uit op alle apparaten. Dit geldt voor uw computer(s), uw LAN-hub/switch (indien van toepassing) en de ADSL BarricadeTM. Stap 3. De voedingsconnector aansluiten Sluit de wisselstroomadapter aan op de voedingsconnector aan de achterkant van het apparaat en sluit de adapter aan op een stopcontact of stekkerdoos. Stap 1.
2 Uw computers configureren Deze sectie bevat instructies voor het configureren van de internetinstellingen op uw computer zodat deze werken met de ADSL BarricadeTM. Windows® XP 1. Klik achtereenvolgens op [Start] en [Control Panel] (Configuratiescherm) op de taakbalk van Windows. 2. Dubbelklik op het pictogram [Network Connections] (Netwerkverbindingen). 4.
Windows 2000 1. Klik op [Start], wijs [Settings] (Instellingen) aan en klik op [Control Panel] (Configuratiescherm) op de taakbalk van Windows. 5. Selecteer [Protocol] in het dialoogvenster [Select Network Component Type] (Type netwerkonderdeel selecteren) en klik vervolgens op [Add…] (Toevoegen). 2. Dubbelklik op het pictogram [Network and Dial-up Connections] (Netwerk- en inbelverbindingen). 6.
Windows 98, Me, SE 1. Klik op [Start], wijs [Settings] (Instellingen) aan en klik op [Control Panel] (Configuratiescherm) op de taakbalk van Windows. 10. Selecteer [Internet Protocol (TCP/IP)] (Internet-protocol (TCP/IP)) in het dialoogvenster [Local Area Connection Properties] (Eigenschappen voor lokale netwerkverbinding) en klik vervolgens op [Properties] (Eigenschappen). 2. Dubbelklik op het pictogram [Network and Dial-up Connections] (Netwerk- en inbelverbindingen). 11.
4. Als [Internet Protocol (TCP/IP)] (Internet-protocol (TCP/IP)) niet wordt weergegeven als geïnstalleerd onderdeel, klikt u op [Add…] (Toevoegen). 9. Dubbelklik op het pictogram [Network and Dial-up Connections] (Netwerk- en inbelverbindingen) op het [Control Panel] (Configuratiescherm). 5. Selecteer [Protocol] in het dialoogvenster [Select Network Component Type] (Type netwerkonderdeel selecteren) en klik vervolgens op [Add…] (Toevoegen). 10.
3 De ADSL BarricadeTM configureren Deze sectie bevat instructies voor het gebruik van het hulpprogramma Auto Setup voor configuratie van de ADSL BarricadeTM voor uw internetprovider. 1. Plaats de cd-rom met het installatieprogramma en de documentatie in uw cd-rom-station. 5. Selecteer uw internet-/netwerkprovider uit de keuzelijst en klik vervolgens op [Next] (Volgende) om door te gaan.
7. Klik tenslotte op [Finish] (Voltooien). Het hulpprogramma AutoSetup configureert nu de ADSL BarricadeTM met de instellingen die u hebt ingevoerd. Dit kan enkele seconden in beslag nemen. Nadat de setup is voltooid, wordt het volgende bericht weergegeven: Aangepast Als uw land of internetprovider niet voorkomen in de lijst, moet u de instellingen voor de internetprovider handmatig invoeren. Dit doet u met de optie [Custom] (Aangepast).
Conteúdo da Embalagem 1. Selecteer de waarden die overeenkomen met de bovenstaande instellingen die zijn verstrekt door uw internetprovider of voer deze waarden in. • • • • • • Um ADSL BarricadeTM. Um adaptador de corrente. Um cabo Ethernet RJ-45. Um cabo de linha DSL/telefone standard RJ-11. Um CD com o utilitário de instalação e a documentação. Manual de Instalação Rápida. Português Nederlands Nota: Alguns modelos incluem micro-filtros/separadores ADSL. 2. Ga terug naar stap 6.
Requisitos do Sistema Para utilizar o ADSL BarricadeTM, deverá possuir o seguinte: • TX/RX Estado da cor Verde Verde Verde Um ou mais computadores, cada um deles com uma placa de interface de rede (NIC) Ethernet 10/100 Base-T. Verde fixo Alimentação ligada Linha ADSL programada DSL a transmitir/ Ligação receber • Um hub/switch Ethernet, se pretender ligar o dispositivo a mais do que um computador numa rede Ethernet.
85 Este Manual de Instalação Rápida inclui instruções básicas sobre como ligar o ADSL BarricadeTM a um computador ou LAN e à Internet. Conector do Painel Traseiro Descrição Fonte de alimentação 12 V, 1,2 A Botão de reinicialização e reposição das definições de origem Se for premido durante 1-2 segundos: reinicialização. Se for premido por 5 segundos ou mais: reposição das definições de origem.
1 Ligar o Hardware Aviso: Antes de começar, desligue a alimentação de todos os dispositivos. Entre estes dispositivos encontram-se o(s) computador(es), o hub/switch de LAN (se aplicável) e o ADSL BarricadeTM. Passo 1. Ligar o cabo ADSL Ligue uma extremidade do cabo de telefone fornecido (RJ-11) à porta com a identificação DSL, no painel traseiro do dispositivo. Ligue a outra extremidade ao micro-filtro/separador ADSL*. Passo 3.
2 Configurar os Computadores Esta secção explica como configurar as definições de Internet dos seus computadores, para funcionarem com o ADSL BarricadeTM. Português Antes de começar Como valor assumido, o ADSL BarricadeTM atribui automaticamente todas as definições de Internet necessárias aos seus PCs. Assim, só terá de configurar os PCs para aceitarem as informações, quando estas forem atribuídas. Siga as instruções correspondentes ao sistema operativo instalado no seu PC. 3.
Windows 2000 Em primeiro lugar, verifique o protocolo IP e, se necessário, instale-o. 1. Na barra de tarefas do Windows, faça clique no botão [Start] (Iniciar), marque [Settings] (Definições) e, em seguida, faça clique em [Control Panel] (Painel de controlo). 2. Faça duplo clique no ícone [Network and Dial-up Connections] (Ligações de acesso telefónico e de rede). Português 5.
Windows 98/Me/SE 1. Na barra de tarefas do Windows, faça clique no botão [Start] (Iniciar), marque [Settings] (Definições) e, em seguida, faça clique em [Control Panel] (Painel de controlo). 10. Na caixa de diálogo [Local Area Connection Properties] (Propriedades de ligação de rede local), seleccione [Internet Protocol (TCP/IP)] (Protocolo de Internet (TCP/IP)) e faça clique em [Properties] (Propriedades). 2.
Português 9. No [Control Panel] (Painel de controlo), faça duplo clique no ícone [Network and Dial-up Connections] (Ligações de acesso telefónico e de rede). 5. Na caixa de diálogo [Select Network Component Type] (Seleccionar tipo de componente de rede), seleccione [Protocol] (Protocolo) e, em seguida, faça clique em [Add…] (Adicionar). 10.
3 Configurar o ADSL BarricadeTM Esta secção explica como usar o utilitário Auto Setup (Instalação Automática) para configurar o ADSL BarricadeTM para o seu ISP. 1. Introduza o CD com o utilitário de instalação e a documentação na unidade de CR ROM. 2. Localize a sua unidade de CD ROM e execute o ficheiro AutoSetup.exe. Será iniciado o utilitário Auto Setup, que permite configurar facilmente o ADSL BarricadeTM para o seu ISP. 4.
7. Por fim, faça clique em [Finish] (Concluir). O utilitário AutoSetup irá configurar o ADSL BarricadeTM com as definições especificadas. Este processo pode demorar alguns segundos. Uma vez concluída a instalação, será apresentada a seguinte mensagem: Personalizar Se o seu país ou ISP não for apresentado na lista, deverá introduzir manualmente as sua definições de ISP. Para tal, deverá utilizar a opção [Custom] (Personalizar).
Compliances 2. Regresse ao Passo 6. FCC - Class B This equipment has been tested and found to comply with the limits for a Class B digital device, pursuant to Part 15 of the FCC Rules. These limits are designed to provide reasonable protection against harmful interference in a residential installation. This equipment generates, uses and can radiate radio frequency energy and, if not installed and used in accordance with instructions, may cause harmful interference to radio communications.
If trouble is experienced with this equipment, please contact our company at the numbers shown on back of this manual for repair and warranty information. If the trouble is causing harm to the telephone network, the telephone company may request you to remove the equipment from the network until the problem is resolved. No repairs may be done by the customer. This equipment uses the following USOC jacks: RJ-11C. This equipment cannot be used on telephone company-provided coin service.
RFI Emission: • Limit class B according to EN 55022:1998 • Limit class B for harmonic current emission according to EN 61000-3-2/1995 • Limitation of voltage fluctuation and flicker in low-voltage supply system according to EN 61000-3-3/1995 • Immunity to conducted disturbances, Induced by radiofrequency fields: EN 61000-4-6:1996 (0.
1. Bitte lesen Sie diese Hinweise sorgfältig durch. 2. Heben Sie diese Anleitung für den späteren Gebrauch auf. 3. Vor jedem Reinigen ist das Gerät vom Stromnetz zu trennen. Verwenden Sie keine Flüssigoder Aerosolreiniger. Am besten eignet sich ein angefeuchtetes Tuch zur Reinigung. 4. Die Netzanschlu ßsteckdose soll nahe dem Gerät angebracht und leicht zugänglich sein. 5. Das Gerät ist vor Feuchtigkeit zu schützen. 6. Bei der Aufstellung des Gerätes ist auf sicheren Stand zu achten.
Information Full Installation Manual Full installation manuals are provided on the Installation CD-Rom. Manuals in other languages than those included on the CD-Rom are provided on www.smc-europe.com (section support). Limited Lifetime Warranty Statement For detailed information on SMC’s limited lifetime warranty please check the English full manual on this CD-Rom or visit www.smc-europe.com (section support, product registration). Contact SMC Contact details are available on www.smc-europe.