Barricade Broadband Router with built in 4 port switch and Print server Installation Guide SMC7004ABR 1
Table of Contents Hardware Setup Conguring Your Computer Conguring Your Computer with Windows 95/98/ME Conguring Your Computer with Windows 2000 Conguring Your Computer with Windows NT 4.
Congratulations on your purchase of the SMC Barricade™ Broadband Router. The SMC Barricade is a Broadband Router designed to share Internet Access, provide security, and to network multiple devices for a variety of users. The Barricade’s simple installation setup can be used by the least experienced of users, while providing networking professionals with easy to congure advanced features. Please read the User Guide for advanced features of this product. Thank you for purchasing an SMC product.
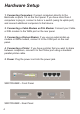
Hardware Setup 1. Connecting Computers: Connect computers directly to the Barricade on ports 1-4 on the front panel. If you have more than 4 computers to plug in, connect a hub or a switch (using its uplink port) and connect additional computers to that device. 2. Connecting a Cable Modem or DSL Modem: Connect your Cable or DSL modem to the WAN port on the rear panel. 3. Connecting a Dial-up Modem: If you use an external dial-up modem or ISDN modem, connect it to the COM port on the rear panel. 4.
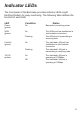
Indicator LEDs The front panel of the Barricade provides indicator LEDs (Light Emitting Diodes) for easy monitoring. The following table denes the function of each LED. LED Condition On Barricade is receiving power. WAN (green) On The WAN port has established a valid network connection. The WAN port is transmitting or receiving data. Power (green) Flashing Link/Act (green) On Flashing 10/100 (amber) On Off Status The indicated LAN port has established a valid network connection.
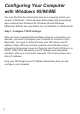
Conguring Your Computer with Windows 95/98/ME You may nd that the instructions here do not exactly match your version of Windows. This is because these steps and screenshots were created from Windows 98. Windows 95 and Windows Millennium Edition are very similar, but not identical, to Windows 98. Step 1. Congure TCP/IP Settings After you have completed the hardware setup by connecting your devices, you need to congure your computer to connect to your Barricade.
1. From the Windows desktop, click the “Start” button. Choose “Settings,” then click “Control Panel.” 2. From “Control Panel,” double-click the “Network” icon. 3. In the “Network” window, under the “Conguration” tab, double-click the “TCP/IP” entry that is listed with your network card.
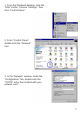
4. Select the “IP Address” tab. If “Obtain an IP address automatically” is already selected, your computer is already congured for DHCP. Click “Cancel” to close each window, and skip to Step 2 “Disable HTTP Proxy.” 5. Locate your IP address and Subnet Mask. Record them in the spaces provided below. 6. Click the “Gateway” tab and record the numbers listed under “Installed gateways.” 7. Click the “DNS Conguration” tab. Locate the DNS servers listed under “DNS Server Search Order.
TCP/IP Conguration Setting IP Address ____.____.____.____ Subnet Mask ____.____.____.____ Primary DNS Server ____.____.____.____ Secondary DNS Server ____.____.____.____ Default Gateway ____.____.____.____ Step 2. Disable HTTP Proxy You will need to verify that the “HTTP Proxy” feature of your Web browser is disabled. This is so that your Web browser will be able to view the conguration pages inside your Barricade. The following steps are for Internet Explorer and for Netscape.
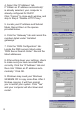
Netscape 1. Open Netscape and click the stop button. Click “Edit,” then click “Preferences…” 2. In the “Preferences” window, under “Category” double-click “Advanced,” then click “Proxies.” Select “Direct connection to the Internet.” Click “OK.” 3. Repeat these steps for each Windows 95/98/Me computer connected to your Barricade. Step 3. Obtain IP Settings from Your Barricade Now that you have congured your computer to connect to your Barricade, it needs to obtain new network settings.
Conguring Your Computer with Windows 2000 Step 1. Congure TCP/IP Settings After you have completed the hardware setup, you need to congure your computer to connect to your Barricade. You also need to determine how your ISP issues your IP address. Many ISPs issue these numbers automatically, using a networking technology known as Dynamic Host Control Protocol, or DHCP. Other ISPs will specify your IP address and associated numbers, which you must enter manually. This is also known as a static IP address.
TCP/IP Conguration Setting IP Address Subnet Mask Primary DNS Server Secondary DNS Server Default Gateway ____.____.____.____ ____.____.____.____ ________.____.____ ____.____.____.____ ____.____.____.____ Step 2. Disable HTTP Proxy You will need to verify that the “HTTP Proxy” feature of your Web browser is disabled. This is so that your Web browser will be able to view the conguration pages inside your Barricade. The following steps are for Internet Explorer and for Netscape.
Netscape 1. Open Netscape and click the stop button. Click “Edit,” then click “Preferences…” 2. In the “Preferences” window, under “Category” double-click “Advanced,” then click “Proxies.” Select “Direct connection to the Internet.” Click “OK.” Step 3. Obtain IP Settings From Your Barricade Now that you have congured your computer to connect to your Barricade, it needs to obtain new network settings.
Conguring Your Computer with Windows NT 4.0 Step 1. Congure TCP/IP Settings After you have completed the hardware setup, you need to congure your computer to connect to your Barricade. You need to determine how your ISP issues your IP address. Many ISPs issue these numbers automatically using a networking technology known as Dynamic Host Control Protocol, or DHCP. Other ISPs will specify your IP address and associated numbers, which you must enter manually. This is also known as a static IP address.
7. In the “TCP/IP Properties” dialog box, click the IP address tab to locate your IP address, subnet Mask, and default gateway. Record these values in the space provided below. 8. Click the “DNS” tab to see the primary and secondary DNS servers. Record these values in the appropriate spaces below. 9. After writing down your IP settings, click the IP address tab. Select “Obtain IP address automatically” and click OK. Click OK again to close the “Network” window. 10.
Step 2. Disable HTTP Proxy You will need to verify that the “HTTP Proxy” feature of your Web browser is disabled. This is so that your Web browser will be able to view the conguration pages inside your Barricade. The following steps are for Internet Explorer and for Netscape. Determine which browser you use and follow the appropriate steps. Internet Explorer 1. Open Internet Explorer and click the stop button. Click “Tools,” then “Internet Options.” 2.
Step 3. Obtain IP Settings From Your Barricade Now that you have congured your computer to connect to your Barricade, it needs to obtain new network settings. By releasing any old IP settings and renewing them with settings from your Barricade, you will also verify that you have congured your computer correctly. 1. From the Windows desktop, click the “Start” button, then “Programs,” and then select “Command Prompt.” 2. In the “Command Prompt” window, type “IPCONFIG /RELEASE” and press the key. 3.
Conguring Your Macintosh Computer You may nd that the instructions here do not exactly match your screen. This is because these steps and screenshots were created using Mac OS 8.5. Mac OS 7.x and above are all very similar, but may not be identical to Mac OS 8.5. Step 1. Congure TCP/IP Settings After you have completed the hardware setup, you need to congure your computer to connect to your Barricade. You need to determine how your ISP issues your IP address.
4. After writing down your IP settings, select “Using DHCP Server” in the “Congure” eld and close the window. 5. Another box will appear asking whether you want to save your TCP/IP settings. Click Save. TCP/IP Conguration Setting IP Address ____.____.____.____ Subnet Mask ____.____.____.____ Router ____.____.____.____ Name Server ____.____.____.____ Step 2. Disable HTTP Proxy You will need to verify that the “HTTP Proxy” feature of your Web browser is disabled.
Netscape 1. Open Netscape and click the stop button. Click “Edit” and select “Preferences.” 2. In the “Preferences” dialog box, In the left-hand column labeled “Category,” select “Advanced.” Under the “Advanced” category, select “Proxies.” 3. Select “Direct Connection to the Internet” and click “OK” Step 3. Obtain IP Settings From Your Barricade Now that you have congured your computer to connect to your Barricade, it needs to obtain new network settings.
Conguring Your Barricade Now that you have successfully congured your computer and retrieved your new network settings from your Barricade, you are ready to congure the Barricade’s settings for your LAN. 1. Open your Web browser (i.e., Internet Explorer or Netscape Navigator) and click the stop button. 2. In the “Address” eld type “http://192.168.2.1” and press . 3. The Barricade login screen will appear. Leave the Password eld empty and click on “login”. There is no password by default.
Using a password can protect your Barricade from unauthorized changes. Not using a password can easily leave your Barricade-and your network-open to security risks. We recommend using a password for the security of your network. If you use a password, write it down and keep it in a safe place, or make sure you can remember it. 6. In the “Change Password” screen, enter your current password in the “Current Password” eld. If you have not yet set a password, leave it blank.
By using the Barricade’s built-in DHCP (Dynamic Host Control Protocol) server you are allowing the Barricade to handle all the IP addressing on your Local Area Network (LAN). This can save you much of the time and hassle of administrating your network. If you have a server on your network that requires a static IP address, you may still use the DHCP server and manually assign a static IP address to your server. We recommend leaving the DHCP Server “Enabled.” 10.
If you connect to the Internet using a Cable Modem, your ISP probably uses DHCP to issue an IP address to you. If you use a Cable Modem or you know you use a dynamic IP address, please go to “Conguring Your Barricade for a Dynamic IP Address”. If you connect to the Internet using a DSL Modem, your ISP probably requires you to manually enter your TCP/IP settings. If you have a DSL connection or if you know you use a static IP address, please go to “Conguring Your Barricade for a Static IP Address”.
Conguring Your Barricade for a Dynamic IP Address 1. Select “Dynamic IP address,” and click “More Conguration.” Both options on this page for further conguring your dynamic IP address are optional, depending upon how your ISP works. If your ISP does not require you to change either of these, you may skip these settings. The @Home network usually requires your computer to have a “Host Name” to obtain an IP address from their network. 2. If you have a host name provided by your ISP (i.e.
3. If you need to “Clone” the MAC Address from your network card, click “Clone MAC Address.” The MAC Address eld will display the new address. 4. Click “ENTER” when nished. A Domain Name Server (DNS) is like an index of names and Web addresses. If you type a Web address into your browser, such as www.smc-europe.com, a DNS server will nd that name in its index and nd the matching IP address: 198.137.240.92. Most ISPs provide a DNS server for speed and convenience.
Congratulations! Conguration is complete and your Barricade is now connected to the Internet. There are also some advanced conguration options that may be congured, but we do not recommend making any changes to these options unless you need to. You can consult the User Guide for information on these advanced settings.
Conguring Your Barricade . for a Static IP Address 1. Select “Static IP address,” and click “More Conguration.” 2. Enter the IP address, subnet mask, and gateway provided to you by your ISP in the appropriate elds. You recorded these numbers earlier when you congured your computer to connect to the Barricade. 3. Click “ENTER” when nished. A Domain Name Server (DNS) is like an index of names and Web addresses. If you type a Web address into your browser, such as www.smc-europe.
4. Enter the DNS server address (es) in the spaces provided. 5. Click “ENTER” when nished. Many ISPs use modems that provide auto-conguration. Sometimes connection information is stored on the modem and needs to be updated. You may need to shut down and restart your modem after you have congured your Barricade. 6. Restart your DSL modem by removing the power, waiting a few seconds, and then reconnecting it. Congratulations! Conguration is complete and your Barricade is now connected to the Internet.
Conguring Your Barricade for PPPoE 1. Select “PPP over Ethernet,” and click “More Conguration.” 2. Enter the User Name and Password required by your ISP in the appropriate elds. Enter the password again for verication in the “Please retype password” eld. 3. If your ISP has provided you with a “Service Name” enter it in the “Service Name” eld, otherwise, leave it blank. 4. Click “ENTER” when nished. A Domain Name Server (DNS) is like an index of names and Web addresses.
5. If you are connecting to the Internet through PPPoE, you probably do not need to enter anything here. However, if there is another DNS server that you would rather use, enter the DNS server addresses in the spaces provided. 6. Click “ENTER” when nished. Many ISPs use modems that provide auto-conguration. Sometimes connection information is stored on the modem and needs to be updated. You may need to shut down and restart your modem after you have congured your Barricade. 7.
Conguring Your Barricade for Dialup on Demand 1. Select “Dialup on Demand,” and click “More Conguration.” 2. If the serial port is used for primary Internet access, then mark the item “Check if you only use a dial-up modem to connect to the Internet.” If not marked, then this connection will only be used for backup access if the primary WAN link fails. 3. Enter your ISP account user name and password in the “Dial-Up Account Information.” 4.
Conguring Your Computer for the Barricade Print Server If you are not connecting your printer to your Barricade, skip this section. With the Barricade’s built-in print server, you can connect your printer to the Barricade and print from any computer on your network. Each computer needs to have a “client” installed that will communicate with the Barricade’s print server. Windows 2000 and UNIX and Linux operating systems have a print client already installed.
6. Insert the Installation CD into your CD-ROM drive. 7. Click “Start” and “Run…” 8. Type “D:\PrintSvr\Setup” and click “OK.” 9. InstallShield will guide you through the installation process. Click “Next >” for each window and “Finish” when complete. 10. Windows must reboot for the changes to take place. When asked if you want to reboot now, select yes and click “OK.
Step 2: Conguring SMC Barricade Print Server Monitor Now that the software is installed, it must be congured to work properly. 1. Click “Start,” click “Settings,” and then select “Printers.” 2. Double-click “Add Printer.” 3. Follow the screen prompts to add your printer as a “Local printer” for Windows 95/98/ME/2000 or as a printer managed by “My Computer” for Windows NT.
4. From the list of manufacturers and printers in the next window, select the printer you have attached to the Barricade. 5. Select the SMC Barricade Print Server Monitor (the default port name is “SMC 100”) and click “Congure Port” 6. Enter the Barricade’s IP address in the “IP address” eld (default is 192.168.2.1) and click “OK.” 7. You will be asked if you want to print a test page. Click “Yes” to make sure that your printer is congured correctly. 8.
PPtP Installation Enter PPtP user account and password given by your Internet service provider. Service name is generaly not necessary ; but may be needed by some internet service providers. “My IP Address” and “My subnet mask” elds are IP address and subnet mask given by your Internet service provider. “Server IP address” is the Ip address for your modem, given by your Internet Service Provider.
Copyright Information furnished by SMC Networks, Inc. (SMC) is believed to be accurate and reliable. However, no responsibility is assumed by SMC for its use, nor for any infringements of patents or other rights of third parties which may result from its use. No license is granted by implication or otherwise under any patent or patent rights of SMC. SMC reserves the right to change specications at any time without notice. Copyright © 2001 by SMC Networks, Inc. 6 Hughes Irvine, CA 92618 All rights reserved.
LIMITED WARRANTY Limited Warranty Statement: SMC Networks, Inc. (“SMC”) warrants its products to be free from defects in workmanship and materials, under normal use and service, for the applicable warranty term. All SMC products carry a standard 90-day limited warranty from the date of purchase from SMC or its Authorized Reseller. SMC may, at its own discretion, repair or replace any product not operating as warranted with a similar or functionally equivalent product, during the applicable warranty term.
WARRANTIES EXCLUSIVE: IF AN SMC PRODUCT DOES NOT OPERATE AS WARRANTED ABOVE, CUSTOMER’S SOLE REMEDY SHALL BE REPAIR OR REPLACEMENT OF THE PRODUCT IN QUESTION, AT SMC’S OPTION. THE FOREGOING WARRANTIES AND REMEDIES ARE EXCLUSIVE AND ARE IN LIEU OF ALL OTHER WARRANTIES OR CONDITIONS, EXPRESS OR IMPLIED, EITHER IN FACT OR BY OPERATION OF LAW, STATUTORY OR OTHERWISE, INCLUDING WARRANTIES OR CONDITIONS OF MERCHANTABILITY AND FITNESS FOR A PARTICULAR PURPOSE.
FCC - Class B This equipment has been tested and found to comply with the limits for a Class B digital device, pursuant to Part 15 of the FCC Rules. These limits are designed to provide reasonable protection against harmful interference in a residential installation. This equipment generates, uses and can radiate radio frequency energy and, if not installed and used in accordance with instructions, may cause harmful interference to radio communications.
Safety Compliance Underwriters Laboratories Compliance Statement Important! Before making connections, make sure you have the correct cord set.
11. Wird das Gerät über einen längeren Zeitraum nicht benutzt, sollten Sie es vom Stromnetz trennen. Somit wird im Falle einer Überspannung eine Beschädigung vermieden. 12. Durch die Lüftungsöffnungen dürfen niemals Gegenstände oder Flüssigkeiten in das Gerät gelangen. Dies könnte einen Brand bzw. elektrischen Schlag aus-lösen. 13. Öffnen sie niemals das Gerät. Das Gerät darf aus Gründen der elektrischen Sicherheit nur von authorisiertem Servicepersonal geöffnet werden. 14.
WAN Interface LAN Interface Printer Interface Management Advanced Features Internet Standards Indicator Panel Dimensions Weight Input Power Maximum Current Power Consumption Heat Dissipation Temperature Humidity Compliances Warranty 10/100BASE-T, 1 RJ-45 port Serial, 1 RS232 DB-9 connector 10BASE-T/100BASE-TX 4 RJ-45 ports Parallel 1 DB-25 printer port Web management Dynamic IP Address Conguration – DHCP, DNS Firewall – Client privileges, hacker prevention and logging, NAT Virtual Private Network – PPT