
User's Manual


5
2. First-Time Installation and Configuration
2.1. Selecting a Power Supply Method
The SMC2585W-G can be powered by either the supplied power adapter or the optional
SMCPWR-INJ3 EliteConnect™ Power Injector. The SMC2585W-G automatically selects the
suitable power depending on your decision.
To power the SMC2585W-G by the supplied power adapter:
1. Plug the power adapter to an AC socket.
2. Plug the connector of the power adapter to the power jack of the SMC2585W-G.
NOTE: This product is intended to be power-supplied by a Listed Power Unit, marked “Class
2” or “LPS” and output rated “12V DC, 1.25 A minimum” or equivalent statement.
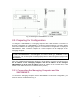
To power the SMC2585W-G by SMCPWR-INJ3 Power Injector:
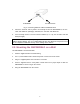
1. Connect the power cord cable from power outlet to the SMCPWR-INJ3 power connec-
tor.
To Power Outlet
Fig. 1. Connecting the power cord cable to SMCPWR-INJ3.
2. Check the “POWER” LED: if system is normal, the LED will be on (Green light); other-
wise, the “POWER” LED will be off.
3. Connect the Ethernet cable (RJ-45 Category 5) from Ethernet Hub/Switch to the “DATA
IN” port of SMCPWR-INJ3 Power Injector.
4. Connect another Ethernet cable (RJ-45 Category 5) from “POWER & DATA OUT” port
of the SMCPWR-INJ3 Power Injector to the SMC2585W-G Wireless Bridge.