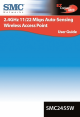
SMC2455W
Copyright Information furnished by SMC Networks, Inc. (SMC) is believed to be accurate and reliable. However, no responsibility is assumed by SMC for its use, nor for any infringements of patents or other rights of third parties which may result from its use. No license is granted by implication or otherwise under any patent or patent rights of SMC. SMC reserves the right to change specifications at any time without notice. Copyright © 2002 by SMC Networks, Inc.
Compliances FCC Class B Federal Communication Commission Interference Statement This equipment has been tested and found to comply with the limits for a Class B digital device, pursuant to Part 15 of the FCC Rules. These limits are designed to provide reasonable protection against harmful interference in a residential installation.
IMPORTANT NOTE FCC Radiation Exposure Statement: This equipment complies with FCC radiation exposure limits set forth for an uncontrolled environment. This equipment should be installed and operated with minimum distance 20cm between the radiator & your body. This transmitter must not be co-located or operating in conjunction with any other antenna or transmitter.
Warranty Limited Warranty Statement: SMC Networks, Inc. (“SMC”) warrants its products to be free from defects in workmanship and materials, under normal use and service, for the applicable warranty term. All SMC products carry a standard 90-day limited warranty from the date of purchase from SMC or its Authorized Reseller. SMC may, at its own discretion, repair or replace any product not operating as warranted with a similar or functionally equivalent product, during the applicable warranty term.
firmware, configuration information, or memory data of Customer contained in, stored on, or integrated with any products returned to SMC pursuant to any warranty. Products returned to SMC should have any customer-installed accessory or add-on components, such as expansion modules, removed prior to returning the product for replacement. SMC is not responsible for these items if they are returned with the product.
WARRANTIES EXCLUSIVE: IF AN SMC PRODUCT DOES NOT OPERATE AS WARRANTED ABOVE, CUSTOMER’S SOLE REMEDY SHALL BE REPAIR OR REPLACEMENT OF THE PRODUCT IN QUESTION, AT SMC’S OPTION. THE FOREGOING WARRANTIES AND REMEDIES ARE EXCLUSIVE AND ARE IN LIEU OF ALL OTHER WARRANTIES OR CONDITIONS, EXPRESS OR IMPLIED, EITHER IN FACT OR BY OPERATION OF LAW, STATUTORY OR OTHERWISE, INCLUDING WARRANTIES OR CONDITIONS OF MERCHANTABILITY AND FITNESS FOR A PARTICULAR PURPOSE.
Congratulations on your purchase of this EZ Connect™ Turbo 2.4GHz 11/22 Mbps Auto-Sensing Wireless Access Point. The EZ Connect™ Turbo Wireless Access Point is the perfect device for adding wireless connectivity to your Ethernet network, or expanding and existing wireless network. Plug and Play installation allows users to easily set up this Wireless Access Point in minutes.
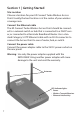
Section 1 | Getting Started Site Location Choose a location for your EZ Connect Turbo Wireless Access Point. Usually, the best location is at the center of your wireless coverage area. Connect the Ethernet cable The EZ Connect Turbo Wireless Access Point should be connected to a network switch or hub that is connected to a DHCP server, or connected to a Barricade Broadband Router.
1.1 | EZ Connect Turbo 11/22 Mbps Wireless Access Point LED Indicators The preceding diagram shows the LED indicator lights on the EZ Connect Turbo Wireless Access Point. The EZ Connect Turbo Wireless Access Point has 2 external antennas, which are adjustable for best wireless reception.
3. Hold down the [Reset] button which is located on the back of the device. You may need to use a pin or other pointed object to hold the button down. 4. Plug the power connector into the Wireless Access Point while holding down the [Reset] button. 5. The “TX/RX” LED will be solid, then flash 5-6 times. 6. Then the “LINK/ACT” LED will blink quickly several times. 7. Release the [Reset] button. 8. Unplug the power from the Access Point for 2 seconds, and then plug the power back in. 9.
3. Click the [APPLY] button to complete the reset process. 4. The unit will reboot and reset the SMC2455W. Using the Web-based Utility to reset the SMC2455W to factory defaults 1. Log into the SMC2455W using the Web-based Utility. (See section 4.2 for more information) 2. Click on [Tools] link on the left hand navigation menu, and then click the [Configuration Tools] option. 3. Click the [Default] button to reset the unit to factory defaults. 4.
Section 2 | Understanding Wireless Connections The EZ Connect Turbo Wireless Access Point is based on the IEEE 802.11b Wi-Fi standard, which uses radio transmission for network connectivity. These 802.11b radio waves travel in all directions, and can transmit through walls and floors. Wireless transmission operating range and data throughput rate are based on several factors, as described below in the following section. 2.
2.2 | Adjusting the Antennas The antennas on the SMC2455W can be adjusted for best radio reception. Start with the antennas pointing straight up, and adjust each antenna if wireless reception is poor. Certain areas, such as directly below the antennas, get relatively poor reception. Pointing the antennas toward another wireless component does not improve reception. Important: Enable wireless security Wired Equivalent Privacy (WEP) to protect your network from unwanted access.
2.4 | Understanding Wireless Security (WEP) Anyone within range of your wireless network is a potential security risk. Without wireless security options configured on your network, a person outside of your physical location but within your wireless range may be able to access the network and any data that is being transmitted over it.
The SMC2455W is a Plug-and-Play device. When you plug this Access Point into your network, it will automatically get an IP address from your DHCP server and begin to provide wireless connections based on your current network IP configuration. 3.
3.2 | Installing the Utility Software 1. At the splash screen, click the [Install Utility] option to launch the Installation Wizard. 2. Click the [Next >] button to confirm the installation.
3. Configure the install location, and then click the [Next >] button to continue. * It is recommended that you choose the default folder name. 4. Click the [Finish] button to complete the installation process.
Section 4 | Accessing the SMC2455W The EZ Connect Turbo Wireless Access Point can be configured and managed by using two different utilities. Each utility provides the same functionalities. • Windows Utility • Web-based Utility 4.1 | Using the Windows Utility 1. Click [Start], then [Programs], then [SMC2455W Access Point Utility], then [SMC2455W Access Point Utility]. 2. The Utility will search your network for the EZ Connect Turbo Wireless Access Point.
3. Once you have logged into the Windows Utility, you can: • View link and device information • See the available EZ Connect Turbo Wireless Access Points (SMC2455W) in your network if you have more than one SMC2455W installed. • Configure wireless settings and TCP/IP settings • Configure wireless security (WEP) 4.2 | Using the Web-based Utility 1. Launch your web browser. (i.e. Internet Explorer or Netscape) 2. In the Address Bar, type in the IP address that is configured on your Wireless Access Point.
Note: The SMC2455W is DHCP-enabled by default. If you do not know the IP address that was assigned by your DHCP server, please use the Windows Utility or look at your DHCP client list to get the correct IP address to use. If you do not have a DHCP server on your network, then the SMC2455W will auto-assign itself an IP address of: 192.168.2.50. 3. Log into the Web-based Utility. The factory default password for he SMC2455W is “default”, all lower-case. 4.
Section 5 | Configure The SMC2455W EZ Connect Turbo Wireless Access Point can be configured from both the Windows and Web-based utility. Since the EZ Connect Turbo Wireless Access Point ships with the default configuration of DHCP-enabled, it will auto-configure itself to any network setting. 5.1 | Configure the Wireless Access Point using Windows-based Utility 1. Log into the SMC2455W using the Windows-based Utility. (See section 4.1 for more information) 2.
5.2 | Configure the Wireless Access Point using Web-based Utility (Setup Wizard) 1. Log into the SMC2455W Web-based Utility. (See section 4.2 for more information) 2. Click on [Setup Wizard] link. 3. The Setup Wizard will guide you through the basic configuration settings for the SMC2455W.
4. The first step in the Setup Wizard is to configure: • SSID • Wireless Channel (default wireless channel is 6) 5. When you have completed this step, click the [NEXT] button. 6.
Note: If this is your first experience with wireless networking, it is a good idea to keep WEP disabled until you have the connection up and running. Then enable this security feature on both the Access Point and your wireless client. 7. When you have completed this step, click the [FINISH] button to save the settings and reboot the Access Point. When you do this, the Access Point will log you out of the Web-based Utility. 5.
3. To change the IP configuration on the SMC2455W, click on the [LAN] link on the left hand navigation menu. From this section, you can configure the following: • Static IP or DHCP Configuration For static IP settings, you can configure: • IP Address • Subnet Mask • Gateway 4. When you have completed configuring these settings, click the [APPLY] button to save the settings and reboot the Access Point. 5.
Section 6 | Security Wired Equivalent Privacy (WEP) is used to protect your data as it is transmitted over the wireless connection. The EZ Connect Turbo Wireless Access Point supports 3 levels of encryption, 64/128-/256-bit, and both HEX and ASCII formats. Please refer to the chart below for the each key and formats requirements.
3. Check the [Data Encryption] checkbox. Under the WEP Settings section, you can configure: • WEP Key Length • HEX or ASCII format • Set Key Number to use Note: For information on WEP Key structures, see Section 6. 6.2 | Configure WEP using Web-based Utility 1. Log into the SMC2455W Web-based Utility. (See section 4.2 for more information) 2. Click on [Advanced Setup] link.
3. Click on [Wireless] link on the left hand navigation menu, and then select the [Encryption] option. 4. To enable WEP, choose the WEP key length you want to use. 5. Then set the WEP key format. 6. Enter in the WEP key you want to use, based on the key length and format. 7. Select the WEP key you want to use by clicking the button next to the Key number. 8. When you have completed configuring these settings, click the [APPLY] button to save the settings and reboot the Access Point.
6.3 | Configure MAC Filtering using Web-based Utility 1. Log into the SMC2455W Web-based Utility. (See section 4.2 for more information) 2. Click on [Advanced Setup] link. 3. Click on [Filter] link on the left hand navigation menu. 4. Check the [Enable] option. 5. Enter in the MAC address of the clients/users that you want to have access to your wireless network. Note: On the MAC Filtering option, there is a Connection list option.
Section 7 | EZ Connect Turbo Wireless Access Point Information Both the Windows Utility and Web-based Utility provide information about the EZ Connect TurboTM Wireless Access Point.
7.1 | View Wireless Access Point information using Windows-based Utility 1. Log into the SMC2455W using the Windows-based Utility. (See section 4.1 for more information) 2. The default page of the Windows-based Utility displays all of the information outlined above.
7.2 | View Wireless Access Point information using Web-based Utility 1. Log into the SMC2455W using the Web-based Utility. (See section 4.2 for more information) 2. Click on [Advanced Setup] link. 3. Click on [Status] link on the left hand navigation menu.
Section 8 | Changing the Password on the SMC2455W For network security, it is a good idea to change the EZ Connect Turbo Wireless Access Point’s default password. To change the password on your SMC2455W, follow the steps outlined below: 1. Log into the SMC2455W using the Web-based Utility. (See section 4.2 for more information) 2. Click on [Advanced Setup] link. 3. The default page is the [System] section. Click on [Password Settings] option.
Section 9 | Upgrading the SMC2455W The EZ Connect Turbo Wireless Access Point is upgradeable through the Web-based Utility. Please verify that you have the latest firmware available from http://www.smc.com. 1. Log into the SMC2455W using the Web-based Utility. (See section 4.2 for more information) 2. Click on [Advanced Setup] link. 3. Click on [Tools] link on the left hand navigation menu, and then click the [Firmware Upgrade] option. 4.
Section 10 | Backing up and Restoring the Wireless Access Point The EZ Connect Turbo Wireless Access Point offers a configuration backup and configuration restore option through the Webbased Utility. This feature will allow you to save all of your configuration settings to a separate file, so you can easily configure multiple Access Points with the same configuration. 10.1 | Back-up the SMC2455W configuration 1. Log into the SMC2455W using the Web-based Utility. (See section 4.2 for more information) 2.
10.2 | Restore the SMC2455W configuration from “SMC2455W_backup.bin” file 1. Log into the SMC2455W using the Web-based Utility. (See section 4.2 for more information) 2. Click on [Advanced Setup] link. 3. Click on [Tools] link on the left hand navigation menu, and then click the [Configuration Tools] option. 4. Click the [Browse…] button and locate the SMC2455W “SMC2455W_backup.bin” located on your computer. 5. Click the [Restore] button to begin the restoration process.
Section 11 | Uninstalling the SMC2455W Windows Utility If you need to uninstall the EZ ConnectTM Turbo Wireless Access Point Windows Utility program, please follow the steps below: 1. Click [Start], then [Programs], choose [SMC2455W Access Point Utility], and then select [Uninstall]. 2. To complete the uninstall process, when prompted by the [Confirm File Deletion] dialog box, click [OK] to continue. 3. The uninstall process will begin. 4. Click [Finish] to complete the uninstall process.
Section 12 | Technical Specifications Data Rate • Up to 22 Mbps with Auto Fallback to 11/5.5/2/1 Mbps Operating Range • Up to 1,155 feet Interface • RJ-45 – 10/100 Mbps • Power Jack – 2.
Section 13 | Troubleshooting This section provides possible solutions to issues regarding the installation and operation of your EZ Connect Turbo Wireless Access Point. If the solution you are looking for is not listed here, please visit SMC Networks web site at www.smc.com. Before you begin troubleshooting your EZ Connect Turbo Wireless Access Point, please make sure you are running the latest firmware. You can download the latest firmware from www.smc.com. 1.
Section 14 | Glossary 802.11 - 802.11 refers to a family of specifications developed by the IEEE for wireless LAN technology. 802.11 specifies the overthe-air interface used between a wireless client and a base station or between two wireless clients. The IEEE accepted the specification in 1997. 802.11b - An extension to 802.11 that applies to wireless LANS and provides 11 Mbps transmission (with a fallback to 5.5, 2 and 1 Mbps) in the 2.4 GHz band. 802.11b uses only DSSS.
DHCP (Dynamic Host Configuration Protocol) - A protocol for assigning dynamic IP addresses to devices on a network. With dynamic addressing, a device can have a different IP address every time it connects to the network. In some systems, the device's IP address can even change while it is still connected. DHCP also supports a mix of static and dynamic IP addresses. DNS (Domain Name System) - Is the system that is used to translate Internet domain names into Internet Protocol (IP) addresses.
is modulated with a narrowband carrier signal that "hops" in a random but predictable sequence from frequency to frequency as a function of time over a wide band of frequencies. The signal energy is spread in time domain rather than chopping each bit into small pieces in the frequency domain. This technique reduces interference because a signal from a narrowband system will only affect the spread spectrum signal if both are transmitting at the same frequency at the same time.
LAN - A local area network (LAN) is a group of computers and associated devices that share a common communications line and typically share the resources of a single processor or server within a small geographic area (for example, within an office building). MAC Address - Short for Media Access Control address, a hardware address that uniquely identifies each node of a network.
Static IP Address - A permanent IP address that is assigned to a node in a TCP/IP network. Subnet Mask - The method used for splitting IP networks into a series of subgroups, or subnets. The mask is a binary pattern that is matched up with the IP address to turn part of the host ID address field into a field for subnets. SSID Broadcast- For security purposes, this selection can be disabled, allowing only those wireless network cards with the Access Point’s SSID to communicate with the Access Point.
WEP (Wired Equivalent Privacy) - Is a security protocol for wireless local area networks (WLANs) defined in the 802.11b standard. WINIPCFG - Configuration utility based on the Win32 API for querying, defining, and managing IP addresses within a network. A commonly used utility, under Windows 95, 98, and Me, for configuring networks. WLAN - Acronym for wireless local-area network. A type of local-area network that uses high-frequency radio waves rather than wires to communicate between nodes.
FOR TECHNICAL SUPPORT, CALL: From U.S.A. and Canada (24 hours a day, 7 days a week) (800) SMC-4-YOU; (949) 679-8000; Fax: (949) 679-1481 From Europe (8:00 AM - 5:30 PM UK Time) 44 (0) 118 974 8700; Fax: 44 (0) 118 974 8701 INTERNET E-mail addresses: techsupport@smc.com european.techsupport@smc-europe.com Driver updates: http://www.smc.com/index.cfm?action=tech_support_drivers_downloads World Wide Web: http://www.smc.com/ http://www.smc-europe.com/ For Literature or Advertising Response, Call: U.S.A.