USER GUIDE SMCWPCI-N EZ Connect™ N Draft 11n Wireless PCI Adapter
LIMITED WARRANTY Limited Warranty Statement: SMC Networks, Inc. (“SMC”) warrants its products to be free from defects in workmanship and materials, under normal use and service, for the applicable warranty term. All SMC products carry a standard 90-day limited warranty from the date of purchase from SMC or its Authorized Reseller. SMC may, at its own discretion, repair or replace any product not operating as warranted with a similar or functionally equivalent product, during the applicable warranty term.
LIMITATION OF LIABILITY: IN NO EVENT, WHETHER BASED IN CONTRACT OR TORT (INCLUDING NEGLIGENCE), SHALL SMC BE LIABLE FOR INCIDENTAL, CONSEQUENTIAL, INDIRECT, SPECIAL, OR PUNITIVE DAMAGES OF ANY KIND, OR FOR LOSS OF REVENUE, LOSS OF BUSINESS, OR OTHER FINANCIAL LOSS ARISING OUT OF OR IN CONNECTION WITH THE SALE, INSTALLATION, MAINTENANCE, USE, PERFORMANCE, FAILURE, OR INTERRUPTION OF ITS PRODUCTS, EVEN IF SMC OR ITS AUTHORIZED RESELLER HAS BEEN ADVISED OF THE POSSIBILITY OF SUCH DAMAGES.
Compliances Federal Communication Commission Interference Statement This equipment has been tested and found to comply with the limits for a Class B digital device, pursuant to Part 15 of the FCC Rules. These limits are designed to provide reasonable protection against harmful interference in a residential installation.
Table of Contents Chapter 1 - Getting Started with the SMCWPCI-N 6 Chapter 2 - Wireless LAN Networking Transmission Rate (Transfer Rate) Type of Wireless Networks Wireless LAN Security 7 7 7 11 Chapter 3 - Hardware and Wireless Utility About Your Draft 11n Wireless PCI Adapter Package Content System Requirement LED Definition Hardware and Wireless Utility Installation Using the Utility to Configure Your Network 13 13 13 13 13 14 17 Chapter 4 – Maintenance Uninstall the Driver Uninstall the Client Util
Chapter 1 - Getting Started with the SMCWPCI-N Congratulations on purchasing the SMCWPCI-N. This manual provides information for setting up and configuring the SMCWPCI-N. This manual is intended for both home users and professionals. It is not required to read some of the more technical information in this manual (such as in “Wireless LAN Networking” and “Configuring Wireless Security”) to operate and enjoy the SMCWPCI-N. It is included for your reference only.
Chapter 2 - Wireless LAN Networking This section provides background information on wireless LAN networking technology. THE INFORMATION IN THIS SECTION IS FOR YOUR REFERENCE. CHANGING NETWORK SETTINGS AND PARTICULARLY SECURITY SETTTINGS SHOULD ONLY BE DONE BY AN AUTHORIZED ADMINISTRATOR. Transmission Rate (Transfer Rate) The SMCWPCI-N provides various transmission (data) rate options for you to select. In most networking scenarios, the factory default Auto setting proves the most efficient.
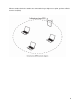
Independent Basic Service Set (IBSS). To set up an ad-hoc network, configure all the stations in ad-hoc mode. Use the same SSID and channel for each station.
When a number of wireless stations are connected using a single access point, you have a Basic Service Set (BSS).
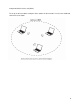
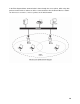
In the ESS diagram below, communication is done through the access points, which relay data packets to other wireless stations or devices connected to the wired network. Wireless stations can then access resources, such as a printer, on the wired network.
In an ESS environment, users are able to move from one access point to another without losing the connection. In the diagram below, when the user moves from BSS (1) to BSS (2) the SMCWPCI-N automatically switches to the channel used in BSS (2). Roaming in an ESS network diagram Wireless LAN Security Because wireless networks are not as secure as wired networks, it’s vital that security settings are clearly understood and applied.
D ATA E NCRYPTION WITH W E P The WEP (Wired Equivalent Privacy) security protocol is an encryption method designed to try to make wireless networks as secure as wired networks. WEP encryption scrambles all data packets transmitted between the SMCWPCI-N and the access point or other wireless stations to keep network communications private. Both the wireless stations and the access points must use the same WEP key for data encryption and decryption. There are two ways to create WEP keys in your SMCWPCI-N.
Chapter 3 - Hardware and Wireless Utility This chapter introduces the Adapter and prepares you to use the Wireless Utility. About Your Draft 11n Wireless PCI Adapter With the Adapter, you can enjoy wireless mobility within almost any wireless networking environment. The following lists the main features of your Card. • IEEE802.11n draft v1.0 compliant • Wireless speeds up to 300Mbps • Increased speeds & coverage - up to 5x the speed of 802.11g • Fully backwards compatible with 802.
Hardware and Wireless Utility Installation Follow the instructions below to install the PCI Card and Wireless Utility. Do not insert the EZ Connect™ N Wireless PCI Adapter until instructed. 1. Put the EZ Installation & Documentation CD in to your CD-ROM drive. The CD will auto run. If the CD does not auto run browse to your CD drive & double-click the “SMCWPCI_N.exe” file. 2. Click [Install Driver/Utility] to start the installation Wizard. 3. The installation Wizard will run.
4. To install to the default folder location click [Next]. It is recommended to use the default folder location unless you are an advanced user. To change the installation folder click the [Browse] button and specify a new location. Click [Next] to continue. 5. The wizard is ready to begin installation. Click [Install]. 6. A “Software Installation” warning may appear, click [Continue Anyway]. 7. Click [Finish] to exit in the installation wizard.
8. Turn off your computer. 9. Insert the EZ Connect™ N Wireless PCI Adapter in to an available PCI slot. IMPORTANT: For correct installation of new hardware please refer to your Computer user manual. NOTE: To install the card you may be required to remove the attached antennas. This is done by pulling the antennas from the base. 10. Once the EZ Connect™ N Wireless PCI Adapter is inserted screw on the larger 5dBi antenna to the connector marked with a green sticker.
14. A “Hardware Installation” warning may appear, click [Continue Anyway]. 15. Click [Finish] to complete the Driver/Utility installation.
Using the Utility to Configure Your Network The following are explanations on how to configure and use the Utility program. After completing the installation procedure, a new icon as shown below will automatically appear in the lower right tray bar. Hold your mouse pointer over the icon, and double click the left mouse button to open the Wireless Client Utility. The Wireless Client Utility window as shown below will appear. The user can now use any of the management functions available in the IEEE 802.
The following table describes the items found on the Link Information screen. Wireless Network Status Profile Name The name of the current selected configuration profile. Set up the configuration name on the Profile tab. SSID Displays the wireless network name. Link Status Shows whether the station is associated to the wireless network. Network Type The type of network the station is connected to. The options include: Infrastructure (access point) Ad Hoc Wireless Mode Displays the wireless mode. 802.
channel Channel Width 20MHz only or 40/20MHz channel support Security Status Security Shows the security type – Disable, WEP, WPA/WPA2, WAP-PSK/WAP2-PSK or 802.1X Authentication Displays the authentication mode. TCP/IP Status IP Address Displays the computer's IP address. Subnet Mask Displays subnet mask Gateway Displays gateway address DNS Server Display DNS server address Site Survey Click the Site Survey tab to see available infrastructure and ad hoc networks.
Click the Connect button to connect the available network. If no configuration profile exists for that network, the Profile Settings window opens to ask to create a profile for the network. Follow the procedures to create profile for that network. Profile To add a new configuration profile, click Add on the Profile tab. To modify a configuration profile, select the configuration from the Profile list and click the Edit button.
Scan Available Networks Click the Browse button on the Profile Settings screen to scan for available infrastructure and ad hoc networks. On this list, click Refresh to refresh the list at any time. To configure a profile for Ad-Hoc or Infrastructure mode, select the Network Type field on the Profile Settings.
Click Next to continue. To define the security mode, select the security button of the desired security mode. And then click Next to continue. Please see following table for details of security modes. WEP This card support three modes of WEP, include: 64 Bits 128 Bits 152 Bits Except 152-Bit ode, both 64-Bit & 128-Bit modes support Passphrase. WPA/WPA2 Enables the use of Wi-Fi Protected Access (WPA). Choosing WPA/WPA2 opens the WPA/WPA2 Security Settings screen.
Protocol) authenticates wireless LAN clients using only server-side digital certificates by creating an encrypted SSL/TLS tunnel between the client and the authentication server. The tunnel then protects the subsequent user authentication exchange. PEAP (EAP-MSCHAP V2) (Protected Extensible Authentication Protocol) To use PEAP (EAP-MSCHAP V2) security, the server must have WPA-PEAP certificates, and the server properties must already be set.
The following table describes the items found on the Advanced Settings screen. Power Save Mode Shows the power save mode. Power management is disabled in ad hoc mode. The options include: z Continuous Access Mode z Maximum Power Saving z Fast Power Saving 802.11b Preamble Displays the 802.11b preamble format. The options include: z Long z Short z Auto RTS Threshold Value from 0 ~ 2347 FRAG Threshold Value from 256 ~ 2346 Wireless Mode Enable or disable 802.11n mode.
Chapter 4 - Maintenance This chapter describes how to uninstall or upgrade the Wireless Utility. Uninstall the Driver Follow the steps below to remove (or uninstall) the Card driver from your computer. Step 1. To remove the driver from the OS, go to Start -> Control Panel Step 2. Double-click System Step 3. Under Hardware tab, click Device Manager. Step 4. Double-click Network Card Step 5. Right-click mouse button on “SMC EZ Connect N Wireless PCI Adapter”, and choose Uninstall Step 6.
Glossary For unfamiliar terms used below, look for entries elsewhere in the glossary. A D-H OC (IBSS) Ad-hoc mode does not require an AP or a wired network. A network that transmits wireless from computer to computer without the use of a base station (access point). Two or more wireless stations communicate directly to each other. An ad-hoc network may sometimes be referred to as an Independent Basic Service Set (IBSS). C HANNEL A radio frequency used by a wireless device is called a channel.
SSID The SSID (Service Set Identity) is a unique name shared among all wireless devices in a wireless network. Wireless devices must have the same SSID to communicate with each other. T EM POR AL K E Y I NTEGRI TY P R O TOC O L (TKIP) Temporal Key Integrity Protocol (TKIP) uses 128-bit keys that are dynamically generated and distributed by the authentication server. U S E R A UTHENTI C ATI O N WPA applies IEEE 802.
TECHNICAL SUPPORT From U.S.A. and Canada (24 hours a day, 7 days a week) Phn: (800) SMC-4-YOU / (949) 679-8000 Fax: (949) 679-1481 ENGLISH Technical Support information available at www.smc.com FRENCH Informations Support Technique sur www.smc.com DEUTSCH Technischer Support und weitere Information unter www.smc.com SPANISH En www.smc.com Ud. podrá encontrar la información relativa a servicios de soporte técnico DUTCH Technische ondersteuningsinformatie beschikbaar op www.smc.