
User's Manual

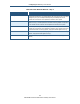


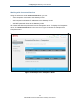


Table Of Contents
- Contents
- Preface
- 1 Getting to Know the Gateway
- 2 Installing the Gateway
- 3 Preconfiguration Guidelines
- 4 Configuring the Gateway
- Accessing the Gateway’s Web Management
- Understanding the Web Management Interface Menus
- Web Management Interface Menus
- Viewing Information About Your Network and Connected Devices
- Viewing Information About Your Network and Connections
- Configuring Firewall Settings
- Viewing System Software Settings
- Configuring System Hardware
- Configuring Your Home Network
- Working with Connected Devices
- Configuring Parental Controls
- Using Advanced Features
- Troubleshooting the Gateway
- 5 Configuring the Gateway’s mso Interface
- Accessing the Gateway’s Web Management
- Understanding the Web Management Interface Menus
- Web Management Interface Menus
- Configuring the Gateway Settings
- Configuring Connections
- Configuring Firewall Settings
- Viewing System Software Settings
- Configuring Hardware
- Configuring Your Home Network
- Working with Connected Devices
- Configuring Parental Controls
- Using Advanced Features
- Troubleshooting the Gateway
- 6 Troubleshooting Procedures
- Basic Troubleshooting Procedures
- Advanced Troubleshooting Procedures
- Specific Troubleshooting Procedures
- Unable to Log In to Gateway
- Local Networked Devices Unable to Access the Gateway
- Unable to Access the Internet
- Unable to Access Networked Devices
- Using the Ping Utility to Troubleshoot
- Gateway Disconnects from the Internet
- Slow Web Browsing
- Unable to Configure Port Forwarding
- Unable to Use Pass-thru VPN
- Gateway is Not Passing DHCP Address to a computer
- Determining a Computer’s MAC Address
- Wireless Troubleshooting
- Application and Gaming Troubleshooting
- Connecting to Messenger Services Behind the Gateway
- Connecting to America Online Behind the Gateway
- Connecting to XBox Live, PSP, and Nintendo WFC
- Index

Configuring the Gateway’s mso Interface
139
SMCD3GNV Wireless Cable Modem Gateway User Manual
Manually Adding Wireless Clients
You can manually add a wireless client to the Gateway’s LAN using Wireless Protected
Setup (WPS). While not a security feature, WPS is a standard for easy and secure wireless
network set up and connections.
Note: WPS is optional for Wi-Fi Certified products. Check for the Wi-Fi Protected Setup logo
or terms on products to see whether the product is WPS compatible.
A few of the key advantages associated with WPS are:
WPS automatically configures the network name (SSID) and WPA security key for the
Gateway or access point and for wireless devices that join the network.
You do not have to know the network name and security keys or passphrases to use
WPS to join a wireless network.
Security keys or passphrase because are generated randomly generated, making them
nearly impossible to guess.
WPS uses the Extensible Authentication Protocol (EAP), a strong authentication protocol
used in WPA2.
To manually add a wireless client to the Gateway’s LAN, perform the following procedure
from the Computers menu.
1. Under Offline Computers, click the ADD WIFI PROTECTED SETUP (WPS) CLIENT
button. The Add Wireless Client menu appears (see Figure 82).
2. Complete the fields in the Add Wireless Client menu (see Table 40).
3. Click PAIR to pair the wireless device with the Gateway’s LAN (pairing can take up to 2
minutes). Alternatively, if your wireless device has a Pair button, you can press this button
to pair the device with the Gateway’s LAN.
4. If you click PAIR, the Private Wireless Advanced Setting options in the WiFi menu appear.
For information about completing these settings see page 50.
5. To add more wireless devices, repeat steps 1 through 4.
6. To edit an online wireless device, click the EDIT button next to the computer you want to
modify, edit the settings on the Edit Computer menu (see Figure 82 and Table 40), and
click SAVE.<<I did not see this button??>>
7. To delete an online or offline wireless device, click the X next to the device. When the
Delete Computer message appears, click OK to delete the device or CANCEL to retain it.
If you clicked OK, the device is removed from the Computers menu. <<true??>>