Cable/DSL Broadband Router Built-in 8-Port 10/100Mbps Switch and Integrated Print Server USER GUIDE SMC7008ABR
7008ABR – Manual COMPLIANCES FCC - Class B This equipment has been tested and found to comply with the limits for a Class B digital device, pursuant to Part 15 of the FCC Rules. These limits are designed to provide reasonable protection against harmful interference in a residential installation. This equipment generates, uses, and can radiate radio frequency energy and, if not installed and used in accordance with instructions, may cause harmful interference to radio communications.
7008ABR – Manual COMPLIANCES Industry Canada - Class B This digital apparatus does not exceed the Class B limits for radio noise emissions from digital apparatus as set out in the interference-causing equipment standard entitled “Digital Apparatus,” ICES-003 of the Department of Communications.
7008ABR – Manual 10. Verlegen Sie die Netzanschlußleitung so, daß niemand darüber fallen kann. Es sollte auch nichts auf der Leitung abgestellt werden. 11. Alle Hinweise und Warnungen, die sich am Gerät befinden, sind zu beachten. 12. Wird das Gerät über einen längeren Zeitraum nicht benutzt, sollten Sie es vom Stromnetz trennen. Somit wird im Falle einer Überspannung eine Beschädigung vermieden. 13.
7008ABR – Manual TABLE OF CONTENTS COMPLIANCES CHAPTER 1 | Introduction ……………………………………………………………… 6 Features and Benefits Package Contents Minimum Requirements CHAPTER 2 | Getting to know the Barricade ……………………………………… 7 LED Indicators Resetting the Barricade CHAPTER 3 | Getting Connected …………………………………………………….. 8 Basic Installation Procedure 3-Click Installation Wizard CHAPTER 4 | Configuring your Computer ………………………………………….
7008ABR – Manual CHAPTER 1 | Introduction Congratulations on your purchase of a Barricade™ Broadband Router. SMC is proud to provide you with a powerful yet simple communication device for connecting your local area network (LAN) to the Internet. For those who want to surf the Internet at the lowest possible cost, the Barricade™ Broadband Router is the convenient, easy solution. 1.
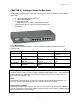
008ABR – Manual CHAPTER 2 | Getting to know the Barricade The Barricade Broadband Router is the perfect solution for the office environment. This full-featured router offers: • • • • • • 8 - 10/100 Mbps Auto-Sensing LAN ports 1 - 10/100 Mbps WAN port 1 - Printer Server Port 1 - COM (RS232) port for ISDN or external dial-up modem Comprehensive LEDs for network status and troubleshooting Reset Button 2.
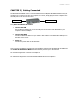
7008ABR – Manual CHAPTER 3 | Getting Connected The Barricade Broadband router is connected between the Cable/DSL Broadband Modem and your computers. If you have more then one computer to connect, simply plug the other computers into the LAN ports on the front of the router. MODEM COMPUTER 3.1 | Basic Installation Procedure 1. Connect the LAN Run an Ethernet cable from one of the LAN ports on the front of the Barricade to your computer’s network adapter. 2.
7008ABR – Manual CHAPTER 4 | Configuring your Computer The information outlined in this chapter will guide you through the configuration for the following Operating Systems: • • • • • Windows 95/98 Windows Me Windows 2000 Windows XP Apple Macintosh For installation information on Windows NT, please see your Windows Manual. 4.1 | Configuring Windows 95/98/Me 1. Access your Network settings by clicking [Start], then choose [Settings] and then select [Control Panel]. 2.
7008ABR – Manual 4. Next, click the [Properties] button to view that adapters TCP/IP settings. 5. From the TCP/IP Properties dialog box click the [Obtain an IP address automatically] option. 6. Next click on the [Gateway] tab and verify the Gateway field is blank. If there are IP addresses listed in the Gateway section, highlight each one and click [Remove] until the section is empty. 7. Click the [OK] button to close the TCP/IP Properties window. 8.
7008ABR – Manual 4. On the [Local Area Connection] Properties box, verify the box next to Internet Protocol (TCP/IP) is checked. Then highlight the Internet Protocol (TCP/IP), and click the Properties button. 5. Select Obtain an IP address automatically to configure your computer for DHCP. Click the [OK] button to save this change and close the Properties window. 6. Click the [OK] button again to save these new changes. 7. Reboot your PC. 4.
7008ABR – Manual 3. On the [Local Area Connection] Properties box, verify the box next to Internet Protocol (TCP/IP) is checked. Then highlight the Internet Protocol (TCP/IP), and click the Properties button. 4. Select Obtain an IP address automatically to configure your computer for DHCP. Click the [OK] button to save this change and close the Properties window. 5. Click the [OK] button again to save these new changes. 6. Reboot your PC. 4.
7008ABR – Manual CHAPTER 5 | Configuring the Barricade After you have configured TCP/IP on a client computer, use a web browser to configure the Barricade™ Broadband Router. The Barricade can be configured by any Java-supported browser including Internet Explorer 4.0 or above, or Netscape Navigator 4.0 or above. Using the web management interface, you may configure the Barricade and view statistics to monitor network activity.
7008ABR – Manual 5.3 | Accessing the Barricade Management To access the Barricade’s web-based management screens follow the steps below: 1. Launch your web-browser. NOTE: Your computer does not have to be ONLINE to configure the Barricade Router. 2. In the Address Bar, type: http://192.168.2.1 3. When the Barricades Login screen loads up, click the [Login] button to access the router. NOTE: The Barricade does not ship with a default password. 4.
7008ABR – Manual CHAPTER 6 | Navigating the Web-based Administration The Barricade’s management interface features a Setup Wizard and an Advanced Setup section. Use the Setup Wizard if you want to quickly setup the Barricade for use with a cable modem or DSL modem. Advanced setup supports more advanced functions like hacker attack detection, IP and MAC address filtering, intrusion detection, virtual server setup, virtual DMZ hosts, as well as other advanced functions. 6.
7008ABR – Manual 6.1 | Setup Wizard Below is an outline of each option available from the Setup Wizard section. This wizard takes 3 steps to complete an ISP configuration. 6.1.1 | Step One: Time Zone The first step is to configure the Time Zone you are located in. This setting is used for accurate timing of client filtering and log events. 6.1.2 | Step Two: Broadband Type Select the type of broadband connection you have. • Cable Modem Your ISP may have given you a host name.
7008ABR – Manual Name is normally optional, but may be required by some service providers. Leave the Maximum Transmission Unit (MTU) on the default value (1492) unless you have a particular reason to change it. Enter a Maximum Idle Time (in minutes) to define a maximum period of time for which the Internet connection is maintained during inactivity. If the connection is inactive for longer than the Maximum Idle Time, it will be dropped.
7008ABR – Manual 6.2 | Advanced Setup Below is an outline of the Advanced Setup section. This section is used to manually configure your ISP connection and also define the advanced system parameters, manage and control the Barricade and its ports, or monitor network conditions. 6.2.1 | System This section is used to configure the local time zone, password for administrator access, and the IP address of a PC that will be allowed to manage the Barricade remotely.
7008ABR – Manual 6.2.2 | WAN Specify the WAN connection type provided by your Internet Service Provider, then click “More Configuration” to enter detailed configuration parameters for the selected connection type. • Dynamic IP The Host Name is optional, but may be required by some ISPs. The default MAC address is set to the WAN’s physical interface on the Barricade. Use this address when registering for Internet service, and do not change it unless required by your ISP.
7008ABR – Manual • PPPoE Enter the PPPoE user name and password assigned by your Service Provider. The Service Name is normally optional, but may be required by some service providers. The MTU (Maximum Transmission Unit) governs the maximum size of the data packets. Leave this on the default value (1492) unless you have a particular reason to change it. Enter a Maximum Idle Time (in minutes) to define a maximum period of time for which the Internet connection is maintained during inactivity.
7008ABR – Manual • Static IP Address If your Internet Service Provider has assigned a fixed IP address, enter the assigned address and subnet mask for the Barricade, then enter the gateway address of your ISP. You may need a fixed address if you want to provide Internet services, such as a web server, or FTP server. • DNS Domain Name Servers map numerical IP addresses to the equivalent domain name (e.g., www.smc.com). Your ISP should provide the IP address of one or more domain name servers.
7008ABR – Manual 6.2.3 | LAN From this section you can configure the TCP/IP configuration for the Barricade LAN interface and DHCP clients. • LAN IP Use the LAN menu to configure the LAN IP address for the Barricade and to enable the DHCP server for dynamic client address allocation. Set a period for the lease time if required. For home networks this may be set to “Forever”, which means there is no time limit on the IP address lease.
7008ABR – Manual 6.2.4 | NAT From this section you can configure the Address Mapping, Virtual Server, and Special Application features that provide control over the port openings in the router’s firewall. This section can be used to support several Internet based applications such as VPN connections. • Address Mapping This section allows you to configure one or more public IP addresses to be shared by multiple internal users. Enter the Public IP address you wish to share into the “Global IP” field.
7008ABR – Manual • Special Applications Some applications, such as Internet gaming, videoconferencing, Internet telephony and others, require multiple connections. These applications cannot work with Network Address Translation (NAT) enabled. If you need to run applications that require multiple connections, use the following screen to specify the additional public ports to be opened for each application.
7008ABR – Manual The Barricade Plus’ firewall can provide the access control of connected client PCs, block common hacker attacks, including IP Spoofing, Land Attack, Ping of Death, IP with zero length, Smurf Attack, UDP port loopback, Snork Attack, TCP null scan, and TCP SYN flooding. The firewall does not significantly affect system performance, so we advise leaving it enabled to protect your network users.
7008ABR – Manual • URL Blocking The URL Blocking feature of the Barricade limits access to website domains (i.e. www.somesite.com). This feature is ideal way to limit questionable content from your being accessed at either your home or business network. • Schedule Rule The Schedule Rule feature allows you to configure specific rules based on Time and Date. These rules can then be used to configure more specific Access Control Rules.
7008ABR – Manual • Intrusion Detection The Intrusion Detection feature of the Barricade limits the access of the incoming traffic from the WAN port. When the SPI feature is turned on, all the incoming packets will be blocked unless certain types of traffic types are checked by the users. When the user checks certain types of traffic, only the particular type of traffic initiated from the Internal LAN will be allowed.
7008ABR – Manual • o Email Notification When hackers attempt to enter your network, we can alert you by e-mail Enter your E-mail address for alerting hacker access. Specify your E-mail servers, user name and password. o Connection Policy Enter the appropriate values for TCP/UDP sessions DoS Criteria and Port Scan Criteria Setup DoS and port scan criteria in the spaces provided.
7008ABR – Manual 6.2.7 | UPnP The Barricade supports UPnP (Universal Plug and Play), a networking architecture that provides compatibility amongst networking equipment. This feature allows a UPnP based operating system, like Windows XP to automatically communicate with the Barricade and open the required services when needed. 6.2.8 | Tools Use the “Tools” menu to backup the current configuration, restore a previously saved configuration, restore factory settings, update firmware, and reset the Barricade.
7008ABR – Manual 6.2.9 | Status The Status screen displays WAN/LAN connection status, firmware, and hardware version numbers, illegal attempts to access your network, as well as information on DHCP clients connected to your network. The following items are included on this screen: 1. INTERNET Displays WAN connection type and status. 2. GATEWAY Displays system IP settings, as well as DHCP and Firewall status. 3.
7008ABR – Manual For additional information on the 7008ABR please visit www.smc.com.
7008ABR – Manual Chapter 7 | Setting up the Print Server If you want to use the print server built into the Barricade, then you must first install the Port Monitor program as described in the following section for Windows 95/98/ME/NT/2000. To configure the Barricade Print Server for Windows 95/98/ME/ NT/2000, or Unix, see “Configure the Print Server” on page 6-4. 7.
7008ABR – Manual 4. Select the Program Folder that will contain the program icon for uninstalling the port monitor, and then click [Next]. 5. Enter the printer port name that will be used to identify the port monitor in your system, and press [Next]. 6. When the setup program finishes installing the port monitor, select the item to restart your computer and then click the [OK] button. 7.
7008ABR – Manual 4. Specify the printer type attached to the Barricade. 5. Select the monitored port. The default port name is [SMC100] – but this can be changed during the installation process outlined above. Once you select the correct port name, click the [Configure Port] button. 6. Enter the IP address of the Barricade and click the [OK] button to close this dialog box. 7. Click the [Next] button in the Add Printer Wizard dialog box. 8.
7008ABR – Manual 7. Select the [Create a New Port] option and then select the [Standard TCP/IP Port] option in the drop down menu. 8. When you click the [Next] button the [Add Standard TCP/IP Printer Port Wizard] will launch. 9. To start this new installation wizard click the [Next] button 10. Provide the appropriate IP and Port name information for your new Printer port. If you are using default settings on the router you can use the following information: Printer Name or IP Address: 192.168.2.
7008ABR – Manual 14. In the [Configure Standard TCP/IP Port Monitor] dialog box you will need to configure some additional settings. Please confirm these settings below: • • • • • • • Port Name: IP_192.168.2.1* Printer Name or IP Address: 192.168.2.1* In the [Protocol] section click on the “LPR” option The [Raw Settings] section should be grayed out The LPR Settings section should have the Queue Name set to one of 2 options depending on the version of Barricade you are using.
7008ABR – Manual printer documentation to get your printer installed. 20. Once you have your printer listed and selected in this dialog box click the [Next] button. 21. Name your printer. In this dialog box you will give your installed printer a name; this will be the name this printer is referred to in your Printer folder. 22. Once you have named your printer, click [Next] to continue. 23. Choose the [Do not share this printer] option and click the [Next] button. 24.
7008ABR – Manual 4. Click on the [Ports] tab and verify that you have the TCP/IP port that you just created selected and the [Enable bidirectional support] and [Enable printer pooling] options are unchecked.
7008ABR – Manual 5. Click the [Apply] button to save the settings. 6. Next click on the [General] tab and click on the [Print Test Page] button. This will verify that you have successfully setup your LPR printing port, and now you can print through the SMC Barricade Router. 7.4 | Confirm printer Connection On the status page of the web-based login, you can confirm the printer connection to the Barricade.
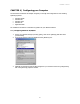
7008ABR – Manual APPENDIX A | Troubleshooting The information outlined in this section describes some useful steps for getting your computer and Barricade router online. A.1 | Verify you are connected to the Barricade Router If you are unable to access the Barricade’s web-based administration pages then you may not be properly connected or configured. The screen shots in this section were taken on a Windows 2000 machine, but the same steps will apply to Windows 95/98/Me/XP.
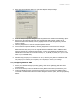
7008ABR – Manual If you are still unable to get an IP Address from the Barricade, reinstall your network adapter. Please refer to your adapter manual for information on how to do this. A.3 | I have another IP Address displayed If you have another IP address listed then the PC may not be configured for a DHCP connection. Please refer to Chapter 4 | Configure your Computer for information. Once you have confirmed your computer is configured for DHCP, then please follow the steps below. 1.
7008ABR – Manual A.4 | I have a Dynamic IP connection and I can’t get online Most cable companies use a Dynamic IP configuration to provide internet access. If have this type of a connection, and are unable to get connected please follow the steps outlined below: 1. 2. 3. 4. Unplug the power from your Cable or DSL modem for 2 mins. Confirm that your Barricade router is configured for a Dynamic IP configuration Plug the power back into your Modem.
7008ABR – Manual APPENDIX B | Technical Specifications Below is an outline of the Technical Specifications for the Barricade 8-Port Cable/DSL Broadband Router (SMC7008ABR) LAN Interface 8 - RJ-45 10/100Mbps Auto MDI/MDI-X ports WAN Interface 10/100, 1 RJ-45 port Serial, 1 RS-232 DB-9 connector Printer Interface Parallel 1 DB-25 printer port Management Web management Advanced Features Dynamic IP Address Configuration – DHCP, DNS Firewall – Client privileges, hacker prevention and logging Virtual Private Net
7008ABR – Manual Internet Standards ARP (RFC 826), IP (RFC 791), ICMP (RFC 792), UDP (RFC 768), TCP (RFC 793), Telnet (RFC 854-859), MD5 (RFC 1321), BOOTP Extension (RFC 1497), PPP LCP Extension (RFC 1570), PPPoE (RFC 2516), NAT (RFC 1631), PPP (RFC 1661), HTML (RFC 1866), HTTP (RFC 1945), CHAP (RFC 1944), DHCP (RFC 2131), PPTP (RFC 2637) Temperature Operating 32 to 104°F (0 to 40°C) Storage -40 to 158°F (-40 to 70°C) Humidity 5% to 95% (non-condensing) Compliances CE Mark Emissions FCC Class B Industry Ca
7008ABR – Manual TECHNICAL SUPPORT PHONE From U.S.A. and Canada (24 hours a day, 7 days a week) • (800) SMC-4-YOU • (949) 679-8000 • Fax: (949) 679-1481 From Europe (8:00 AM - 5:30 PM UK Time) • 44 (0) 118 974 8700 • Fax: 44 (0) 118 974 8701 INTERNET E-mail addresses: • techsupport@smc.com • european.techsupport@smc-europe.com Driver updates: • http://www.smc.com/index.cfm?action=tech_support_drivers_downloads World Wide Web: • http://www.smc.com/ • http://www.smc-europe.
7008ABR – Manual FOR LITERATURE OR ADVERTISING RESPONSE, CALL: U.S.A.