Using your VRE-1 Preamplifier Congratulations on your purchase of the VRE-1 preamplifier. The VRE-1 is simple to setup and operate, but that simplicity belies an exceptionally sophisticated design that includes a great deal of innovative thinking and the best parts available today. Although reading this manual may not be necessary for you to begin enjoying your VRE-1, I urge you to take a few minutes to familiarize yourself with the more novel aspects of its design.
Preparing for use - locating your VRE-1: Your VRE-1 has a lot of wonderful attributes, and one of them is the fact that neither it nor its power supply produce appreciable heat. In addition, the Corian chassis is fairly immune to heat, so the VRE-1 may be installed in an enclosed cabinet.
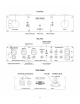
Front Panel layout • Input selector switch: Rotary switch selects one of 4 inputs. • Polarity switch and LED indicator: Sets system polarity (absolute polarity, sometimes called “absolute phase”). Up is normal, non-inverted polarity, and flipping the switch down inverts signal polarity. The LED then lights to indicate that system polarity is inverted. Polarity switching is done at the user’s discretion and “correct” system polarity is determined by ear.
Front Panel layout • Input selector switch: Rotary switch selects one of 4 inputs. • Polarity switch and LED indicator: Sets system polarity (absolute polarity, sometimes called “absolute phase”). Up is normal, non-inverted polarity, and flipping the switch down inverts signal polarity. The LED then lights to indicate that system polarity is inverted. Polarity switching is done at the user’s discretion and “correct” system polarity is determined by ear.
• Circuit Ground Connector: This binding post offers access to the system electrical ground if needed. There is normally no connection to this post. • Main Input Group: 4 pairs of inputs are provided, labeled 1 thru 4 (corresponding to the front panel Input Selector switch). Input 1 is a dedicated balanced input with XLR connectors, while 2 thru 4 are via RCA unbalanced connectors.
near-ideal load on the input and confer that magic tube-like musicality. They also act as a “brick wall” filter against DC and RFI contamination. In addition, they allow the VRE-1 to be configured for voltage gain (up to +6dB) if it is needed. Thus, the VRE-1 is a “passive” preamp -- but with gain. Finally, all of the parts and materials used to build your VRE-1 are the best available.
The Power Supply The VRE-1’s companion power supply provides carefully tailored DC power for the proper operation of your preamp. The “Power 1” connection provides +/- 24 VDC of choke-filtered, unregulated power, while the “Power 2” connection provides +/- 24 VDC of fully regulated power for the relays, LEDs, and Monitor Out buffer amplifier. Power supply design is critical to superior performance. In a very real sense, it is the power supply we are hearing when we listen to music.
Please Note: The VRE-1 is a hand-built work of “industrial art.” It is a beautiful object, and a great deal of effort has gone into its creation. Ironically, because it is hand-made, you may find small blemishes that do not occur in the routine perfection of mass-marketed consumer goods. We believe you’ll accept these as part of the unique personality of your VRE-1. Your VRE-1 comes with a set of high-quality damping feet from Vibrapod.
This is important because I cannot fully break-in your VRE-1 before shipping. Your preamp has been thoroughly tested and listened-to, but this is just the beginning. I make every effort to present you with a good initial impression, but beyond that it is up to you to complete the break-in process, and to *understand* that it will take time. Break-in is a process of using your equipment - not simply leaving it turned on.
Acknowledgements This project has been in development for a long time, and I sincerely thank everyone who contributed in any way to its success. However, there are a few people I would like to point-out for their special contributions… • Jim Merod - For his to-the-point observations and criticism, and his indefatigable efforts on behalf of music, musicians, and the audio community. • Kris Jeter - His hard work keeps the wheels turning here at SMc Audio, and his good humor makes the work go smoothly.
Getting the most from your VRE-1 preamplifier - a user’s guide Suggestions for AC cords and accessories After some thought, I have come to the decision to leave a “standard” AC cord out of the parts complement. It is my experience that the AC cord is an integral part of the sound of your VRE-1, and I suggest that you use the best power cord you can find.
Grounding Options Your VRE-1 provides several options for matching earth ground arrangements for best results with your system. A binding post connected to circuit ground is provided on the rear panel to facilitate external connections to other equipment chassis grounds if need be, and an adjustable ground jumper is provided inside the power supply.
Tuning the Stealth power link cable Your VRE-1 uses a custom-built power-link cable from Stealth Audio Cables. This cable includes a carbon-composite sleeve that will slide along its length. The position of this sleeve has a “tuning” effect - moving it will affect the sound of your preamp to some degree. I find the effect to be significant enough to bring it to your attention. You may or may not find it meaningful in your system, but I suggest that it is worth investigating.
Using the XLR-to-RCA balanced input adaptors As stated in the owner’s manual, all 4 of the VRE-1’s inputs are actually balanced. I chose the connector arrangement based on a best-guess estimate of what most audiophiles are likely to have in their systems - one balanced source (XLR), and the rest unbalanced (RCA). If you have more than one balanced source and wish to take full advantage of its balanced mode of operation, I can provide custom-built adaptors to allow for this.