
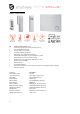
Operation Manual


9
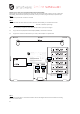
Step 16:
Decide where you want to mount you main unit! We advice to mount it out of sight, so that in case of burglary it wil not
easy be found! You need to connect the internet (LAN) cable and plug in the adaptor! Use the template paper to mark
the positions of the screws on the wall. Leave the screw head protruding for about 7mm so it can push the tamper switch
(on the back of the Gateway) into place.
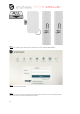
Step 17:
Install Motion Sensors and Magnetic Contact Sensors on the place you think they are the most effective! Montion Sensors
secure a complete Area of 110° x 10 meter. Install in the rooms which are attractive fur the burglar a Motion Sensor.
Don't point the Sensor to windows or heathers! When a Motion Sensor registers Motion it will give a signal to the main
unit. Magnetic Contact Sensors secures one door or window. Install on the doors or windows which are interesting for the
burglar a Magnetic Contact Sensor. When a door or window is opened, it will give a signal to the main unit.
Advice:
We advice to make a drawing of your home and mark the burglary
sensitive points with a red arrow! When you have done
this you are going to fill in where you want to install motion- and magnetic sensors! When you have filled in all sensors,
you mark
them if you want them active at night, or only when you are out. We advise to
install also minimum a indoor
siren, on a strategic place. I case of burglary
everybody in the house must be warned. Depending on the neighbour-hood it
is
also wise to install a outdoor siren! They are all wireless, so easy to install. If you
live with more persons in one house, or
doesn't like to take the remote, or open
the app everytime to activate or deactivate the system, then we advice to add a
keypad! You can give per person a code, so you can always see who activated or
deactivated the system! For total security
of your home you also can add; smoke-
and waterdetectors and a connected to your alarmsystem Internet camera!