C730IP | 10.028.16 Baby IP Camera HD Installation and Operating Instructions PLEASE READ THESE INSTRUCTIONS CAREFULLY BEFORE USING THIS PRODUCT AND KEEP THIS MANUAL FOR FUTURE REFERENCE.
Important Note The state of the art Baby IP Camera HD is capable of delivering high quality Digital High Definition (HD) video to your smart-mobile device(s), which would require higher internet bandwidth. Due to your local internet environment condition, your mobile device(s) may display black-screen or temporary disconnect to the camera. * Make sure the camera is operating with sufficient internet bandwidth, 1Mbps (upload/ download speed) is suggested.
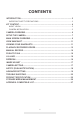
CONTENTS INTRODUCTION............................................................................................... 2 IMPORTANT SAFETY PRECAUTIONS......................................................................2 KIT CONTENT.................................................................................................. 4 NIGHT VISION..........................................................................................................5 CAMERA INSTALLATION.......................................
INTRODUCTION PLEASE READ BEFORE YOU START Always use discretion when installing monitoring system, especially when local regulation(s) may have certain policy concerning the surveillance, video recording and/or listen-in function(s) the device have to offer. Please check with your local authority for more detail. Third party consent may also be required.
FCC Compliance Statement: This Products with CE Marking comply device complies with Part 15 of the with EMC Directive (2004/108/ FCC rules. Operation is subjected to EC); Low Voltage Directive (73/23/ the following two conditions: (1) this EEC); R&TTE(1999/5/EC); ROHS device may not cause harmful interference, and (2) this Directive (2011/65/EU) issued by the Commission device must accept any interference received, including of the European Community.
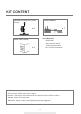
KIT CONTENT Camera Power Adapter (including stand & wall- bracket) x1 x1 Tools Required: ‧Electric drill ‧5mm masonry drill bit ‧15mm masonry drill bit ‧No. 2 Philips screwdriver Quick Start Guide x1 For best system performance: - iOS: iPhone5 / iPad2 / Mini iPad or above. - Android: 1.5G dual core processor dual core procesor with 1G Ram or above. - Storage: Class 10 memory card. - Bandwidth: 1Mbps or above upload/download speed suggested.
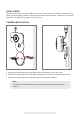
NIGHT VISION The camera has built-in infrared LEDs to allow you to view at night for 24-hour surveillance. The LEDs will automatically activate at low light environment and the picture viewed will turn to black and white. The night viewing range is up to 5 meters. CAMERA INSTALLATION 1. Place the mounting base on the mounting surface as a pattern to mark the holes. 2. Drill the mounting holes and use the wall plug screws to secure the mouting base to the wall. 3.
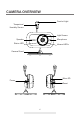
CAMERA OVERVIEW Comfort Light Temperture/ Humidity Sensor Light Sensor Microphone Speaker Status LED Infrared LEDs Camera Stand Micro SD Power Reset 6
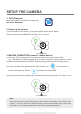
SETUP THE CAMERA 1. APP Download Download the APP from APP Store/Google Play. APP Name: BabyAdore 2. Power up the camera (1) Provide power to the camera by using the supplied camera power adaptor. (2) 60 seconds later the GREEN LED will flash, go on to step 3. 3. MAKING CONNECTION (camera - mobile device) (1) Go to the "Wi-Fi" setting section of mobile device and look for the camera's SSID (e.g., "HD-000123") uniquely assigned for your camera. Select the camera's SSID to connect.
4. MAKING CONNECTION (camera - Wi-Fi router) This is the last part of the camera setup. After this your camera will be ready to go (1) Tap the "Camera Edit" icon (Camera Edit Icon) select "Camera Info" icon (Camera Info Icon), select "Advanced" and enter the default admin password 123456 to enter the camera's advanced setting section. (2) Scroll to "Wi-Fi Setting" section, select your Wi-Fi router and enter its password.
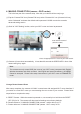
MAIN SCREEN OVERVIEW After launch the app the app will display live-view. By default, all the control icons are hidden until the user tapping anywhere on screen. User can quickly switch channels by using the icons when multiple cameras are registered to the app. User can also perform other control functions by tapping on the following control icons. Tap to turn on/off the volume in Live View mode. Tap to capture screen images. Tap to record video in device memory card.
The controls and the layout design has been maximumized to meet the operating system requirments of the mobile devices. The main page will display in landscape mode by default. Note: Once the recording is started by motion detection or manually, the APP will continue the recording for 1 minute. User cannot stop the recording during this period.
VIEW SNAPSHOTS Tap on once to take a snapshot of the screen. For iOS Snapshot images are saved in the Camera Roll section of the mobile device. The file name of the snapshots will be the time of when the images captured (YYYY/MM/DD/HH/MM). For Android Snapshot images are saved in the Photo Gallery/Snapshot folder in the mobile device. The file name of the snapshots will be the time of when the images are captured (YYYY/MM/DD/MM).
PLAYBACK RECORDED VIDEOS The recorded video file(s) on your camera is automatically saved to the memory card inserted in your camera. You can remotely access the file(s) for playback via OMG Care app. 1.Tap in the main screen (Live-vew) to bring up camera setting section. 2. Tap to enter Event List section. Once in Event List section you will see recorded video events within the 24 hours period. Tap the file once for normal resolution event video playback.
User can Pause the video or Mute audio at anytime. Tap Go Back to return to Event List section. User can allocate the recorded video files to PC for playback via memory card transfer. For best playback performance user can use "Free Video Converter". The software can be downloaded from: http://www.freemake.com/free_video_converter/ or http://www.videolap.org/ Note: A. User's local network environment/speed will determain the overall playback experience. B.
For iOS: Tap to bring up the Event Filter. ‧To View HD Event Video User can view HD format event videos. Due to the data size user must download the file first before playback. it is strongly suggested to download the file(s) at your home Wi-Fi network (WLAN), where the mobile device is connecting to the same Wi-Fi router as the camera. Minimum bandwidth requirment is 1Mbps (upload/download). Download process may be stopped if the bandwidth is too slow and cannot continue.
Note: During the download system will stop both Live-view and Recording functions, and the app will also inform any user accessing the camera that the system is busy and connection is not available. Once the HD Video Event File downloaded, use following apps for playback: A. For iOS, please use "Oplayer Lite". You can download the app for free from the Apple Store. The downloaded HD Video Event files are automatically saved in the Camera Roll section of the mobile device. B.
MANUAL RECORD While at the Live-View section, tap once and camera will begin recording for 60 seconds. The 60 seconds video clip will be saved at the memory card inserted in the camera. To view the video clip, please refer to “PLAYBACK RECORDED VIDEOS” section for more detail. PUSH-TO-TALK While at the Live-View section, hold down the to speak. While speaking the audio from the camera will stop and resume when you release the icon.
IMAGE ADJUST While at the Live-View section, tap to bring up the Image Adjust page. Resolution: Select VGA or HD video display. Select HD video display only when you have sufficient internet bandwidth. Backlight Gain: Activate the backlight gain when the camera is facing bright light source, such as window or lamp. Mirror/Flip: Depending on the camera installation location, you can use mirror and or flip function to adjust the video display.
About: You will find app and camera firmware version information here. Advance Setting: In this section you have access to detail camera settings, such as Time, Wi-Fi Network, Email Alert, etc. You will require to have specific password to enter the advance setting section. Please refer to P19 for more details. NOTIFY (PUSH NOTIFICATION) The camera offers motion detection function therefore upon detection motion event the camera will send out push notification to user's mobile device.
ADVANCED SETTING This chapter explains the advanced settings for administrator. Administrator is the one who owns the administration password and has the full control to the camera, including having access to all camera functions and settings, while general users can receive the surveillance images for liveview/screen capture/video recording and may not manage the camera settings. Admin Password The security code required to enter Advanced Setting for system setting management.
ADMIN PASSWORD The Admin Password is a specific security code for administrator to change the advanced settings. The default admin password is 123456. Please use this function to change the default admin password into your personal admin password. For the protection of your system configuration, every time you change the advanced settings, you need to enter the admin password. Please change the admin password periodically.
VIDEO SETTINGS This section allows you to configure the video quality and environment mode. Video Quality By selecting better video image will allow you to view high resolution image. By selecting better streaming will allow the video to display more smoothly (quality depend on local internet environment). Only select better image when you have sufficient bandwidth and updated mobile device(s). Please refer to P.4 for system requirment.
TROUBLE SHOOTING IF SOLUTION The APP cannotfound the camera ‧ Make sure your network supports the DHCP protocol. ‧ Make sure the camera and your mobile device connect to the same Wi-Fi router for the first setting. ‧ Make sure the Wi-Fi router is activated. ‧ Make sure the camera is properly powered on. ‧ Use the “ADD CAMERA” function to manually add the camera. Wi-Fi router is not shown in the drop down list ‧ Make sure SSID broadcasting function is enabled in the WiFi router.
The APP cannot record any video clips ‧ Make sure the SD card has been correctly inserted ‧ Make sure the motion detection function has been enabled. (please refer to the Sensitivity Setting section). ‧ Please format the SD card when it is used for the first time (please refer to the SD Card Format section) ‧ Make sure you are using Class 10 rated memory card. Email alert is not working ‧ Make sure the email alert function is enabled (please refer to the Email Alert section).
Wrong data and time are shown ‧ Wrong date and/or time will result in unexpected record schedule. Make sure you’ve selected the correct time zone (please refer to the Time Zone section). ‧ Confirm the system date/time of the mobile device to ensure correct operation. ‧ System will clock itself when connect to the internet. Make sure the system is connected properly to the internet. You may use your mobile device to access the system to see if remote view is f unctioning properly.
PRODUCTION SPECIFICATION Networking Parameter Wireless Technology IEEE 802.
STORAGE MEDIA MANAGEMENT Micro SD Card Capacity (Class 10) Event Minutes 4G 220 220 8G 440 440 16G 880 880 32G 1,760 1,760 26
APPENDIX: COMPATIBLE LIST WiFi Compatible Router List Brand Product Name ASUS RT-N53 BUFFALO WIR-HP-C300NH2 BUFFALO WZR-HP-G450 Cisco ERT120 D-Link DIR-816L Huawei WSR20 INTELBRAS WRN300 NETGEAR Wndr3700v4 NETGEAR WGR614 Tenda FS395 TP-link TL-WR941N 27