Thank you for choosing smartpond BEFORE RETURNING TO LOWE’S Contact Customer Care: 1-888-755-4497 Merci d’avoir choisi smartpond AVANT DE RETOURNER À LOWE’S Contact Les Soins de client: 1-888-755-4497 Gracias por elegir smartpond ® ANTES DE DEVOLVER A LOWE’S Contacte Atención al Cliente: 1-888-755-4497 Model #s: 52281, 52500 ® ®
English TABLE OF CONTENTS Product Tips 1 Warnings and Cautions 2 Package Contents 2 Preparation 3 Operation Instructions 3 Maintenance 4 Replacement Parts 4 Français TABLE DES MATIÈRES Soins du client 5 Avertissements et précautions 5 Contenu de l’emballage 6 Préparation 6 Instructions d’utilisation 6-7 Maintenance 7-8 Pièces de rechange 8 Español TABLA DE CONTENIDO Atención al cliente 9 Advertencias y precauciones 9 Contenido del paquete 10 Preparación 10 Instrucci
EN Filter Box Model # 52281, 52500 Questions, problems, missing parts? 1-888-755-4497 customercare@smart-pond.com Monday - Friday, 8am - 6pm ET Visit smart-pond.com/maintenance for a step by step guide and video. Product Tips To keep your pond healthy and running smoothly, smartpond® is here for you. • For optimal performance, change your filter pads annually or when visibly deteriorating with Replacement Filter Pads.
EN WARNINGS AND CAUTIONS IMPORTANT SAFETY INFORMATION Please read these instructions carefully prior to starting up the unit! The water system on which the operation of this product is based requires utmost care and maintenance, possibly also the use of chemicals, in order to prevent and keep the occurrence of micro-organisms and harmful bacteria, especially legionellae that are responsible for legionnaire’s disease, under control.
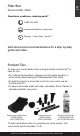
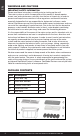
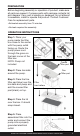
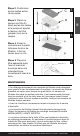
EN PREPARATION Before beginning assembly or operation of product, make sure all parts are present. Compare parts with package contents list and diagram. If any part is missing or damaged, do not attempt to assemble, install or operate the product. Contact Customer Care for replacement parts. • Estimated assembly time: 15 minutes • No tools required for assembly. OPERATION INSTRUCTIONS Step 1. Place your pump inside the filter box close to the center with the pump outlet facing up.
EN MAINTENANCE • Occasional cleaning of the filter pads will be necessary to ensure the proper functioning of the filter. The coarse filter pad is a designed to trap large debris. The fine filter pad catches smaller particles. All pads should be removed and washed with clean water when they are visibly soiled - for best results, clean the filter pads weekly. • Before cleaning, always disconnect the pump from the power source. • Filter pads should be replaced annually.
Boîtier de Filtre Modèle # 52281, 52500 Questions, problèmes, pièces manquantes? FR 1-888-755-4497 customercare@smart-pond.com Lundi - Vendredi, 8am - 6pm ET Visitez smart-pond.com/maintenance pour un guide étape par étape et une vidéo.
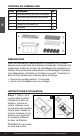
FR CONTENU DE L’EMBALLAGE Pièce A Description Partie supérieure du bloc de filtration Qté 1 B Partie inférieure du bloc de filtration 1 C Coussin de filtration grossière 1 D Coussin de filtration fine 1 E Bio-balles 10 PRÉPARATION Avant de commencer l’assemblage ou l’utilisation d’un produit, assurez-vous que toutes les pièces sont présentes. Comparez les pièces avec la liste du contenu de l’emballage et le diagramme cidessus.
Étape 2. Positionnez les bio-balles autour de la pompe. 3 FR Étape 3. Placez le tampon de filtre fin (bleu) sur les bio-balles et la pompe et ajoutez le tampon du filtre grossier (noir) sur le dessus. 4 Étape 4. Posez le couvercle sur la partie inférieure du bloc de filtration. Il doit se fermer avec un clic. Étape 5. Placez le filtre assemblé dans l’eau et branchez la pompe dans une prise électrique correctement mise à la terre.
FR REMARQUE: Les bio-boules dans votre système de filtre et les surfaces internes de votre boîte de filtre contiennent des bactéries bénéfiques. Au moins une fois par année, le système en entier devrait être démonté et nettoyé complètement avec de l’eau tiède. Ceci ne devrait pas être fait pendant la saison chaude, car cela pourrait prendre jusqu’à 8 semaines pour rétablir l’équilibre de l’environnement.
Caja del Filtro Modelo # 52281, 52500 ¿Preguntas, problemas, piezas que faltan? 1-888-755-4497 customercare@smart-pond.com Lunes a viernes, 8am - 6pm HORA DEL ESTE SP Visite smart-pond.com/maintenance para obtener una guía paso a paso y un video.
CONTENIDOS DEL PAQUETE Descripción Parte superior del filtro de caja ctdad 1 B Parte inferior del filtro de caja 1 C Almohadilla de filtración gruesa 1 D Almohadilla de filtración fina 1 E Bio-bolas 10 SP Pieza A PREPARACIÓN Antes de comenzar a ensamblar y a hacer funcionar el producto, asegúrese de que no falte ninguna pieza. Compare las piezas con la lista de contenidos del paquete y con el diagrama de arriba.
Paso 2. Coloque las bio-bolas alrededor de la bomba. Paso 3. Coloque la almohadilla del filtro fina (azul) sobre las bio-bolas y la bomba y agregue la almohadilla del filtro de curso (negro) en la parte superior. 4 Paso 4. Coloque la tapa sobre la parte inferior del filtro de caja. Luego, trábela. Paso 5. Coloque el filtro montado en el agua y conecte la bomba a un tomacorriente debidamente conectado a tierra.
• La superficie exterior de la caja del filtro también puede necesitar una limpieza ocasional. Especialmente si las aberturas en la parte superior de la caja del filtro están obstruidas. Cuando limpie la caja del filtro use solamente agua tibia. No use productos químicos que puedan destruir las bacterias beneficiosas. SP NOTA: Las bolas bio en que sistema de filtros y las superficies interiores de la caja del filtro contienen bacterias beneficiosas.
Show us your ponds and projects! Share with us Use #smartpondProject for a chance to be featured by smartpond smartpond® Need help? Call Customer Care at 1-888-755-4497 (US) or visit www.smart-pond.com 08/18 ©GeoGlobal Partners, LLC.